|
|
I have been playing with EMC UIM/P 4.1 recently and discovered a couple new features that were not available in the previous versions.
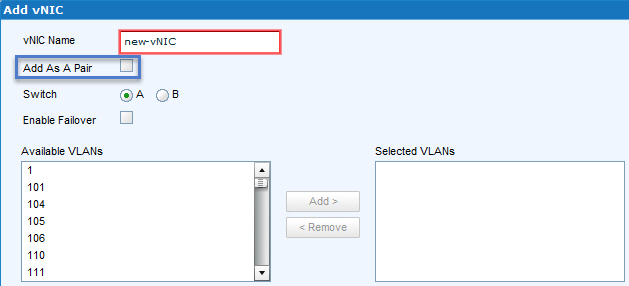
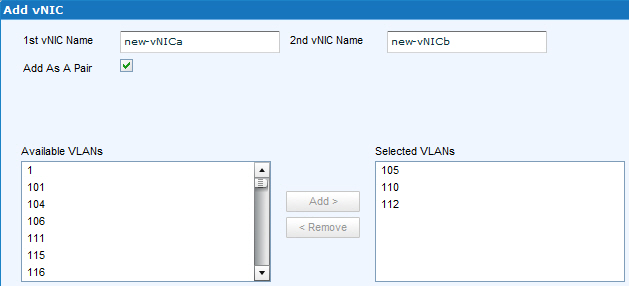
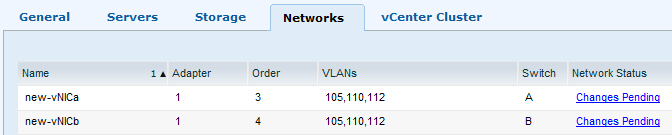
If you need to add new vNICs to an existing Service, you can now add them as a pair! Selected VLANs, MTU, Native VLAN, QoS and other Policies will be configured identically for both vNICs AND they will be places on different switches, one on switch A, one on switch B! How cool is that!!! Unfortunately, in the best tradition of EMC UIM development, this feature is not available for new Service Offering configuration…
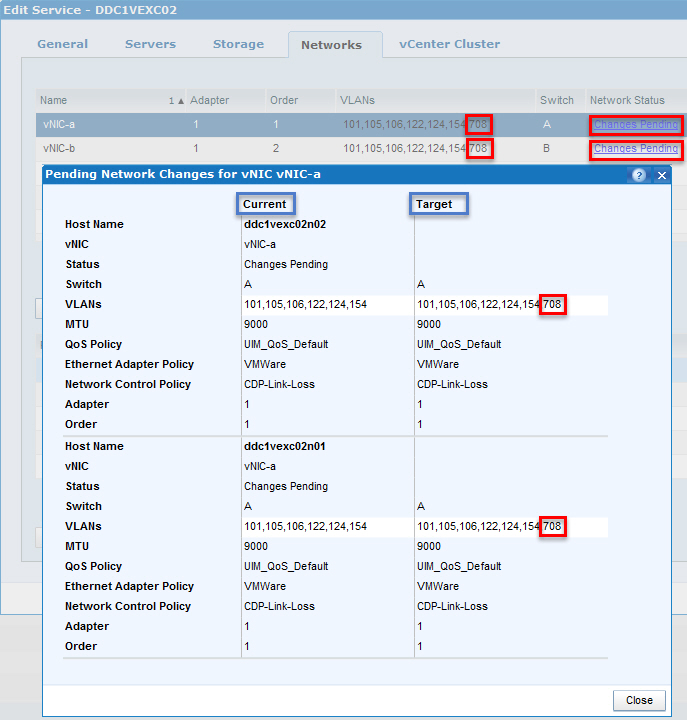
… and here is another cool new feature – before you hit the Apply button, you can check what changes are pending. No more guessing or double checking the changes you are about to apply!
Click on Changes Pending and confirm the difference between the current and the target configuration:
Have you spotted any more interested and useful features? Please share them in the comments below.
I recently upgraded VMware vCloud Connector from version 2.6.0 to 2.6.1 (check out THIS POST for details) and noticed a cool new feature!
In the previous versions, including v 2.6.0, the pre copy validation did not check the size of the vCC Node staging area – the local disk storage used for the OVF export and therefore if you try to copy a VM bigger than the staging area, the copy may fail. In the new version 2.6.1 it warns you that this may happen.
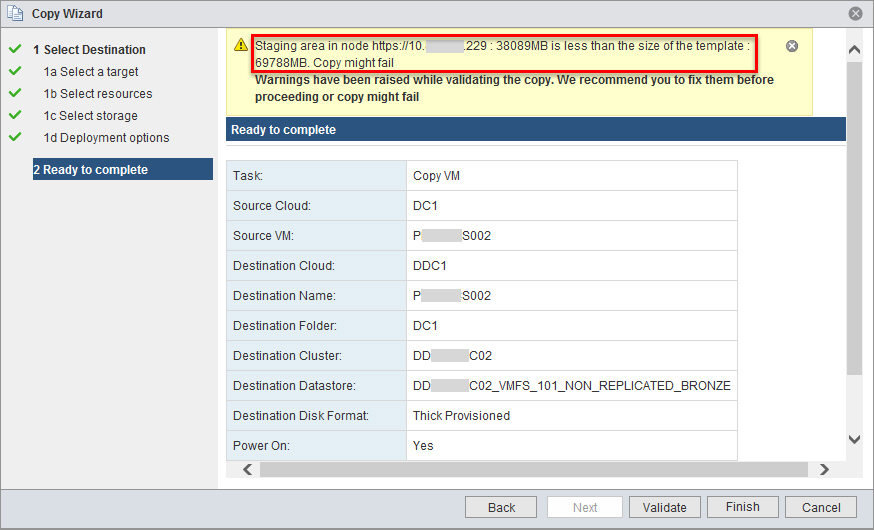
One thing we need to keep in mind – during VM export to OVF template, the disk files are stored in a compressed, sparse format. In the example above, VM being migrated is bigger than the size of the staging area on the vCC Node BUT it is not a problem, I know the disks are in TPLZ format and only 30GB is actually used by the guest OS. The VM Copy completed successfully.
You may ask what can we do if VM is definitely larger that the staging area on the vCC Node? No problem! You can resize the vCC Node data disk. The procedure is documented in the Installing and Configuring vCloud Connector (PDF version) document, search for “Configure vCloud Connector Node Allocated Storage in vSphere”.
…and for your convenience… :)
Configure vCloud Connector Node Allocated Storage in vSphere
To successfully copy resources to or from a vSphere cloud, you must configure and resize the data disk associated with the vCloud Connector node for that vSphere cloud.
Prerequisites
- You are a vSphere administrator.
- You have taken a snapshot of the virtual appliance.
Procedure
- Log in to the vSphere Client.
- In the hierarchy tree, select the vCloud Connector node virtual appliance.
- Right-click and select Edit Settings.
The Virtual Machine Properties window opens to the Hardware tab.
- Select Hard disk 2 in the Hardware column.
- Modify the size, based on the size of the resources you are going to be transferring, and click OK.
- Open the console for the vCloud Connector node, ALT-F2, login as admin. Alternatively, SSH to the vCC Node.
- Run the following command to resize the disk:
sudo /opt/vmware/hcagent/scripts/resize_disk.sh
In the example below I extended the disk from default 40GB to 100GB:
login as: root
vCloud Connector Node Appliance
root@10.XXX.XXX.XXX's password:
Last login: Fri Oct 31 16:59:41 2014 from desktop.vStrong.info
vcn001:~ # sudo /opt/vmware/hcagent/scripts/resize_disk.sh
  Physical volume "/dev/sdb" changed
  1 physical volume(s) resized / 0 physical volume(s) not resized
  Extending logical volume data to 100.00 GiB
  Logical volume data successfully resized
Filesystem at /dev/data_vg/data is mounted on /data; on-line resizing required
old desc_blocks = 3, new_desc_blocks = 7
Performing an on-line resize of /dev/data_vg/data to 26213376 (4k) blocks.
The filesystem on /dev/data_vg/data is now 26213376 blocks long.
Hope this helps.
I tried to upgrade VMware vCloud Connector Server but the upgrade got stuck at “Checking for available updates…” and Check Updates button was greyed out even after restarting the vCC Server.
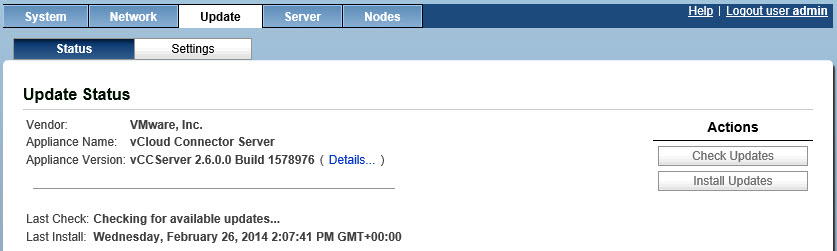
In order to stop vCC from continuing in this state perform the following steps:
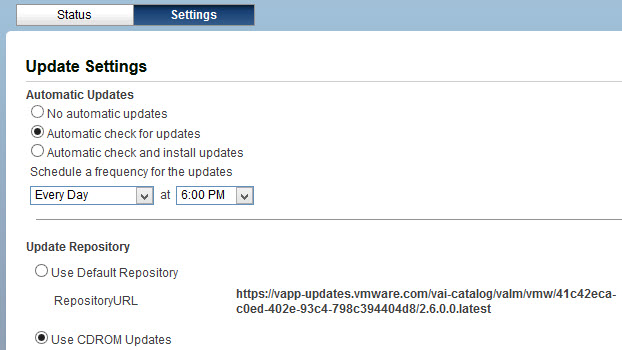
- In the vCC Server web interface go to the Update section where we see the ‘Checking for available updates…’ message being displayed. Please then choose the Settings tab within the Update section;
- Under the Update Repository section please set the update to point to ‘Use CDROM Updates’. Hence you cannot manually initiate vCC Server upgrade, you also need to set vCC Server to automatically check for new updates by selecting “Automatic check for updates” and schedule the check to run at the next full hour. Unfortunately, there is no option to set the time more granularly, you may need to wait for the schedule to kick in. Click Save Settings under Actions;
- Shut down the vCC Server (System Tab, Shutdown) and attach CDROM .ISO file (as vCC does not come with CDROM drive per-configured, you need to add it to the VA). Any .ISO file will do;
- Restart the vCC Server and wait for the update process to check for update, it should then fail due to invalid .ISO;
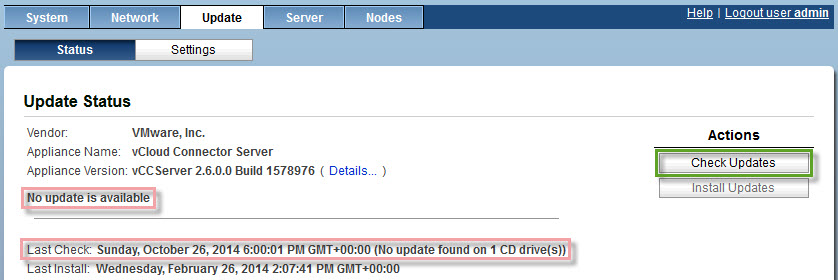
- Reconfigure Update Settings back to ‘No automatic updates’ and ‘Use Default Repository’, click Save Settings.
- Go back to the Status tab, click on Check Updates and then on Install Updates.

Hope this helps.
Today one of our Solution Architects asked me how to reclaim Cisco UCS Chassis ID.
Someone has decommissioned a previous chassis and removed it physically! It was done weeks/months ago and chassis is gone.
If you try to recommission chassis with original ID you’ll get error:
Error: Update failed: [Chassis 3 has already been allocated (N20-C6508 FOX1448GT9G).]
You need to delete old chassis from CLI and then you can use ID again
FI-A# show config all | grep "recommission chassis"
recommission chassis "Cisco Systems Inc" N20-C6508 FOX1326GC2R 4
recommission chassis "Cisco Systems Inc" N20-C6508 FOX1437G8KE 1
recommission chassis "Cisco Systems Inc" N20-C6508 FOX1448GT9G 3 <-- this one was gone
recommission chassis "Cisco Systems Inc" N20-C6508 FOX1452G718 2
If the old chassis# was 3, then do this :
FI-A# delete decommissioned chassis "Cisco Systems Inc" N20-C6508 FOX1448GT9G
FI-A* # commit-buffer
(c) Zbigniew ‘Ziggy’ Misiak
I had to re-visit a vCloud Connector environment I built quite a while ago but could not login to neither VMware vCloud Connector Server nor Node with the admin account. I was sure that I did not change the default password (vmware) so was the customer. I also checked that admin account was not locked out – see “HOW TO: Unlock admin account in vCloud Connector Server / Node” blog post for details.
Here is the error message:
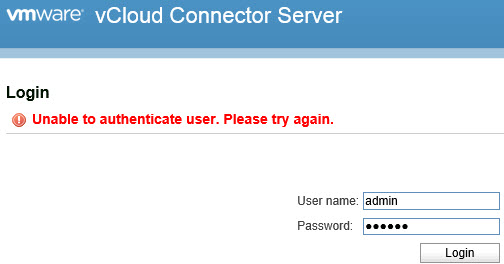
After a bit of goggling I found Marek Zdrojewski’s post “How to upgrade vCloud Connector 2.5 to version 2.6” that mentions that VMware vCloud Connector Server / Node admin password may have expired.
When I tried to login to the vCC Server / Node console as admin, there was a confirmation that the admin password has indeed expired and needs to be changed:
login as: admin

vCloud Connector Node Appliance

admin@vcn001's password:

Your password has expired. Choose a new password.

WARNING: Your password has expired.

You must change your password now and login again!

Changing password for admin.

Old Password:
etc etc
I did not want to change the default password and therefore reconfigured admin account to stop it expiring.
Login to vCCS/vCCN as root and use chage command check current admin account aging.
login as: root

vCloud Connector Node Appliance

root@vcn001's password:

vcn001:~ # chage -l admin

Minimum:        0

Maximum:        365

Warning:        7

Inactive:       -1

Last Change:            Jun 15, 2013

Password Expires:       Jun 15, 2014

Password Inactive:      Never

Account Expires:        Never
To disable password aging / expiration for user admin, type command as follows and set:
Maximum Password Age to 99999
Account Expiration Date to -1
vcn001:~ # chage -M 99999 -E -1 admin

Aging information changed.

vcn001:~ # chage -l admin

Minimum:        0

Maximum:        99999

Warning:        7

Inactive:       -1

Last Change:            Jun 15, 2013

Password Expires:       Never

Password Inactive:      Never

Account Expires:        Never
Hope this helps.
I would like to thank Marek Zdrojewski (@MarekDotZ) for his prompt replies and his help to get me on the right track in troubleshooting this issue. Please check out his blog http://defaultreasoning.com
EMC KB 193094 : ESA-2014-113: EMC Unified Infrastructure Manager Operations and Unified Infrastructure Manager Provisioning Security Update for Multiple Vulnerabilities in Bash
https://support.emc.com/kb/193094
Affected Products
EMC Software: EMC Unified Infrastructure Manager/Operations (UIMO) All versions
EMC Software: EMC Unified Infrastructure Manager/Provisioning (UIMP) All versions
Resolution
Remediate bash by following the steps below. These steps work the same for UIM/O and UIM/P.
Link To Remedies:
Registered EMC Online Support customers can download shell_shock_fix.zip from support.emc.com at: https://support.emc.com/downloads/28497_Unified-Infrastructure-Manager
- Download shell_shock_fix.zip and copy it to the system to be updated
Use WinSCP or similar product to upload to /tmp
- Unzip shell_shock_fix.zip
uim001:/tmp # unzip shell_shock_fix.zip

Archive:  shell_shock_fix.zip

creating: shell_shock/

inflating: shell_shock/bash-3.2-147.22.1.x86_64.rpm

inflating: shell_shock/shell-shock-vulnerability-fix.pl

inflating: shell_shock/bash-doc-3.2-147.22.1.x86_64.rpm

inflating: shell_shock/libreadline5-5.2-147.22.1.x86_64.rpm

inflating: shell_shock/readline-doc-5.2-147.22.1.x86_64.rpm
- Change directory to shell_shock
uim001:/tmp # cd shell_shock/

uim001:/tmp/shell_shock #
- Run ./shell-shock-vulnerability-fix.pl
uim001:/tmp/shell_shock # ./shell-shock-vulnerability-fix.pl

This system is vulnerable to shell shock.

Do you want to install the update? (y/n) y

Preparing...             ########################################### [100%]

1:libreadline5           ########################################### [ 25%]

2:bash                   ########################################### [ 50%]

3:bash-doc               ########################################### [ 75%]

4:readline-doc           ########################################### [100%]

Done
I hope this will help.
In my ‘EMC UIM Service Adoption Utility (SAU)‘ article I talked about a potential need to amend the Service Offering template that will be used for multiple Services during adoption through UMC SAU. See Step 13 for details.
Some services could not be adopted using an Existing Service Offering and the adoption failed with the following error message:

The selected Service Offering does not match for these reasons:
- There was no network adapter that satisfies this network constraint…
- Network adapter XXX does not match any network constraint…
The screenshot above shows the error message in EMC UIM/P 4.1 where VLAN IDs is used to configure vNICs, rather than VLAN names like in previous version. Side Note: This is really annoying and I complained about this approach to the development team. I hope they will listen to their customers. This issue is not specific to UIM/P 4.1, it existed in previous versions as well.
These errors do not make any sense as the existing Service Offering we try to use in the EXACT copy of the Service we try to adopt – see ‘EMC UIM Service Adoption Utility (SAU)‘ article, steps 14 to 20.
No, we are not going mad, it is just a bug!
The workaround is to allow the SAU to create a new Service Offering until the fix is released in UIM 4.1 P3 (no release date currently available).
I hope this will help.
We discovered another bug in EMC UIM/P 4.x where VMFS volumes are not syncing with vCenter.
Here are the error messages:
- In the vCenter Sync Status:
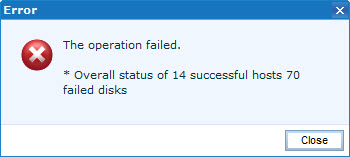
The operation failed.
* Overall status of X successful hosts X failed disks
- All those “failed disks” are LUNs that are configured as VMFS datastores.
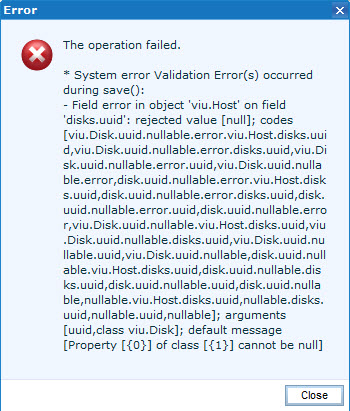
The operation failed.
* System error Validation Error(s) occurred during save():
– Field error in object ‘viu.Host’ on field ‘disks.uuid’: rejected value [null]; codes [viu.Disk.uuid.nullable.error.viu.Host.disks.uuid,viu.Disk.uuid.nullable.error.disks.uuid,viu.Disk.uuid.nullable.error.uuid,viu.Disk.uuid.nullable.error,disk.uuid.nullable.error.viu.Host.disks.uuid,disk.uuid.nullable.error.disks.uuid,disk.uuid.nullable.error.uuid,disk.uuid.nullable.error,viu.Disk.uuid.nullable.viu.Host.disks.uuid,viu.Disk.uuid.nullable.disks.uuid,viu.Disk.uuid.nullable.uuid,viu.Disk.uuid.nullable,disk.uuid.nullable.viu.Host.disks.uuid,disk.uuid.nullable.disks.uuid,disk.uuid.nullable.uuid,disk.uuid.nullable,nullable.viu.Host.disks.uuid,nullable.disks.uuid,nullable.uuid,nullable]; arguments [uuid,class viu.Disk]; default message [Property [{0}] of class [{1}] cannot be null]
Engineering team confirmed it’s a bug and it will be fixed in EMC UIM/P 4.1 P3. We don’t have the release date yet.
Stay tuned!
I had a problem activating TM DS Agent with symptoms similar to the ones described in Trend Micro Knowledge Base / Solution ID 1095437 “Anti-malware module of the Deep Security Agent (DSA) shows “Driver offline / Not installed” in the Deep Security Notifier“.
After numerous attempts to uninstall/clean up/reinstall Trend Micro Deep Security Agent the issue still was not resolved.
So, here is the ULTIMATE guide to uninstalling TM DSA that worked for me on several servers:
N.B. If you have network teaming configured, this procedure may break the team or wipe the team’s network stack. Just re-create the team and it should work OK.
- Uninstall the DSA from the server
- Run the tbclean.exe utility. See [Solution ID 1054528]
- Clean up the registry
HKEY_LOCAL_MACHINESOFTWARETrendMicroAEGIS
HKEY_LOCAL_MACHINESOFTWARETrendMicroAMSP
HKEY_LOCAL_MACHINESOFTWARETrendMicroAMSPStatus
HKEY_LOCAL_MACHINESOFTWARETrendMicroDeep Security Agent
HKEY_LOCAL_MACHINESOFTWARETrendMicroWL
HKEY_LOCAL_MACHINESYSTEMCurrentControlSetServicesAmsp
HKEY_LOCAL_MACHINESYSTEMCurrentControlSetServicesds_agent
HKEY_LOCAL_MACHINESYSTEMCurrentControlSetServicesds_notifier
HKEY_LOCAL_MACHINESYSTEMCurrentControlSetServicestbimdsa
HKEY_LOCAL_MACHINESYSTEMCurrentControlSetServicestmactmon
HKEY_LOCAL_MACHINESYSTEMCurrentControlSetServicestmcomm
HKEY_LOCAL_MACHINESYSTEMCurrentControlSetServicestmevtmgr
HKEY_LOCAL_MACHINESYSTEMCurrentControlSetserviceseventlogApplicationDeep Security Agent
HKEY_LOCAL_MACHINESYSTEMCurrentControlSetserviceseventlogApplicationDeep Security Relay
HKEY_LOCAL_MACHINESYSTEMCurrentControlSetserviceseventlogSystemtbimdsa
HKEY_LOCAL_MACHINESOFTWAREClassesInstallerFeaturesC4AF20E48325C454BBBE163E418FCEA9
HKEY_LOCAL_MACHINESOFTWAREClassesInstallerProductsC4AF20E48325C454BBBE163E418FCEA9
HKEY_LOCAL_MACHINESOFTWAREClassesInstallerUpgradeCodes689D08D76B5A47A4FB59D97D2C4B9308
HKEY_LOCAL_MACHINESOFTWAREMicrosoftWindowsCurrentVersionInstallerUpgradeCodes689D08D76B5A47A4FB59D97D2C4B9308
HKEY_LOCAL_MACHINESOFTWAREMicrosoftWindowsCurrentVersionUninstall{4E02FA4C-5238-454C-BBEB-61E314F8EC9A}
- Restart the server
- Check if any of these files or folders are present and delete them if found:
C:WINDOWSSystem32Driverstbimdsa.sys
C:WINDOWSSystem32Driverstmactmon.sys
C:WINDOWSSystem32Driverstmcomm.sys
C:WINDOWSSystem32Driverstmevtmgr.sys
C:WINDOWSSystem32LogFilesds_agent
C:Program FilesTrend MicroAMSP
C:Program FilesTrend MicroDeep Security AgentAgent
C:Program FilesTrend MicroDeep Relay of Security SettingsLocal (Relay)
C:Program FilesTrend MicroDeep Notifier of Security SettingsLocal (Notifier)
C:ProgramDataMicrosoftWindowsStart MenuProgramsTrend MicroDeep SecurityTrend Micro Deep Security Notifier (for Windows 2008)
C:Documents and SettingsAll UsersStart menuprogramsTrend Micro Deep SecurityTrend Micro Deep Security Notifier (for Windows 2003)
C:WindowsInstaller{4E02FA4C-5238-454C-BBEB-61E314F8EC9A}/Agent 64-bit
- Reviewing the file C:Windowsinfsetupapi.dev.log.
Look for entries containing tmcomm.sys, tmevtmgr.sys and tmactmon.sys On this entries you will be able to identify if there are any remains of a previous installation, look for lines like “Installing catalog (any of the three drivers above).cat as:” note the dates of the installation and the oemXX.inf files used to install these drivers.
- Uninstall the existing tmcomm.sys, tmevtmgr.sys and tmactmon.sys using pnputil -d oemfile.inf (on this particular computer oem26.inf, oem27.inf and oem28.inf)
Identify which oemXX.inf files you need to uninstall by reviewing the setupapi.dev.log
- Delete any catalog files for AMSP drivers present in C:Windowssystem32catroot
(on this particular computer oem9.cat, oem10.cat and oem11.cat) that are leftovers from previous installations and that tbclean and pnputil did not remove
- Delete old driver files present in windows driver store
C:Windowssystem32DriverStoreFileRepositorytmxxxx (folders)
N.B. You might need to take ownership of those folders
- Install all the comodo certificates following the KB: http://esupport.trendmicro.com/solution/en-US/1104241.aspx
Remember to place them in the appropriate store.
- Reinstall the DSA using the freshly downloaded installation package. [Trend Micro Software Download Center]
- Restart the server
- Verify that the drivers are present in the device manager (using view non P&P devices), you should see the following drivers tmcomm.sys, tmevtmgr.sys and tmactmon.sys
- Deactivate the agent on the DSM (to remove the old association)
- Activate the agent from the DSM.
If you prefer using the agent initiated activation use this command: “dsa_control /a dsm://<host or IP>:<port>/” (default port 4120)
Hope this will help
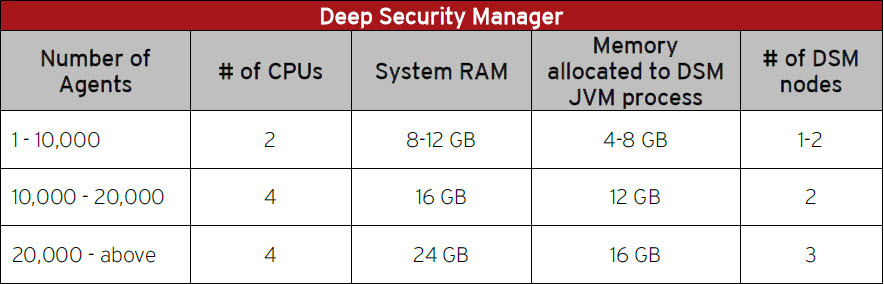
I have been reading Trend Micro Deep Security Best Practice Guide and found this interesting fact – The Deep Security Manager (DSM) default setting for maximum memory usage is 4GB. In other words, even if you increase the size of server memory it may not necessarily help TM DSM performance.
Here is a small extract from the guide on How to Configure Deep Security Manager’s Maximum Memory Usage
Sizing Considerations
Sizing recommendations rely greatly on the type of environment and various other factors such as network, hardware, software, applications, etc. These estimates were based on experience and previous enterprise deployments.
The recommendations below may not accurately reflect the required settings for every configuration, but they provide a guideline to determine the best environment for running Deep Security.
They have been classified into Small (1-10,000), Medium (10,000-20,000) and Large (20,000 – above) deployments.
Change the default allocated memory to the DSM JVM process
You can verify the new setting by going to System > System Information and in the System Details area, expand Manager Node > Memory. The Maximum Memory value should now indicate the new configuration setting.
Default DSM JVM memory configuration:

To configure the amount of memory available to the Deep Security Manager:
For Windows:
- Go to the Deep Security Manager directory (the same directory as Deep Security Manager.exe).
e.g. C:Program FilesTrend MicroDeep Security Manager.
- Create a new file called Deep Security Manager.vmoptions.
- Edit the file by adding the line: -Xmx8g (in this example, “8g” will make 8 GB memory available to the DSM.)
- Save the file and restart DSM.
For Linux:
- Go to the Deep Security Manager directory (/opt/dsm)
- Create a new file called dsm_s.vmoptions.
- Edit the file by adding the line: -Xmx8g (in this example, “8g” will make 8 GB memory available to the DSM.)
- Save the file and restart DSM.
In the following screenshot DSM JVM is configured to use 7GB:

Hope this will help.
|
Subscribe to Blog via Email
Join 169 other subscribers
|
Recent Comments