I recently upgraded VMware vCloud Connector from version 2.6.0 to 2.6.1 (check out THIS POST for details) and noticed a cool new feature!
In the previous versions, including v 2.6.0, the pre copy validation did not check the size of the vCC Node staging area – the local disk storage used for the OVF export and therefore if you try to copy a VM bigger than the staging area, the copy may fail. In the new version 2.6.1 it warns you that this may happen.
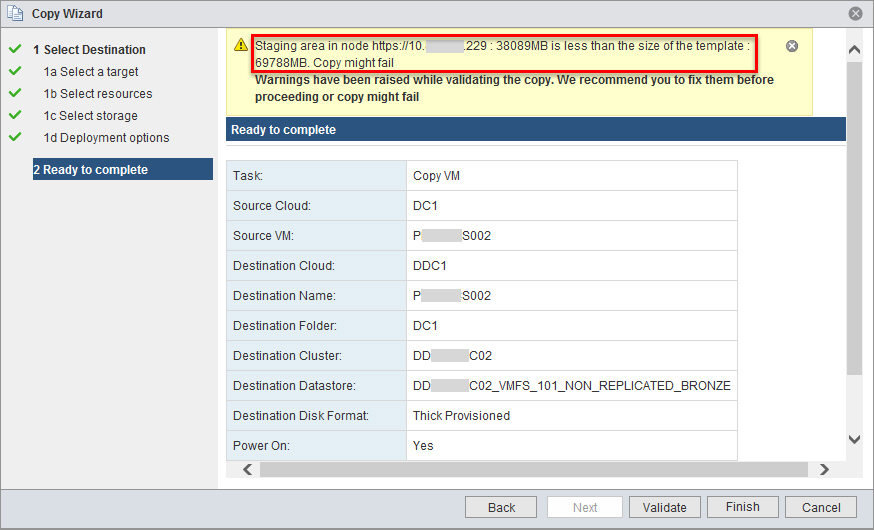
One thing we need to keep in mind – during VM export to OVF template, the disk files are stored in a compressed, sparse format. In the example above, VM being migrated is bigger than the size of the staging area on the vCC Node BUT it is not a problem, I know the disks are in TPLZ format and only 30GB is actually used by the guest OS. The VM Copy completed successfully.
You may ask what can we do if VM is definitely larger that the staging area on the vCC Node? No problem! You can resize the vCC Node data disk. The procedure is documented in the Installing and Configuring vCloud Connector (PDF version) document, search for “Configure vCloud Connector Node Allocated Storage in vSphere”.
…and for your convenience… :)
Configure vCloud Connector Node Allocated Storage in vSphere
To successfully copy resources to or from a vSphere cloud, you must configure and resize the data disk associated with the vCloud Connector node for that vSphere cloud.
Prerequisites
- You are a vSphere administrator.
- You have taken a snapshot of the virtual appliance.
Procedure
- Log in to the vSphere Client.
- In the hierarchy tree, select the vCloud Connector node virtual appliance.
- Right-click and select Edit Settings.
The Virtual Machine Properties window opens to the Hardware tab. - Select Hard disk 2 in the Hardware column.
- Modify the size, based on the size of the resources you are going to be transferring, and click OK.
- Open the console for the vCloud Connector node, ALT-F2, login as admin. Alternatively, SSH to the vCC Node.
- Run the following command to resize the disk:
sudo /opt/vmware/hcagent/scripts/resize_disk.sh
In the example below I extended the disk from default 40GB to 100GB:
login as: root
vCloud Connector Node Appliance
root@10.XXX.XXX.XXX's password:
Last login: Fri Oct 31 16:59:41 2014 from desktop.vStrong.info
vcn001:~ # sudo /opt/vmware/hcagent/scripts/resize_disk.sh
  Physical volume "/dev/sdb" changed
  1 physical volume(s) resized / 0 physical volume(s) not resized
  Extending logical volume data to 100.00 GiB
  Logical volume data successfully resized
Filesystem at /dev/data_vg/data is mounted on /data; on-line resizing required
old desc_blocks = 3, new_desc_blocks = 7
Performing an on-line resize of /dev/data_vg/data to 26213376 (4k) blocks.
The filesystem on /dev/data_vg/data is now 26213376 blocks long.
Hope this helps.
Recent Comments