|
|
Q: Where can I download EMC Ionix Unified Infrastructure Manager/Provisioning (UIM/P) software?
A: You can download it from EMC Powerlink. You must have permissions to access UIM/P.
UIM/P Documentation download:
Home > Support > Technical Documentation and Advisories > Software ~ E-I ~ Documentation > Ionix Family > Ionix for Data Center Automation and Compliance > Ionix Unified Infrastructure Manager/Provisioning, select software version, e.g. ‘3.2 & Service Packs’.
UIM/P software download:
EMC Powerlink: Home > Support > Software Downloads and Licensing > Downloads E-I > Ionix Unified Infrastructure Manager/Provisioning
OR
EMC Support: https://support.emc.com/downloads/5874_Unified-Infrastructure-Manager-Provisioning
PS The way to remember what letter to go to is to know that the full software name of EMC UIM/P is actually EMC Ionix UIM/P and therefore you need to go to E-I section rather than T-Z.
New Hardware Features in Release 2.1
Release 2.1(1a) adds support for the following:
- Cisco UCS CNA M73KR-Q Adapter for B-series M3
- VIC 1225 Adapter for C-series
- C420 M3 Server
New Software Features in Release 2.1
Release 2.1(1a) adds support for the following:
- Storage
- UCSM based FC Zoning – Direct Connect Topologies
- Multi-Hop FCoE
- Unified Appliance Port
- Inventory and Discovery Support for Fusion-IO and LSI PCIe Mezzanine Flash Storage (for UCS M3 blades)
- C-series Single Wire Management
- Fabric
- Sequential Pool ID Assignment
- PV Count Optimization (VLAN Compression. Only available on 6248/6296 Fabric Interconnect)
- VLAN Group
- Multicast Policy with IGMP Snooping and Querier
- Org-Aware VLAN
- LAN/SAN Connectivity Policies for Service Profile Configuration
- VCON Enhancement
- Cisco CNA NIC Multi-receiving Queue Support
- VM FEX for KVM SRIOV
- VM FEX for Hyper-V SRIOV
- Operational enhancements
- Firmware Auto Install
- Mixed Version Support (For Infra and Server bundles firmware)
- Service Profile Renaming
- Fault Suppression
- UCSM Upgrade Validation Utility
- FSM Tab Enhancement
- Native JRE 64 bits Compatibility with OS and Browsers
- Lower Power Cap Minimum for B Series RBAC Enhancement
- CIMC is included in Host Firmware Package (Management Firmware Package deprecated).
- Implicit upgrade compatibility check
- Support for UCS Central
Cisco UCS Manager 2.1 Release Notes, Data Sheet, Software download.
Cisco UCS Platform Emulator download.
The default (self-signed) UCSM keyring certificate must be manually regenerated if the cluster name changes or the certificate expires (it is valid for one year).

Affected object: sys/pki-ext/keyring-default
Description: default Keyring's certificate is invalid, reason: expired
Cause: invalid-keyring-certificate
Code: F0910
Here is what needs to be done:
- Make sure Fabric Interconnects have correct time settings, preferably configured to synchronise time with a NTP server(s). UCSM – Admin – All – Timezone Management;
- SSH to UCS Manager cluster IP address and login as an administrator user;
- Issue the following commands:
VFC01-A# scope security
VFC01-A /security # scope keyring default
VFC01-A /security/keyring # set regenerate yes
VFC01-A /security/keyring* # commit-buffer
- N.B. After you issue ‘
commit-buffer‘ command, all GUI sessions will be disconnected;
- After a couple of minutes, validate new certificate:
VFC01-A /security/keyring # scope security
VFC01-A /security # show keyring detail
Keyring default:
RSA key modulus: Mod1024
Trustpoint CA:
Cert Status: Valid
- Open web browser, connect to UCSM cluster IP address and accept the certificate warning. BTW, It might be a good idea to look into getting a CA-signed certificate…
Mozilla Firefox users: Should you have any problems with new certificate, go to Tools – Options – Advanced – Encryption – View Certificates and delete old/expired UCSM certificates.
EMC UIM/P users: New certificate needs to be exported from UCSM and imported into UIM/P.
I meant to write this article for a very long time, even before I started this blog. Even took the screenshots and made a note of commands but never found time to do it. Well, better late than never! Besides, you don’t do it very often. Most likely only once, when you configure your ESX cluster. Unless shared diagnostic partition needs to be migrated to another storage array, gets deleted or re-formated as VMFS… :)
Diagnostic Partition or a Dump Partition used to store core dumps for debugging and technical support. There are plenty of information on capturing VMware ESX diagnostic information after PSOD (Purple Screen Of Death) on the Internet and VMware Knowledge Base. Here is some light reading for you:
- Collecting diagnostic information from an ESX or ESXi host that experiences a purple diagnostic screen. VMware KB 1004128;
- Configuring an ESX/ESXi host to capture a VMkernel coredump from a purple diagnostic screen. VMware KB 1000328;
- Collecting diagnostic information for VMware ESX/ESXi using the vSphere Client. VMware KB 653;
- Collecting diagnostic information for VMware ESX/ESXi using the vm-support command. VMware KB 1010705.
OK, let’s get started:
- Create a LUN big enough to store VMKernel coredumps from all hosts in your cluster. VMKernel coredump is 110Mb in size, so do the maths;
- Make a note of LUN’s Unique ID.
I am working on EMC VNX, screenshot is from EMC Unisphere:

- Present the LUN to all hosts, it is ‘shared‘ diagnostic partition after all. Make a note of the Host LUN ID – the LUN ID this LUN will be known to all hosts;

- In vShere Client right click on the cluster, select Rescan for Datastores and tick ‘Scan for New Storage Devices’ only, click OK;
- Select any cluster host in the cluster, Configuration, Storage, Devices and check that the host can see the LUN;

- Click on Datastores and select Add Storage…;
- Select Diagnostic, click Next;

- Select Shared SAN storage, click Next,

- Select the LUN from the list, make sure LUN identifier and LUN ID are correct and click Next;
- Theoretically, you should get a confirmation that the shared diagnostic partition has been created and there would be the end of the story… BUT! I received an error message:
The object or item refereed to could not be found
Call "HostDiagnosticSystem.QueryPartitionCreateDesc" for object "diagnosticSystem-3869" on vCenter Server "vCenter.vStrong.info" failed.

I got the same error message when I tried to configure Shared Diagnostic partition in two vCenters, although configured in similar way, using two different VNX storage arrays. I logged a call with VMware but they could not get it sorted and suggested to configure Share Diagnostic Partition via CLI.
OK, lets configure Share Diagnostic Partition via CLI. This is much more interesting way of doing it and the REAL reason to write this article.
There are two VMware Knowledge Base articles that can help us:
- Configuring an ESXi 5.0 host to capture a VMkernel coredump from a purple diagnostic screen to a diagnostic partition, KB 2004299;
- Using the partedUtil command line utility on ESX and ESXi, KB 1036609.
Here is how to do it:
- On any cluster host run the following commands.
List all disks / LUNs:
~ # cd /vmfs/devices/disks
/dev/disks # ls
Make sure you can see the disk with LUN’s Unique ID in the list or run the same command and filter the output with grep:
/dev/disks # ls | grep 6006016055d02c00c0815b17cc78e111
naa.6006016055d02c00c0815b17cc78e111
vml.02002f00006006016055d02c00c0815b17cc78e111565241494420
- Let’s have a look if the disk has any partitions
partedUtil getptbl "/vmfs/devices/disks/mpx.vmhba0:C0:T0:L0"There are no partitions configured:
/dev/disks # partedUtil getptbl /vmfs/devices/disks/naa.6006016055d02c00c0815b17cc78e111
gpt
1305 255 63 20971520
1305 255 63 20971520

|     |   |  |

|     |   |  ----- quantity of sectors

|     |   -------- quantity of sectors per track

|     ------------ quantity of heads

------------------ quantity of cylinders
- Create a diagnostic partition:
partedUtil setptbl "/vmfs/devices/disks/DeviceName" DiskLabel ["partNum startSector endSector type/guid attribute"]
DiskLabel – common labels are bsd, dvh, gpt, loop, mac, msdos, pc98, sun. ESXi 5.0 and higher supports both the msdos and gpt label and partitioning schemes;
partNum – partition number, start from 1;
startSector and endSector – startSector and endSector - specify how much contiguous disk space a partition occupies;
type/GUID – identifies the purpose of a partition:
/dev/disks # partedUtil showGuids
Partition Type       GUID
vmfs                 AA31E02A400F11DB9590000C2911D1B8
vmkDiagnostic        9D27538040AD11DBBF97000C2911D1B8 - VMware Diagnostic Partition GUID
VMware Reserved      9198EFFC31C011DB8F78000C2911D1B8
Basic Data           EBD0A0A2B9E5443387C068B6B72699C7
Linux Swap           0657FD6DA4AB43C484E50933C84B4F4F
Linux Lvm            E6D6D379F50744C2A23C238F2A3DF928
Linux Raid           A19D880F05FC4D3BA006743F0F84911E
Efi System           C12A7328F81F11D2BA4B00A0C93EC93B
Microsoft Reserved   E3C9E3160B5C4DB8817DF92DF00215AE
Unused Entry         00000000000000000000000000000000
attribute – common attribute is 128 = 0x80, which indicates that the partition is bootable. Otherwise, most partitions have an attribute value of 0 (zero).
How to calculate startSector and endSector?
Well, startSector is easy – it is 2048. endSector = startSector + (partition_size_in_MB * 1024 * 1024 / 512).
WOW, too much calculations! But on a plus side you can get really creative! The size of coredump partition for a single server is 110MB, which is 225280 sectors.
You can slice the LUN into multiple diagnostic partitions and then configure hosts to use them individually!
Host        Partition       startSector        endSector
ESXi01         1            2048               227328
ESXi02         2            227329             452609
etc etc...
It would be a nightmare to manage setup like that though!…
Luckily, ESX host will be happy to use shared diagnostic partition between multiple hosts and will not overwrite each others coredumps, see screenshots bellow.
To make your life easier, lets just create a new VMFS datastore on this LUN, make a note of the startSector and endSector, then delete it and re-create partition as vmkDiagnostic.
Here is the same disk we were looking at before with a VMFS partition:
/dev/disks # partedUtil getptbl /vmfs/devices/disks/naa.6006016055d02c00c0815b17cc78e111
gpt
1305 255 63 20971520
1 2048 20971486 AA31E02A400F11DB9590000C2911D1B8 vmfs 0
1 2048 20971486   ^^^^  0

| |       |         |   |

| |       |         |   --- attribute

| |       |         ------- type/GUID

| |       ----------------- ending sector

| ------------------------- starting sector

--------------------------- partition number
OK, we are ready:
/dev/disks # partedUtil setptbl "/vmfs/devices/disks/naa.6006016055d02c00c0815b17cc78e111" gpt "1 2048 20971486 9D27538040AD11DBBF97000C2911D1B8 0"
gpt
0 0 0 0
1 2048 20971486 9D27538040AD11DBBF97000C2911D1B8 0
- Make sure the partition was created
/dev/disks # partedUtil getptbl /vmfs/devices/disks/naa.6006016055d02c00c0815b17cc78e111
gpt
1305 255 63 20971520
1 2048 20971486 9D27538040AD11DBBF97000C2911D1B8 vmkDiagnostic 0
- Now we can configure the host to use Shared Diagnostic Partition:
- Lets check if the coredump partition is currently configured:
Usage: esxcli system coredump partition list
~ # esxcli system coredump partition list
Name                                    Path                                                        Active  Configured
--------------------------------------  ----------------------------------------------------------  ------  ----------
naa.6006016055d02c00c0815b17cc78e111:1  /vmfs/devices/disks/naa.6006016055d02c00c0815b17cc78e111:1   false       false
naa.6006016055d02c00acc1158a7e31e111:7  /vmfs/devices/disks/naa.6006016055d02c00acc1158a7e31e111:7    true        true
In this example the coredump partition was configured during server installation on local storage (in fact it is a partition on a SAN boot LUN)
- Configure host to use shared diagnostic partition:
Usage: esxcli system coredump partition set [cmd options]
Description:
set Set the specific VMkernel dump partition for this system. This will configure the dump partition for the next boot. This command will change the active dump partition to the partition specified.
cmd options:
-e|–enable Enable or disable the VMkernel dump partition. This option cannot be specified when setting or unconfiguring the dump partition.
-p|–partition=<str> The name of the partition to use. This should be a device name with a partition number at the end. Example: naa.xxxxx:1
-s|–smart This flag can be used only with –enable=true. It will cause the best available partition to be selected using the smart selection algorithm.
-u|–unconfigure Set the dump partition into an unconfigured state. This will remove the current configured dump partition for the next boot. This will result in the smart activate algorithm being used at the next boot.
esxcli system coredump partition set --partition="naa.6006016055d02c00c0815b17cc78e111:1"
esxcli system coredump partition set --enable=true
esxcli system coredump partition list
Name                                    Path                                                        Active  Configured
--------------------------------------  ----------------------------------------------------------  ------  ----------
naa.6006016055d02c00c0815b17cc78e111:1  /vmfs/devices/disks/naa.6006016055d02c00c0815b17cc78e111:1    true        true
naa.6006016055d02c00acc1158a7e31e111:7  /vmfs/devices/disks/naa.6006016055d02c00acc1158a7e31e111:7   false       false
You need to run these commands on each host.
OK, lets see how it works:
Q: How to manually initiate PSOD (Purple Screen Of Death)?
A: Run the following command: vsish -e set /reliability/crashMe/Panic
The host crashes and saves coredump to a partition on a local disk, hence ‘Slot 1 of 1’:

Next two screenshots are PSOD from servers configured to use Shared Diagnostic Partition.
In this example 2GB shared diagnostic partition was configured for all hosts in the cluster. As the coredump size is less than 110Mb, there are 20 slots on 2GB partition.
Host 1:

Host 2:

Restart/cold boot the host and, when it comes back online, use the vSphere Client or vm-support command to copy diagnostic information from the host. For more information, see Collecting diagnostic information for VMware ESX/ESXi using the vSphere Client (653) or Collecting diagnostic information for VMware ESX/ESXi using the vm-support command (1010705). It is possible to re-copy the contents of the Dump Partition to a vmkernel-zdump-* coredump file. This may be necessary if the automatically-generated file is deleted. For more information, see Manually regenerating core dump files in VMware ESX and ESXi (1002769).
UPDATE:
I had to rebuild a couple of hosts in a cluster where a Shared Diagnostic partition was created and configured (a LUN with vmkDiagnostic GUID partition, masked to a host) and even though the host was configured to boot from SAN and therefore had ‘local’ coredump partition, it ‘choose’ to use shared diagnostic partition!
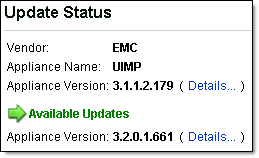
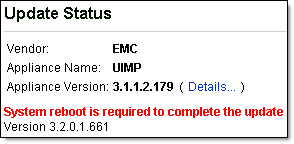
After I upgraded UIM/P as per <these> instructions and restarted the appliance, I could not longer open UIM/P Management Logon Page. The following error message was displayed:

------------------------------------------------------------------------------------
UIM/P Unavailable

UIM/P is unable to service your request at this time.
Please allow a few minutes to ensure UIM/P services are ready and try again.

If you continue to see this message, please contact the UIM/P system administrator.
Error 503
192.168.100.25
Thu Nov 15 13:44:00 2012
Apache
------------------------------------------------------------------------------------
jboss.log had the following errors:
- ERROR [org.apache.coyote.http11.Http11Protocol] (main) Error starting endpoint
- java.io.IOException: Keystore was tampered with, or password was incorrect
- Caused by: java.security.UnrecoverableKeyException: Password verification failed
- WARN [org.jboss.web.tomcat.service.JBossWeb] (main) Failed to startConnectors
2012-11-15 15:49:00,542 ERROR [org.apache.coyote.http11.Http11Protocol] (main) Error starting endpoint
 java.io.IOException: Keystore was tampered with, or password was incorrect
 at sun.security.provider.JavaKeyStore.engineLoad(JavaKeyStore.java:771)
 at sun.security.provider.JavaKeyStore$JKS.engineLoad(JavaKeyStore.java:38)
 at java.security.KeyStore.load(KeyStore.java:1185)
 at org.apache.tomcat.util.net.jsse.JSSESocketFactory.getStore(JSSESocketFactory.java:334)
 at org.apache.tomcat.util.net.jsse.JSSESocketFactory.getKeystore(JSSESocketFactory.java:274)
 ...
 at org.jboss.Main.boot(Main.java:200)
 at org.jboss.Main$1.run(Main.java:518)
 at java.lang.Thread.run(Thread.java:662)
 Caused by: java.security.UnrecoverableKeyException: Password verification failed
 at sun.security.provider.JavaKeyStore.engineLoad(JavaKeyStore.java:769)
 ... 26 more
 2012-11-15 15:49:00,543 WARN [org.jboss.web.tomcat.service.JBossWeb] (main) Failed to startConnectors
 LifecycleException: service.getName(): "jboss.web"; Protocol handler start failed: java.io.IOException: Keystore was tampered with, or password was incorrect
 at org.apache.catalina.connector.Connector.start(Connector.java:1139)
 at org.jboss.web.tomcat.service.JBossWeb.startConnectors(JBossWeb.java:601)
 at org.jboss.web.tomcat.service.JBossWeb.handleNotification(JBossWeb.java:638)
 at sun.reflect.GeneratedMethodAccessor5.invoke(Unknown Source)
 at sun.reflect.DelegatingMethodAccessorImpl.invoke(DelegatingMethodAccessorImpl.java:25)
 at java.lang.reflect.Method.invoke(Method.java:597)
 ...
 at org.jboss.Main.boot(Main.java:200)
 at org.jboss.Main$1.run(Main.java:518)
 at java.lang.Thread.run(Thread.java:662)
 2012-11-15 15:49:00,543 INFO [org.jboss.system.server.Server] (main) JBoss (MX MicroKernel) [4.3.0.GA_CP10 (build: SVNTag=JBPAPP_4_3_0_GA_CP10 date=201107201825)] Started in 35s:728ms
.
When I installed and configured UIM/P, I used a 3rd party application to generate a Private Key and Certificate Signing Request (CSR) which included UIM/P FQDN, IP address and all aliases. See “HOW TO: Create server certificate and include DNS alias” blog post. I guess this is what the UIM/P upgrade utility did not like. To get this issue resolved I had to re-run ‘perl ssl-utility.pl -install server.key certnew.cer‘ command (see Step 4) to re-configure Apache private key, certificate and re-create the keystore. I then restarted the appliance and successfully logged into UIM/P Management Application.
Hope you find it useful.
I am currently working on VMware vCloud Director Proof Of Concept and decided to use two spare UCS blades and some storage to build a test environment.
We are using Vblock 300HX and I recently rebuilt EMC UIM/P and imported current production cluster with EMC UIM/P Service Adoption Utility (I am working on the article on SAU so please stay tuned). Would it not be a good opportunity to utilize UIM/P to build a Proof Of Concept environment. You may have different setup in your environment, please use these instructions as a general guidance only.
- Login to UIM/P as sysadmin;
- Navigate to Administration – Service Offering and click Add;
- Click on Edit and amend Name, Description and select appropriate OS, Click Save. If the desired OS image is not in the list – see “HOW TO: Add new VMware vSphere ISO image to UIM/P” instructions;

- Click on the Servers tab.
Select the Grade blade server will be taken from, minimum and maximum number of blades. As I am going to create a cluster, I am going to select two blades straight away, click Save;

- Click on the Storage tab.
- We need to select storage from two grades: for the boot partition and the storage for virtual machines:
 
In this example BM-BOOT grade is assigned to a storage pool created for Bare Metal blades boot LUNs. TESTDEV-R5 – storage pool for Test and Development VMs.
- Configure boot LUN defaults, click Save:

- Here is what it should look like:

- Click on Networks tab.
Click Add and create two vNICs – one for Switch A and one for Switch B. DO NOT ENABLE FAILOVER! Select Virtual Networks which will be used in the service offering, select appropriate MTU, QoS and Policies. click Save


- Click on vCenter Cluster and configure it the way you like. Click on Set Password and type the password for the root account. vCenter will be using this password to add hosts to the cluster;
- Click Close to close New Service Offering Wizard;
- In the list of Service Offering highlight the one that you have just created and click Make Available;
- Navigate to Service Catalog, select Service Offering you created and click Create Service. UIM/P will check if you have enough spare blades and storage of the desired grade. If you have not graded your spare blades or made storage pool(s) available, you need to do it now;

- Edit the Service:
- General tab. Add a Description;
- Servers tab. Click Add/Edit and specify the server names, IP addresses etc. Click Save.

- Storage tab. Amend boot LUN names and capacity if required. Add some LUNs for the cluster. Click Save.

Amend LUN names if required:

- Networks tab. Amend VLANs if required;
- vCenter Cluster tab. Amend vCenter and root password if required;
- Click Close to finish configuring the Service.
- It is now time to click Provision button and let UIM/P to do its job.
- When the Service has been provisioned, you need to activate the servers by clicking the Activate button and then sync with vCenter (click on Synchronize).
N.B. UIM/P and vCenter need to be able to ping the host(s) by the name you assigned to them. Make sure you create host records in DNS.
Hope this will help.
Last night we had a Control Station failover on VNX7500 and before we could fail it back (Change Control etc etc) I needed to create a new Service Offering in EMC UIM/P. Naturally, I logged into UIM/P, changed Control Station IP address in the Vblock configuration and ran Vblock discovery again. Unfortunately, it failed on Control Station discovery.
Here is the error message:

Details revealed the following:
Action completed successfully...
192.168.100.143: found 1 reachable IP address out of 1 ping request
Discovering device type and communication protocols for device (192.168.100.143)
+++ Device authenticated and credentials identified
---- Driver (#4002:EMC VNX File) could not discover 192.168.100.143
----> Refer additional details below.
---->
----> ADDITIONAL DETAILS
----> Did not receive SMI-S Provider version information
----> Please run 'dv' command of /opt/emc/ECIM/ECOM/bin/TestSmiProvider and ensure command completes successfully
----> dv
----> ++++ Display version information ++++
---->
----> CIM ObjectManager Name: EMC:VNX001B.*.vStrong.info
---->
----> CIMOM Version: EMC CIM Server Version 2.6.3.0.0.38D
----> Error: malformed object name: VNX001B.*.vStrong.info
---->
----> Retrieve and Display data - 1 Iteration(s) In 0.283212 Seconds
---->
----> Please press enter key to continue...
. . . . .
----> Namespace: root/emc
----> repeat count: 1
----> (192.168.100.143:5989) ? q
----> Disconnected from 192.168.100.143:5989
----> +++++ /opt/emc/ECIM/ECOM/bin/TestSmiProvider Terminated Normally
---->
----> Could not verify SMI-S Provider access on port 5989 to address 192.168.100.143
---- Could not discover driver using SSH
=================================================
(192.168.100.143) Valid Credentials Found, but could not determine driver for device
What is this VNX001B.*.vStrong.info? Where the hell the * (asterisk) came from? I logged into Unisphere, checked Control Station Properties and voila:

Disclaimer: .vstrong.info is used to protect the guilty.
I re-configured DNS domain name, NTP server IP addresses and the timezone which were also wrong.
Before we discover Vblock/Control Station again we need to restart CIM service on the Control Station:
cd /celerra/wbem/bin/start_cim_server
./stop_cim_server
./start_cim_server /celerra/wbem
Discovery should now finish successfully!
PS You can manually test connectivity from UIM/P to the Control Station
SSH to UIM/P, run these commands:
cd /opt/emc/ECIM/ECOM/bin
./TestSmiProvider
PPS If you are really fast, you can ‘catch’ the moment UIM/P connects to the Control Station:
netstat -an | grep 5989
tcp        0      0 :::5989                     :::*                        LISTEN
tcp        0      0 ::ffff:<CS_IP_ADDRESS>:5989     ::ffff:<UIM/P_IP_ADDRESS>:57081    ESTABLISHED
All of a sudden vShield Manager stopped working this morning. I could not open management web page (Page Cannot Be Displayed…) but I was able to ping VSE, console worked OK and IP address was shown on the Summary tab. After couple of reboots vShield Manager did not even show the IP address.
The problem was caused by the fact that the root filesystem ran out of space. To confirm this, log in to the VSE console as admin user (default password is ‘default’)and issue the command “show filesystems”:

As you can see, the root filesystem was full and /dev/sda1 and /dev/sda1 were shown twice.
There are two ways to resolve this problem:
- The official way is to open a Support Case with VMware. They will login to VSE as root and a secret password only they know and delete log files in /home/secureall/secureall/logs, /usr/tomcat/logs and /usr/tomcat/temp. I have been told there is an internal KB article 2032017 which describes this issue and what VMware needs to do to solve this.
- Alternative way would be to power VCE off, mount its disk in a Linux virtual machine, truncate the log files on the mounted disk, un-mount and remove the disk from the Linux VM and power VSE back on.
UPDATE:
I have been playing on VSE console and discovered this command:
purge log (manager|system)
manager# purge log
manager  Delete manager logs
system   Delete system logs
Hope this will help…
In previous post we installed and configured UIM/P. We can now add and discover a Vblock.
- Login to UIM/P as sysadmin;
- Navigate to Administration, Vblocks, Add Vblock;
- Select Vblock version, fill in IP addesses, user names and passwords and click Add and Discover;
- If discovery fails, check user names and passwords. Confirm they work by manually connecting to the equipment;
- There are two other reasons the discovery may fail:
- Cannot discover UCS – make sure you imported UCS Manager certificate. See ‘Install and configure EMC UIM/P, Step 8, Install UCS Manager certificate‘
- Cannot discover VNX – There are two services, SMI-S and ECOM, must be enabled and running on VNX for UIM/P to successfully discover it. They are disabled by default and also get disabled during VNX software upgrade. Please refer to Primus emc287203 “What is SMI-S and ECOM and how to start the ECOM service on the Celerra/VNX Control Station“, also see below. You should contact EMC support to get these services enabled or you can do it yourself by following these instructions.
- Validate Vblock setup: Administration, highlight Vblock, click Validate Setup. Make sure Setup Validation Status is Ready or Warning;

- Configure Identity Pools: Administration – Identity Pools. For all pools configure Name, Range and Tag (Global)
- UUID Pool
- MAC Pool
- WWNN Pool
- WWPN Pool
- Configure Blade and Storage Grades:
- Administration – Blade Pool – Manage Grades
- Administration – Storage Pool – Manage Grades
- Add vCenter Server: Administration – vCenter Instances. Click Add, fill in the vCenter details and click OK. Verify connection to vCenter by clicking on Enable Connection.
You are now ready to run EMC Service Adoption Utility to import your Vblock configuration into UIM/P.
Stay tuned…
EMC Primus emc287203:
“What is SMI-S and ECOM and how to start the ECOM service on the Celerra/VNX Control Station”
| ID: |
emc287203 |
| Usage: |
5 |
| Date Created: |
02/12/2012 |
| Last Modified: |
03/29/2012 |
| STATUS: |
Approved |
| Audience: |
Customer |
Knowledgebase Solution
| Question: |
How to start the ECOM service on the Celerra/VNX Control Station |
| Question: |
What is SMI-S and ECOM? |
| Environment: |
Product: VNX |
| Environment: |
EMC SW: VNX Operating Environment (OE) for file 7.0.x |
| Environment: |
Product: Celerra File Server (CFS) |
| Environment: |
EMC SW: NAS Code 6.0.x |
| Fix: |
ECOM is disabled by default. Please contact EMC support quoting this solution ID (emc287203) to assist with enabling this feature. |
| Notes: |
SMI-S PROVIDER is a Web Based Enterprise Management (WBEM):Features represents the Storage Management Initiative-Specification to provide an SMI-S compliant API for storage products (SMIS 1.3).
SMI-S is an infrastructure designed to manage storage devices, CIM client, CIM server, and Provider.
SMI-S is based on CIM, with clients able to manage Celerra via CIM.
Basically it is a Web Based Enterprise Management (WBEM) using Common Information Model (CIM XML).
Embeds the WBEM infrastructure on the Control Station in the form of a CIM Server (also known as, ECOM, using CIMOM Object Manager) and a Provider.
ECOM and SMI-S are embedded on the Control Station.
ECOM is the EMC Common Object Model CIM Server. |
How to enable SMI-S and ECOM service:
- Connect to Primary Control Station as nasadmin;
- Edit /nas/sys/nas_mcd.cfg configuration file
[nasadmin@VNX001A ~]$ cd /nas/sys
[nasadmin@VNX001A sys]$ vi nas_mcd.cfg
_
- Uncomment all lines for each of the following services and save the nas_mcd.cfg file:
- daemon “cim server“;
- daemon “cim conf“;
- daemon “SMISPlugin Log Trimmer“;
- daemon “SMIS securitylog.txt Log Trimmer“;
- daemon “SMIS HTTP_trace.log Log Trimmer“;
- daemon “SMIS cimomlog.txt Log Trimmer“
 daemon  "cim server"
executable      "/celerra/wbem/bin/start_cim_server"
optional        no
autorestart     yes
cmdline         "/celerra/wbem"

daemon "cim conf"
executable      "/nas/sbin/dirsync"
optional        no
autorestart     yes
cmdline         "-all /celerra/wbem/conf/ /nas/site/ecom_config  360"

daemon "SMISPlugin Log Trimmer"
executable      "/nas/sbin/log_trimmer"
optional        no
autorestart     yes
ioaccess        no
cmdline         "-n /nas/log/smis/SMISPlugin.log 1000 l 2 h t 4 y "

daemon "SMIS securitylog.txt Log Trimmer"
executable      "/nas/sbin/log_trimmer"
optional        no
autorestart     yes
ioaccess        no
cmdline         "-n /nas/log/smis/securitylog.txt 1000 l 2 h t 4 y "

daemon "SMIS HTTP_trace.log Log Trimmer"
executable      "/nas/sbin/log_trimmer"
optional        no
autorestart     yes
ioaccess        no
cmdline         "-n /nas/log/smis/HTTP_trace.log 1000 l 2 h t 4 y "

daemon "SMIS cimomlog.txt Log Trimmer"
executable      "/nas/sbin/log_trimmer"
optional        no
autorestart     yes
ioaccess        no
cmdline         "-n /nas/log/smis/cimomlog.txt 1000 l 2 h t 4 y "
- Restart nas service OR reboot Primary Control Station
/etc/rc/d/init.d/nas stop / start
OR
reboot
- During reboot NAS services will be failed over to Secondary Control Station, please fail them back when Primary CS come back on
[nasadmin@VNX001B /]$ /nas/sbin/getreason
10 - slot_0 secondary control station
11 - slot_1 primary control station
5 - slot_2 contacted
5 - slot_3 contacted
5 - slot_4 contacted
5 - slot_5 contacted
[nasadmin@VNX001B /]$ /nasmcd/sbin/cs_standby -failover yes
- Verify if the services are up and running:
[nasadmin@VNX001A /]$ ps -ef | grep -i ecom
nasadmin 15451   951  0 13:33 pts/0    00:00:00 grep -i ecom
root     21851  2967  0 Oct17 ?        00:00:01 /bin/sh /nas/sbin/dirsync -all /celerra/wbem/conf/ /nas/site/ecom_config 360
root     23241 21850  0 Oct17 ?        00:16:54 ECOM
[nasadmin@VNX001A /]$ ps -ef | grep -i smis
nasadmin 15596   951  0 13:33 pts/0    00:00:00 grep -i smis
root     21855  2967  0 Oct17 ?        00:00:06 /nas/sbin/log_trimmer -n /nas/log/smis/SMISPlugin.log 1000 l 2 h t 4 y
root     21856  2967  0 Oct17 ?        00:00:00 /nas/sbin/log_trimmer -n /nas/log/smis/securitylog.txt 1000 l 2 h t 4 y
root     21857  2967  0 Oct17 ?        00:00:00 /nas/sbin/log_trimmer -n /nas/log/smis/HTTP_trace.log 1000 l 2 h t 4 y
root     21858  2967  0 Oct17 ?        00:00:03 /nas/sbin/log_trimmer -n /nas/log/smis/cimomlog.txt 1000 l 2 h t 4 y
[nasadmin@VNX001A /]$ ps -ef | grep -i cim
nasadmin 15845   951  0 13:33 pts/0    00:00:00 grep -i cim
root     21850  2967  0 Oct17 ?        00:00:00 /bin/sh /celerra/wbem/bin/start_cim_server /celerra/wbem
root     21858  2967  0 Oct17 ?        00:00:03 /nas/sbin/log_trimmer -n /nas/log/smis/cimomlog.txt 1000 l 2 h t 4 y
- Verify that Control Station is listening on port 5989:
[nasadmin@VNX001A /]$ netstat -an | grep 5989
tcp        0      0 :::5989                     :::*                        LISTEN
|
Subscribe to Blog via Email
Join 169 other subscribers
|


Recent Comments