Here is how you upgrade UIM/P:
- Power down UIM/P and take a snapshot;
- Upload UIMP-3.X.X.X.XXX-Update-Media.iso to a datastore where it can be mounted to UIM/P virtual appliance;
- Mount Update Media ISO file to UIM/P virtual appliance and power it back on;
- Open UIM/P upgrade page by navigating to https://<hostname>:5480, where <hostname> is UIM/P FQDN or IP address;
- Login as root;
- Click on the Update tab;
- Click the Check Updates button, to find updates on the mounted update media;

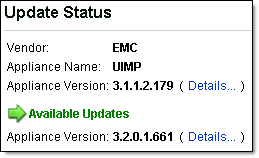
- Click the Install Updates button, click OK;


- Please be patient, installation can take up to 30 minutes to complete;

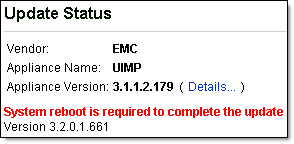
- Should the installation fails, check the /opt/ionix-uim/logs/appliance-update.log file.
- A reboot may be required after updating the UIM/P appliance. To reboot, click the System tab at the top of the UIM/P appliance management webpage, then click Actions, and then Reboot. The reboot may take 10 minutes to complete.
Hope this will help.
UPDATE:
If you use 3rd party Certificate Authority (CA) signed certificate for UIM/P, you may encounter a problem as described in the ‘EMC UIM/P upgrade failed‘ post.
Recent Comments