|
|
We recently upgraded EMC VNXe 3200 storage array from 3.1.1.5395470 to 3.1.1.5803064 (VCE RCM 5.0.10 or 6.0.3). Upgrade completed successfully (the NFS services failed over and back between Storage Processors without any issues and the hosts did not lose connectivity to the storage) but at the last minute we received the following error messages:
“The DPE has faulted
It is unsafe to remove SP B now
It is unsafe to remove SP A now
System VNXe has experienced one or more problems that have had a major impact”
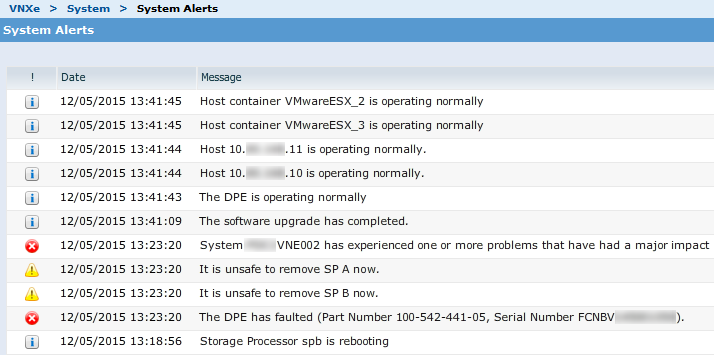
This is a known issue and fix is being developed. A permanent fix will be available in MR1SP2 code (3.1.2.). Since this does not impact production and also hardware is not actually faulted, these alert messages can be safely ignored.
Cause: Baseboard Management Controller (BMC) is onboard device which queries all hardware components periodically. At some point some of the components take long time to process this request. This delay results in ‘timeout’ according to BMC which thinks components are bad. However, next cycle of device query may work fine and result in ‘operating normally’ message. This software bug has been identified and timeout value has been enhanced to accommodate any delay.
I hope this will help.
After upgrading Cisco UCS B200 M4 blade firmware from 2.2(3e) to 2.2(5c) the following minor fault appeared:
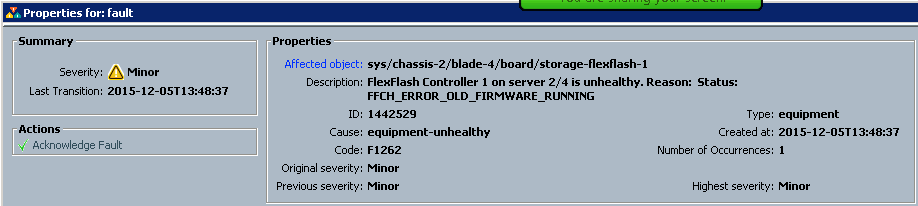
Apparently, it is known Cisco bug.
Cisco Bug: CSCut10525: FlexFlash FFCH_ERROR_OLD_FIRMWARE_RUNNING error on B200 M4
Quickview: https://tools.cisco.com/quickview/bug/CSCut10525
Details: https://tools.cisco.com/bugsearch/bug/CSCut10525/?referring_site=bugquickviewclick
Symptom:
After updating B200 M4 server firmware using MR3 build 169 bundle B, FFCH_ERROR_OLD_FIRMWARE_RUNNING is displayed on fault summary. Please see the attached screenshot in Enclosures.
Conditions:
B200 M4 Server after upgrade to 2.2.4b code
Workaround:
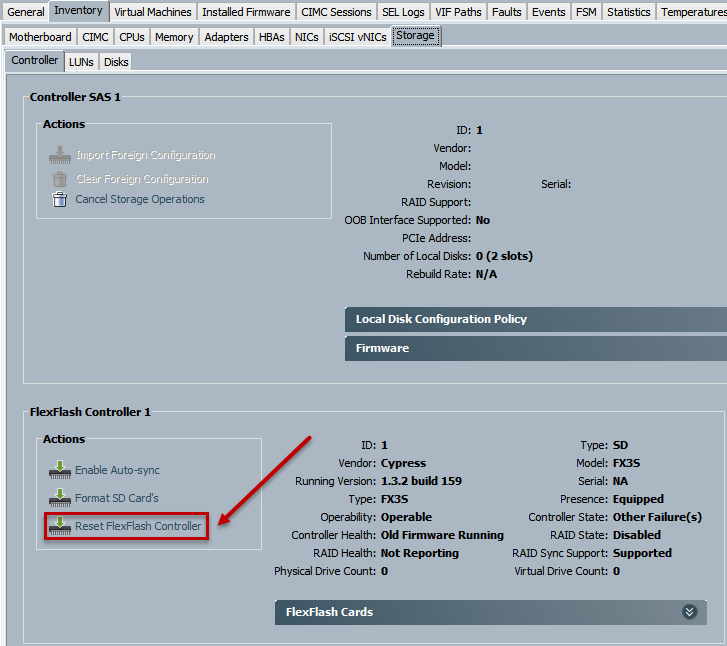
Reset FlexFlash Controller manually to make that error disappear
Here is how you do it:
- Open properties of the blade that that shows this error. Navigate to Inventory / Storage / Controller
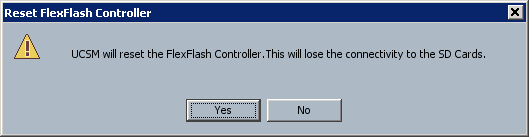
Under FlexFlash Controller 1 click on Reset FlexFlash Controller:
- Click Yes.
- Click OK.
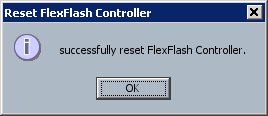
- The error message should go away.
Hope this will help.
VMware vSphere ESXi 5.5 and 6.0 have a limit of 256 LUNs per host:
https://www.vmware.com/pdf/vsphere5/r55/vsphere-55-configuration-maximums.pdf
https://www.vmware.com/pdf/vsphere6/r60/vsphere-60-configuration-maximums.pdf
In an environment where a host with two HBAs (VMware Best Practice) is connected to two fabrics and storage array with two Storage Controllers (EMC VNX, for example) the host will have four paths to a LUN: 2 Controllers x 2 HBAs = 4 paths
When we apply the same approach to EMC XtremIO clusters (two or more X-Bricks, 8 maximum), we should also consider another limit, the ‘Number of total paths on a server‘ which is 1024. With two X-Bricks, you have four controllers, multiply by two HBAs and you have eight paths per LUN. Therefore the max number of LUNs will be 128 LUNs (1024 / 8 = 128).
The following diagram displays the logical connection topology for 8 paths.

If you go to the extreme and configure your XtremIO with eight X-Brick, you have 16 controllers. Again, two HBAs per host and the max number of LUNs you can attach to an ESXi host will be 32… I understand, different OS’es may have different limits than VMware and this logic will not be applicable.
If you have hit the limit of 1024 paths per host (1024 / 4 controllers / 2 HBAs = 128 LUNs) and need to provision more LUNs, the best way will be to re-zone the host to limit the number of X-Bricks / Controllers the host HBA can connect to.
The following diagram displays the logical connection topology for 4 paths.

OK, let see how to reconfigure the zoning. Please refer to ‘HOW TO: Configure smart zoning on Cisco MDS 9148s‘ blog post to see how it was configured in the first place.
- To begin with, lets check the current zoning configuration:
- Fabric1:
zone name Cluster01_hosts_XIO vsan 10
  fcalias name Cluster01_hosts vsan 10
    pwwn 20:00:00:25:b5:03:a0:04 [Cluster01n01_vhba0]  init
    pwwn 20:00:00:25:b5:03:a0:05 [Cluster01n02_vhba0]  init

  fcalias name Cluster01_XIO vsan 10
    pwwn 21:00:00:24:ff:5e:f7:4a [X1_SC1_FC1]  target
    pwwn 21:00:00:24:ff:5f:0b:90 [X1_SC2_FC1]  target
    pwwn 21:00:00:24:ff:8c:9b:78 [X2_SC1_FC1]  target
    pwwn 21:00:00:24:ff:3d:5c:32 [X2_SC2_FC1]  target
- Fabric2:
 zone name Cluster01_hosts_XIO vsan 11
    fcalias name Cluster01_hosts vsan 11
      pwwn 20:00:00:25:b5:03:b1:04 [Cluster01n01_vhba1]  init
      pwwn 20:00:00:25:b5:03:b1:05 [Cluster01n02_vhba1]  init

    fcalias name Cluster01_XIO vsan 11
      pwwn 21:00:00:24:ff:5e:f7:4b [X1_SC1_FC2]  target
      pwwn 21:00:00:24:ff:5f:0b:91 [X1_SC2_FC2]  target
      pwwn 21:00:00:24:ff:8c:9b:79 [X2_SC1_FC2]  target
      pwwn 21:00:00:24:ff:3d:5c:33 [X2_SC2_FC2]  target
- The idea is to configure one HBA to one X-Brick zones therefore I will create an FCalias for X-Brick1 and X-Brick2 (X-BrickN, if you have more…).
- Fabric1:
fcalias name XIO_X1 vsan 10
member device-alias X1_SC1_FC1 target
member device-alias X1_SC2_FC1 target

fcalias name XIO_X2 vsan 10
member device-alias X2_SC1_FC1 target
member device-alias X2_SC2_FC1 target
- Fabric2:
fcalias name XIO_X1 vsan 11
member device-alias X1_SC1_FC2 target
member device-alias X1_SC2_FC2 target

fcalias name XIO_X2 vsan 11
member device-alias X2_SC1_FC2 target
member device-alias X2_SC2_FC2 target
- N.B. These aliases can also be used to zone hosts to all X-Bricks in the normal fashion if the LUN/path limit is not going to be an issue:
 zone name Cluster01_X1_X2 vsan 11
member Cluster01_hosts
member fcalias XIO_X1
member fcalias XIO_X2
- Let’s configure the zones. There is only one HBA per zone, therefore I will not be configuring the
fcalias but use device alias instead:
- Fabric1:
zone name Cluster01N01_X1 vsan 10
member device-alias Cluster01n01_vhba0 initiator
member fcalias XIO_X1

zone name Cluster01N02_X2 vsan 10
member device-alias Cluster01n02_vhba0 initiator
member fcalias XIO_X2
- Fabric2:
zone name Cluster01N01_X1 vsan 11
member device-alias Cluster01n01_vhba1 initiator
member fcalias XIO_X1

zone name Cluster01N02_X2 vsan 11
member device-alias Cluster01n02_vhba1 initiator
member fcalias XIO_X2
- Add the zones to the zoneset:
- Activate zoneset and commit the zone:
- Remove the old zones and fcaliases:
- Fabric1:
no zone name Cluster01_hosts_XIO vsan 10
no fcalias name Cluster01_hosts vsan 10
no fcalias name Cluster01_XIO vsan 10
- Fabric2
no zone name Cluster01_hosts_XIO vsan 11
no fcalias name Cluster01_hosts vsan 11
no fcalias name Cluster01_XIO vsan 11
- Commit the zones again.
- Rescan HBAs and confirm the number of path has changed.
I hope this will help.
Michael Dell spells out his plans for @VMware: “Crown jewel of the EMC federation”
“We believe it is very important to maintain VMware’s successful business model supporting an open and independent ecosystem,” Dell said. “We do not plan to do anything proprietary with VMware as regards Dell or EMC, nor place any limitations on VWware’s ability to partner with any other company.”
VMware Advocacy
The EMC Virtual Storage Integrator (VSI) for VMware vSphere Web Client is a plug-in for VMware vCenter. It enables administrators to view, manage, and optimize storage for VMware ESX/ESXi servers and hosts and then map that storage to the hosts.
VSI consists of a graphical user interface and the EMC Solutions Integration Service (SIS), which provides communication and access to the storage systems.
Depending on the platform, tasks that you can perform with VSI include:
- Storage provisioning
- Setting multipathing policies
- Cloning
- Block deduplication
- Compression
- Storage mapping
- Capacity monitoring
- Virtual desktop infrastructure (VDI) integration
- Data protection using EMC AppSync or EMC RecoverPoint
Using the Solutions Integration Service, a storage administrator can enable virtual machine administrators to perform management tasks on a set of storage pools.
Some light reading and the OVA package:
OK, let’s discuss the upgrade procedure! Well, it is not actually an upgrade (not an in-place upgrade) but rather a database backup, deployment of the new version and then the DB restore (migration).
I am going to upgrade VSI for VMware vSphere Web Client from 6.4.1.1 to 6.6.3.
Note: For migration from VSI 6.1 only: A known limitation causes the migration of VMAX storage systems from 6.1 to 6.6 to fail. Before creating a backup of the existing database, the storage administrator must delete all VMAX storage systems and then re-register them and the VMAX users after the upgrade.
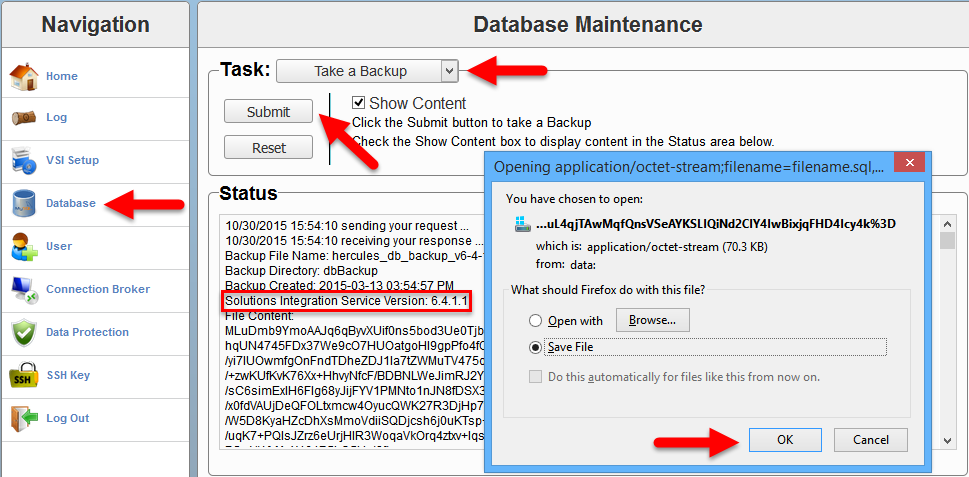
- Log in to your current version of the Solutions Integration Service
https://<SIS IP Address>:8443/vsi_usm/, click Database and select Take a Backup from the Task drop-down and click Submit to create a backup file of the existing database, and save the backup to a secure location.
- Deploy the new Solutions Integration Service .
I will actually power the existing VA off and rename it as the new VA will have the same VM name and be running in the same cluster.
- Deploy EMC Solutions Integration Service OVA file;
- Power On virtual machine with EMC Solutions Integration Service and wait for the deployment to finish;
- Log in to the new Solutions Integration Service as
admin/ChangeMe (see Default Password for details) and change the default password;
https://<SIS IP Address>:8443/vsi_usm/
There is no need to configure the EMC SIS, the configuration will be restored from the DB backup
-
Just to be safe, log in to the new Solutions Integration Service, click Database and select Take a Backup to create a backup of the new Solutions Integration Service database, and save the backup to a secure location.
- Log in to the new Solutions Integration Service, click Database and select Data Migration from the Task drop-down menu. Click Choose File and locate the database backup of the previous version. Click Submit.
It should not matter but in my environment the Data Migration did not work in Mozila FireFox 41.0.2 but worked in Internet Explorer 11.
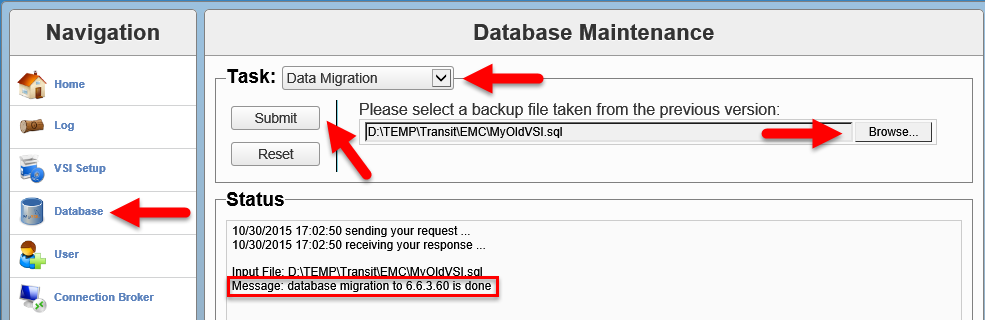
- If the migration is successful, all Solutions Integration Service data for the previous version are moved to the new version, including users, storage systems, and access control information.
If you changed VM name (host name), deactivate the previous version of the Solutions Integration Service.
Follow Step 8.
- If the migration fails:
a. Restore the new Solution Integration Service database from the backup file you created in step 4.
b. Manually provision all required elements.
- Register the VSI plug-in with vCenter:
- Log in to the new Solutions Integration Service
https://<SIS IP Address>:8443/vsi_usm/admin
- Click VSI Setup;
- Enter the values for the following parameters and click Register.
- vCenter IP/Hostname: The IP address that contains the VSI plug-in package.
This is the IP address of the vCenter to which you are registering the VSI plug-in. If you are using the vCenter hostname, ensure that DNS is configured.
- vCenter Username: The username that has administrative privileges.
- vCenter Password: The administrator’s password.
- Admin Email (Optional): The email address to which notifications should be sent.
- If the registration was successful, the following will be displayed in the Status window:
10/30/2015 17:23:12 sending your request ...
10/30/2015 17:23:21 receiving your response ...

The operation was successful.

Registered VSI Plugin:
Key: com.emc.vsi.plugin
Version: 6.6.3.39
Name: EMC VSI Plugin
Description: Integrated management support for EMC storage systems
Admin Email: none
- Browse to the vSphere Web Client address.
After you log in, the VSI plug-in is downloaded and deployed.
Note: The download takes several minutes.
If you have installed previous versions of the VSI plug-in, clear your browser cache to ensure that you use the newest version of VSI.
Hope this will help.
EMC PowerPath Virtual Appliance Version 2.0 SP1 brings the following enhancements to the PowerPath Virtual Appliance web console.
A new tab named PowerPath Monitor added. Includes:
- PowerPath Monitor > Group/Host view lists all the PowerPath hosts under corresponding groups. Physical PowerPath hosts are organized under their corresponding user-defined host groups (created from the inventory tab) and ESXi hosts are grouped under the corresponding vCenter to which they belong.
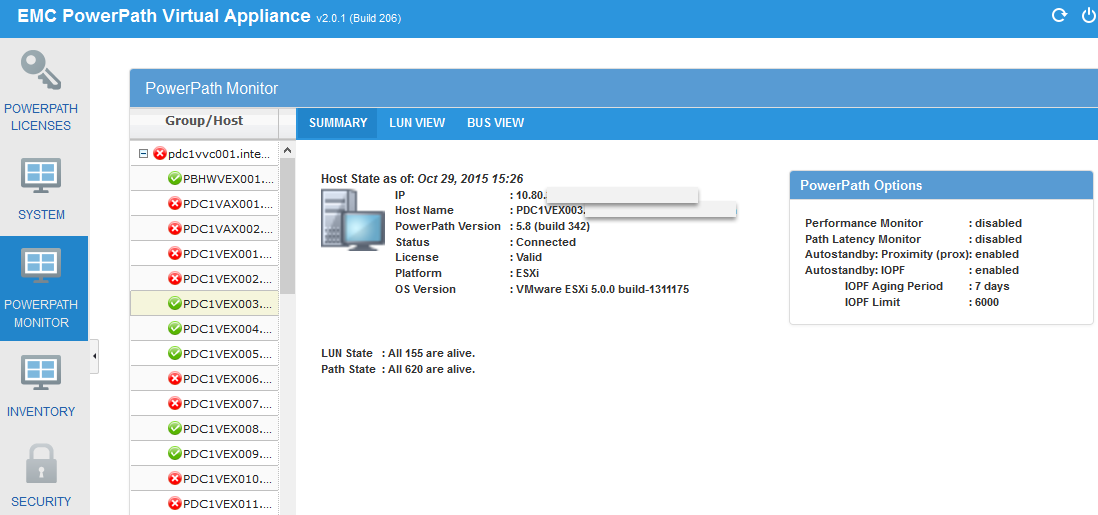
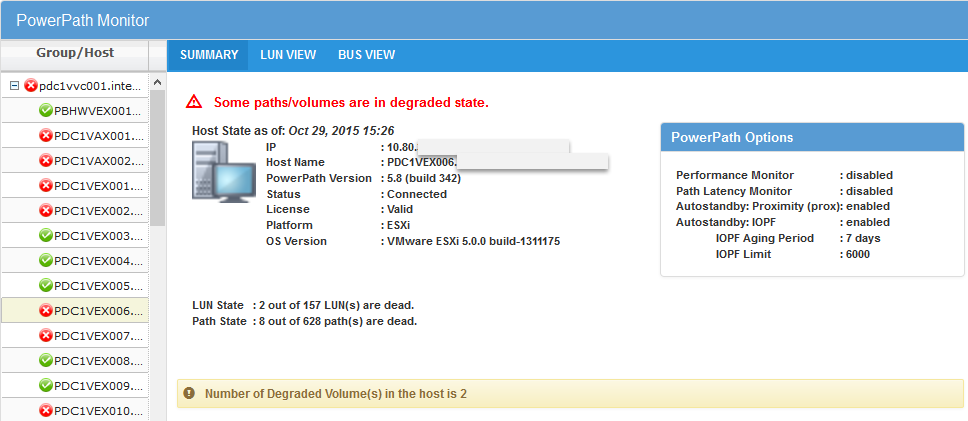
- PowerPath Monitor > Group/Host > Summary view Provides host monitoring capabilities including device/path monitoring. The monitor displays PowerPath volume, path, and bus details.
Healthy state:
Degraded:
- PowerPath Monitor > Group/Host > LUN view similar to PowerPath Viewer, LUN view adds Queued IO value displayed under LUN view, (not available with PowerPath Viewer).

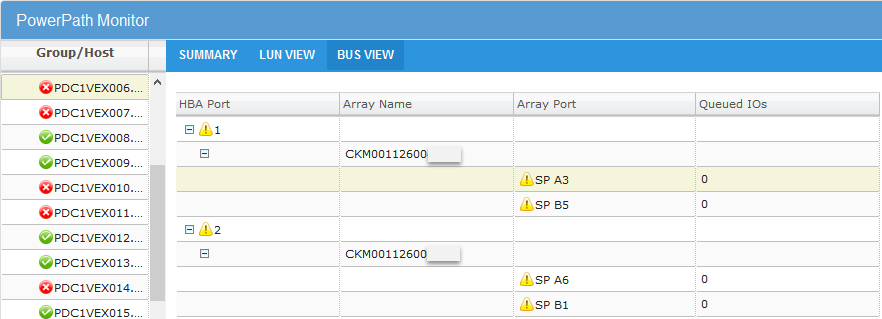
- PowerPath Monitor > Group/Host > BUS view shows the association between HBA Ports > Array > Array Ports along with the IOs queued for the bus.
- EMC PowerPath Virtual Appliance capabilities available as a plug-in for VMware vCenter: PowerPath Virtual Appliance supports script plugins on vSphere vCenter 5.5 and above (only vCenter Web Client is supported). vCenter plugin provides a minimal view of the PowerPath Virtual Appliance GUI. The script plugin is registered and enabled on the vCenter server. It can be accessed via the short cut “EMC PowerPath/VE License Manager” in vCenter web client. Only the details of ESXi hosts belonging to the current instance of vCenter are displayed.
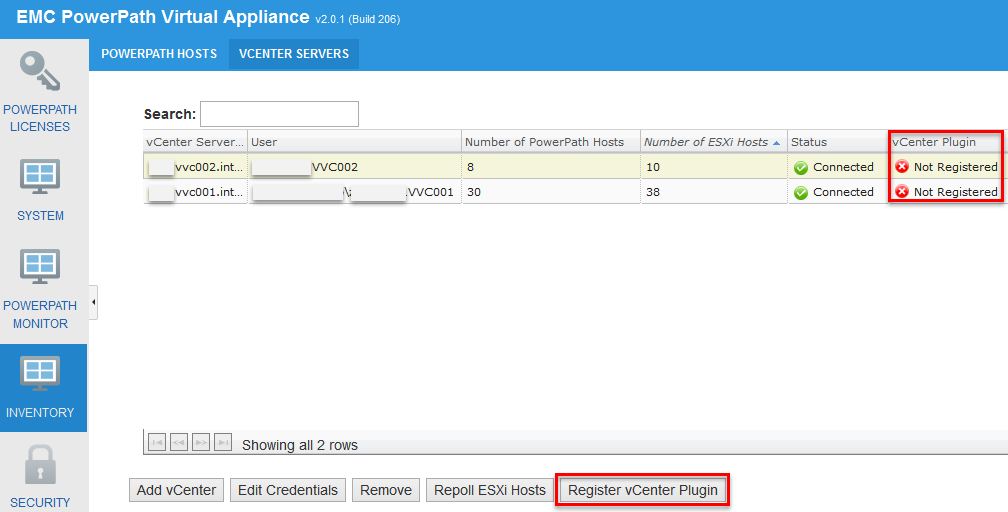
Registering EMC PowerPath vCenter Plugin:
- Click on Register vCenter Plugin;
- Accept vCenter Server certificate if required;
- By default script based plugins are disabled in vCenter Web Client. To enable script the plugin on vCenter server follow these steps:
- Edit the
webclient.properties file, and then append the following line at the end of the file (if not already added):
scriptPlugin.enabled = true
You can locate the webclient.properties file in the following locations of the vCenter server:
- On vCenter server 5.x:
- VMware vCenter Server Appliance:
/var/lib/vmware/vsphere-client
- Windows 2003:
%ALLUSERSPROFILE%Application DataVMwarevSphere Web Client
- Windows 2008/2012:
%ALLUSERSPROFILE%VMwarevSphere Web Client
- On vCenter server 6.0.x:
- VMware vCenter Server Appliance:
/etc/vmware/vsphere-client/
- Windows 2008/2012:
%ALLUSERSPROFILE%VMwarevCenterServercfgvsphereclient
- Restart the vSphere Web client service on the vCenter server.
- On Windows-based vCenter appliances, restart the service with name
vSphere Web Client
- On Linux-based vCenter appliances, run
/etc/init.d/vsphere-client restart
- Access the plugin after registering and enabling it. Use the short-cut, EMC PowerPath/VE License Manager, located in the vCenter Web client.
Note
If you use the default self-signed certificate of Virtual Appliance, open the PowerPath Virtual Appliance GUI in a new tab in order to accept the certificate before accessing plugin via the vCenter web client.
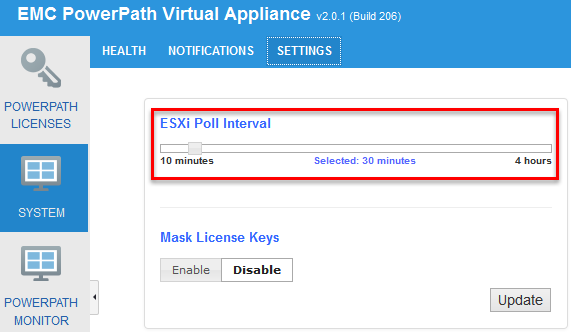
- Minimum configurable polling interval for PowerPath/VE changed to 10 minutes.
Navigate to System > Settings, adjust polling interval if required
- Added polling capability for PowerPath/VE 6.0 and later hosts – based on events.
- Direct upgrade support from EMC PowerPath Virtual Appliance 2.0.0.
See EMC PowerPath Virtual Appliance Upgrade from 1.2.x -> 2.0.0 and 2.0.0 to 2.0.1 for details.
- Added user interface enhancement for Context menu option in PowerPath Monitor tab for inventory management
- Enhanced back-up and restore capability of EMC PowerPath Virtual Appliance inventory.
The EMC PowerPath Virtual Appliance Installation and Configuration Guide provides more information.
- Added new fields in REST API response for host including:
- osVersion: Version of OS running on the host
- hostStateTimestamp: Time when the host state was updated in PowerPath Virtual Appliance
- deadPathCount: Total number of dead paths in the host
- totalPathCount : Total number of paths in the host
- totalVolumeCount : Total number of volumes in the host
- degradedVolumeCount: Total number of degraded volumes on the host
- Support for RTOOLS 6.0 SP1
- Queued IO count has been added in the response for Path REST API
Documentation:
Enjoy!
This article covers EMC® PowerPath® Virtual Appliance upgrade from 2.0.0 to 2.0.1. Please refer to “HOW TO: Upgrade EMC PowerPath Virtual Appliance” article for the upgrade from EMC® PowerPath® Virtual Appliance 1.2.x.
- Download EMC® PowerPath® Virtual Appliance upgrade package from EMC Online Support portal:
- Shutdown PowerPath Virtual Appliance and:
- Take a snapshot;
- Add a new 10 GB disk from storage to PowerPath Virtual Appliance (VM). It is recommended that you increase the size of root file system in case of upgrade from PowerPath Virtual Appliance 2.0.0
- Power on PowerPath Virtual Appliance;
- SSH to EMC PowerPath Virtual Appliance, login as
root and follow this procedure to extend the root file system:
-
epp001:~ # df
Filesystem                  1K-blocks    Used Available Use% Mounted on
rootfs                        3853936 1652176   2000852  46% /
udev                          2028592     108   2028484   1% /dev
tmpfs                         2028592       0   2028592   0% /dev/shm
/dev/mapper/systemVG-LVRoot   3853936 1652176   2000852  46% /
/dev/mapper/systemVG-LVswap   6094400  143484   5636344   3% /swap
/dev/sda1                      165602   24037    133015  16% /boot
-
epp001:~ # cat /proc/partitions
major minor  #blocks  name
8        0   10485760 sda
8        1     171012 sda1
8        2   10311680 sda2
8       16   10485760 sdb
253        0    6291456 dm-0
253        1    4018176 dm-1
-
epp001:~ # ls -l /sys/class/scsi_host
total 0
lrwxrwxrwx 1 root root 0 Oct 29 12:18 host0 -> ../../devices/pci0000:00/0000:00:10.0/host0/scsi_host/host0
lrwxrwxrwx 1 root root 0 Oct 29 12:18 host1 -> ../../devices/pci0000:00/0000:00:07.1/ata2/host1/scsi_host/host1
lrwxrwxrwx 1 root root 0 Oct 29 12:18 host2 -> ../../devices/pci0000:00/0000:00:07.1/ata3/host2/scsi_host/host2
-
epp001:~ # echo "- - -" > /sys/class/scsi_host/host0/scan
This command is used to rescan scsi host. E
-
epp001:~ # cat /proc/partitions
major minor  #blocks  name
8        0   10485760 sda
8        1     171012 sda1
8        2   10311680 sda2
8       16   10485760 sdb
253        0    6291456 dm-0
253        1    4018176 dm-1
-
epp001:~ # fdisk -l /dev/sdb

Disk /dev/sdb: 10.7 GB, 10737418240 bytes
255 heads, 63 sectors/track, 1305 cylinders, total 20971520 sectors
Units = sectors of 1 * 512 = 512 bytes
Sector size (logical/physical): 512 bytes / 512 bytes
I/O size (minimum/optimal): 512 bytes / 512 bytes
Disk identifier: 0x00000000

Disk /dev/sdb doesn't contain a valid partition table
-
epp001:~ # vgdisplay
  --- Volume group ---
  VG Name               systemVG
  System ID
  Format                lvm2
  Metadata Areas        1
  Metadata Sequence No  4
  VG Access             read/write
  VG Status             resizable
  MAX LV                0
  Cur LV                2
  Open LV               2
  Max PV                0
  Cur PV                1
  Act PV                1
  VG Size               9.83 GiB
  PE Size               4.00 MiB
  Total PE              2517
  Alloc PE / Size       2517 / 9.83 GiB
  Free  PE / Size       0 / 0
  VG UUID               RHiVZ9-cqSo-srmH-NGZs-zm4W-rAAm-fLeC15
-
epp001:~ # vgextend systemVG /dev/sdb
No physical volume label read from /dev/sdb
Physical volume "/dev/sdb" successfully created
Volume group "systemVG" successfully extended
-
epp001:~ # vgdisplay
--- Volume group ---
VG Name               systemVG
System ID
Format                lvm2
Metadata Areas        2
Metadata Sequence No  5
VG Access             read/write
VG Status             resizable
MAX LV                0
Cur LV                2
Open LV               2
Max PV                0
Cur PV                2
Act PV                2
VG Size               19.83 GiB
PE Size               4.00 MiB
Total PE              5076
Alloc PE / Size       2517 / 9.83 GiB
Free  PE / Size       2559 / 10.00 GiB
VG UUID               RHiVZ9-cqSo-srmH-NGZs-zm4W-rAAm-fLeC15
-
epp001:~ # lvextend -L +5GB /dev/systemVG/LVRoot
Extending logical volume LVRoot to 8.83 GiB
Logical volume LVRoot successfully resized
-
epp001:~ # resize2fs /dev/systemVG/LVRoot
resize2fs 1.41.9 (22-Aug-2009)
Filesystem at /dev/systemVG/LVRoot is mounted on /; on-line resizing required
old desc_blocks = 1, new_desc_blocks = 1
Performing an on-line resize of /dev/systemVG/LVRoot to 2315264 (4k) blocks.
The filesystem on /dev/systemVG/LVRoot is now 2315264 blocks long.
-
epp001:~ # df
Filesystem                  1K-blocks    Used Available Use% Mounted on
rootfs                        8884968 1653164   6771068  20% /
udev                          2028592     108   2028484   1% /dev
tmpfs                         2028592       0   2028592   0% /dev/shm
/dev/mapper/systemVG-LVRoot   8884968 1653164   6771068  20% /
/dev/mapper/systemVG-LVswap   6094400  143484   5636344   3% /swap
/dev/sda1                      165602   24037    133015  16% /boot
- Upgrade EMC PowerPath Virtual Appliance:
- Upload ‘
applianceUpdate.zip‘ to a directory on Virtual Appliance VM, /tmp for example;
- SSH into the PowerPath Virtual Appliance VM, login as root;
- Unzip the upgrade package:
epp001:~ # cd /tmp
pdc1epp001:/tmp # unzip applianceUpdate.zip
Archive: applianceUpdate.zip
  creating: applianceUpdate/
 inflating: applianceUpdate/preUpdate.sh
 inflating: applianceUpdate/postUpdate.sh
{skipped}
- Run
epp001:/tmp # cd applianceUpdate
epp001:/tmp/applianceUpdate #
- Run
epp001:/tmp/applianceUpdate # /bin/bash applianceUpdate
14:19:23 [INFO]: * Starting the appliance update process *
14:19:23 [INFO]: Updating PowerPath: 2.0.0.0.86 -> 2.0.1.0.206
14:19:23 [INFO]: Logs can be found here:
14:19:23 [INFO]: /opt/ADG/update/logs/update-2.0.0.0.86-2.0.1.0.206-2015_10_29-14_19_23.log
14:19:23 [INFO]: * Validating update *
14:19:24 [INFO]: Checking installed product version ...
14:19:24 [INFO]: Product version check is successful.
14:19:24 [INFO]: Adding update repo ...
14:19:24 [INFO]: Update repo added successfully.
14:19:24 [INFO]: Checking OS version ...
14:19:24 [INFO]: OS version check is successful.
14:19:24 [INFO]: Update validation successful.
14:19:24 [INFO]: * Starting Update *
14:19:24 [INFO]: * Running pre-update script *
14:19:56 [INFO]: Updating the existing packages. This may take some time. Please wait ...
14:21:15 [INFO]: Update of existing packages completed.
14:21:15 [INFO]: Installing new packages. This may take some time. Please wait ...
14:21:17 [INFO]: Installation of new packages completed.
14:21:17 [INFO]: Updating the product version to 2.0.1.0.206 ...
14:21:17 [INFO]: * Running post-update script *
14:21:19 [INFO]: * COMPLETE: Appliance update completed successfully *
- Reboot the PowerPath Virtual Appliance:
epp001:/tmp/applianceUpdate # reboot
Broadcast message from root (pts/0) (Thu Oct 29 14:22:27 2015):
The system is going down for reboot NOW!
- Log in to EMC PowerPath Virtual Appliance, navigate to System / Health and check all services are running.
Hope this will help.
What is EMC® Secure Remote Services (ESRS)?
EMC® Secure Remote Services (ESRS) is a two way remote connection between EMC Customer Service and your EMC products and solutions, available with Enhanced or Premium warranties and maintenance agreements at no additional cost. ESRS maintains connectivity with your EMC products around the clock and automatically notifies EMC if a problem or potential problem occurs. If troubleshooting is necessary, an authorized and authenticated EMC Customer Service professional uses the secure connection to establish a remote session based on your customized security and remote access settings to diagnose, and if necessary, to repair your EMC products and solutions. If unexpected issues arise, our proven processes ensure the fastest possible response, escalation, and resolution time to maximize information availability and reduce your costs. ESRS also connects you with EMC’s Big Data and predictive analytics capabilities, arming you with actionable intelligence to optimize your IT environment and your business.
As of ESRS v. 3.0.4, ESRS IP gateway and, ESRS Policy Manager (optional) are customer installable!
Please refer to the following articles for the information on how to deploy or upgrade Windows based ESRS IP Gateways to ESRS Virtual Edition / Virtual Appliances:
OK, let’s go through the EMC SRS Virtual Edition upgrade:
N.B. I am using screenshots from the 3.04–>3.06 upgrade. ESRS v. 3.08 was released on the 18th of September. UPDATE: ESRS v. 3.10 released on the the 14th of December.
Please make sure you take a snapshot of the Virtual Appliance before you proceed with the upgrade!
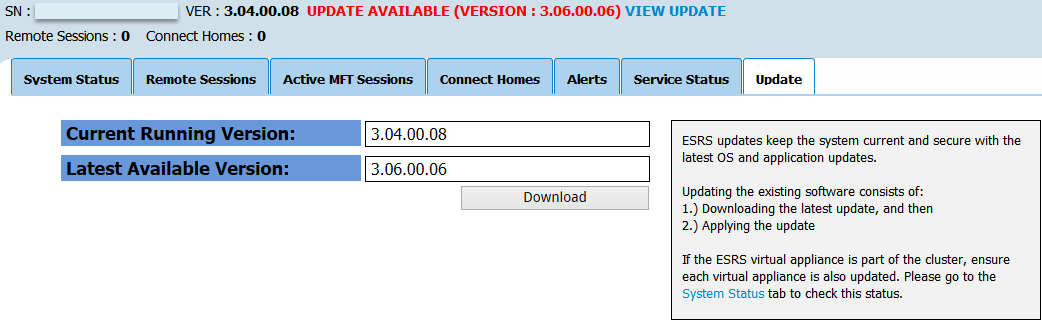
Login to ESRS VE VA, you will notice the message that the UPDATE is AVAILABLE, click on the View Update link:
This will bring you to the following screen, click on Download button to download the latest ESRS software update:
Wait for the download to finish:

Depending on the speed of your Internet connection, you may get the following message:
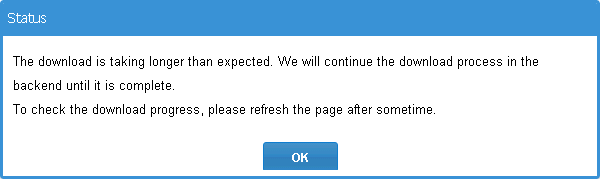
Refresh the web page or click through the tabs. The new new version will be available for the installation.
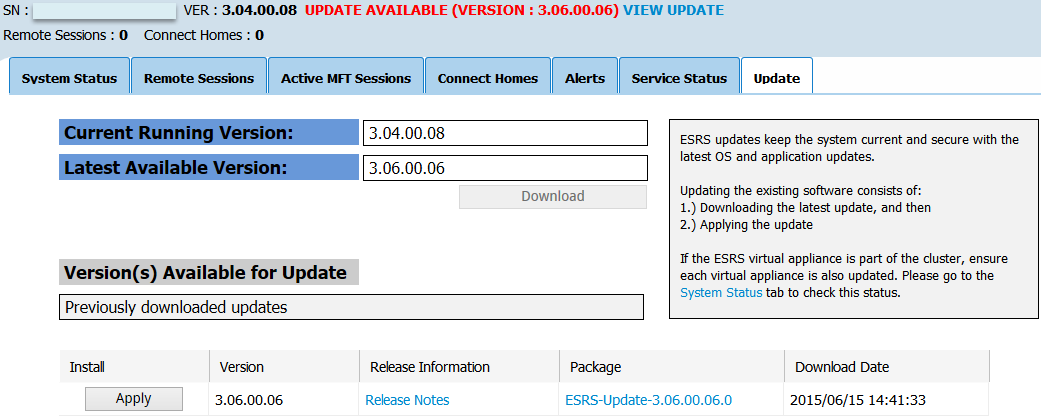
Click Apply and Yes, Apply Update to commence the update.
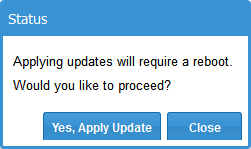

Open ESRS VE VA’s console and wait for the update to finish. Login to the web interface https://ESRS_VE_VA_nameor_IP:9443, confirm the running version, Service Status and System Status.
If you have ESRS VE configured as a cluster, update the second appliance as well.
Hope this will help.
I am upgrading NSX Manager from 6.1.4 to 6.2 in the environment with two vCenters configured in Linked Mode.
When NSX Manager was upgraded in one of them and vCenter Web Client service restarted, I logged back to the Web Client to proceed with the upgrade. Both NSX Managers were visible and correct versions were displayed. Upon navigating to Networking & Security / Installation / Management, the list of NSX Controllers could not be fetched and the following error was displayed:
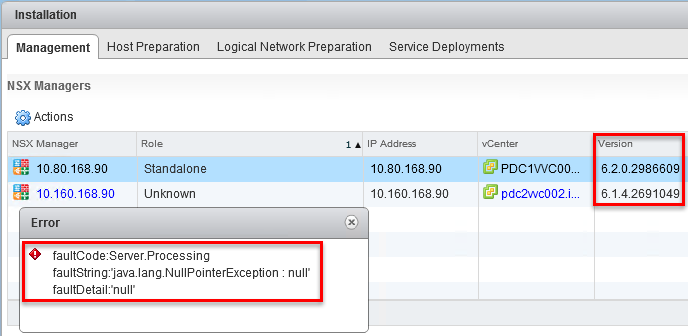
“faultCode:Server.Processing faultString:’java.lang.NullPointerException : null’ faultDetail:’null’”
Suspecting there may be a compatibility issue between the new NSX Manager Web Client extension and the old version, I tried to restart vCenter Web Client service on the vCenter where NSX Manager was not upgraded yet but it did not help.
To proceed with the upgrade I stopped the NSX Management Service on the second vCenter and re-lauched Web Client.
As suspected, Web Client successfully discovered one NSX Manager and all three NSX Controllers.

Click on the Upgrade Available to upgrade NSX Controllers.
Hope this will help.
I’m trying to install VMware vSphere ESXi 5.5 on Cisco UCS C220 M3 server. The local storage is Cisco Flexible Flash (FlexFlash) internal 32GB SD Card.
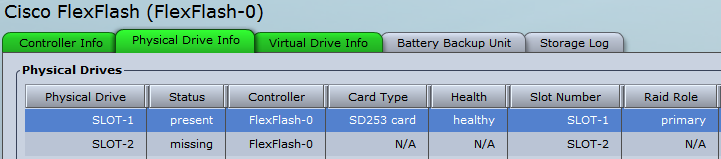
I repartitioned the whole SD card as one HV (Hypervisor) bootable 29GB partition:

Please refer to ‘Cisco FlexFlash: Use and Manage Cisco Flexible Flash Internal SD Card for Cisco UCS C-Series Standalone Rack Servers’ for details how to configure and use internal SD cards.
During VMware vSphere ESXi 5.5 installation, the installer sees local 29GB partition:
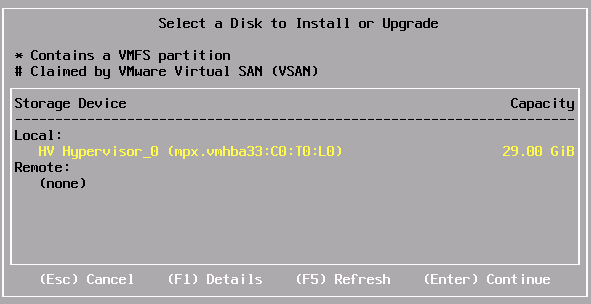
Select language, root password and when I press F11 to Install, it gives the following error:
This program has encountered an error:
partedUtil failed with message: Error: Can’t have a a partition outside the disk!
Unable to read partition table for device
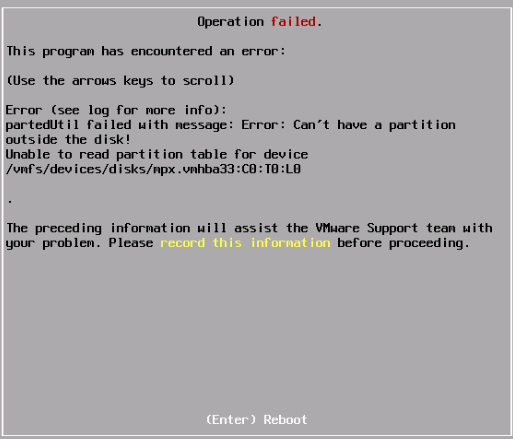
VMware Knowledge Base Article “Formatting LUN as VMFS 5 fails with the error: Can’t have a partition outside the disk! (2082806)” suggests that the Device/LUN already has a partition configured. To resolve this issue, you need to create a normal MS-DOS partition (I guess ANY partition that can be deleted by the Installer) on the affected disks using partedUtil utility. There is no need to map/attach the LUN/SD to another host, you can press ALT-F1, open the DCUI and run partedUtil utility. Unfortunately, it did not work for me.
The workaround is to install VMware vSphere ESXi 5.5 Update 1 and then either upgrade the host with vCenter Update Manager or install install ESXi 5.5 Update 2 for a clean installation.
Many thanks to malabelle on VMware Community forum for suggesting the workaround.
PS I also tried to use ESXi 6.0 installer but got the same error message. It must be one of these scenarios where you better go back than forward…
PPS This issue has been recorded as a bug by Cisco: Unable to install ESXi 5.5 U2 on UCS FlexFlash
|
Subscribe to Blog via Email
Join 169 other subscribers
|
Recent Comments