The EMC Virtual Storage Integrator (VSI) for VMware vSphere Web Client is a plug-in for VMware vCenter. It enables administrators to view, manage, and optimize storage for VMware ESX/ESXi servers and hosts and then map that storage to the hosts.
VSI consists of a graphical user interface and the EMC Solutions Integration Service (SIS), which provides communication and access to the storage systems.
Depending on the platform, tasks that you can perform with VSI include:
- Storage provisioning
- Setting multipathing policies
- Cloning
- Block deduplication
- Compression
- Storage mapping
- Capacity monitoring
- Virtual desktop infrastructure (VDI) integration
- Data protection using EMC AppSync or EMC RecoverPoint
Using the Solutions Integration Service, a storage administrator can enable virtual machine administrators to perform management tasks on a set of storage pools.
Some light reading and the OVA package:
- VSI for VMware vSphere Web Client 6.6.3 Release Notes
- VSI for VMware vSphere Web Client 6.6.3 Product Guide
- Virtual Storage Integrator (VSI) Storage Management Simple Support Matrix
- VSI for VMware vSphere Web Client 6.6.3
OK, let’s discuss the upgrade procedure! Well, it is not actually an upgrade (not an in-place upgrade) but rather a database backup, deployment of the new version and then the DB restore (migration).
I am going to upgrade VSI for VMware vSphere Web Client from 6.4.1.1 to 6.6.3.
Note: For migration from VSI 6.1 only: A known limitation causes the migration of VMAX storage systems from 6.1 to 6.6 to fail. Before creating a backup of the existing database, the storage administrator must delete all VMAX storage systems and then re-register them and the VMAX users after the upgrade.
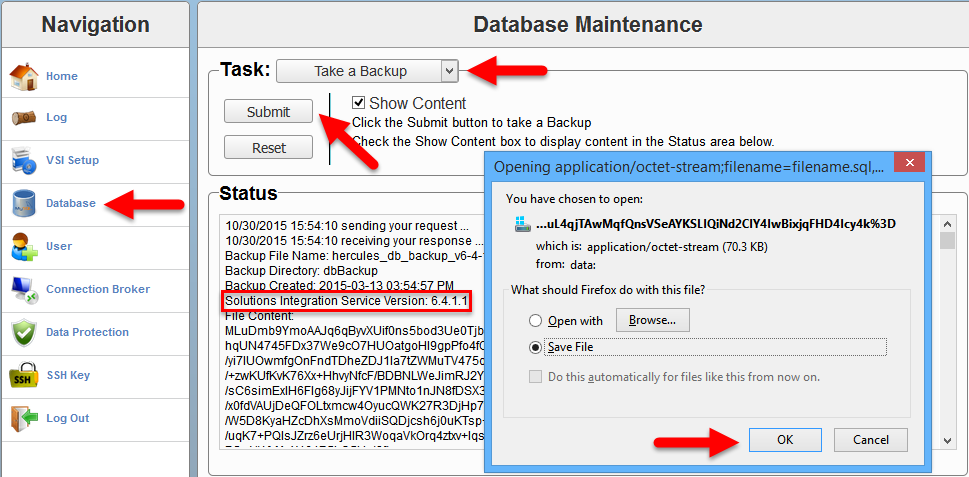
- Log in to your current version of the Solutions Integration Service
https://<SIS IP Address>:8443/vsi_usm/, click Database and select Take a Backup from the Task drop-down and click Submit to create a backup file of the existing database, and save the backup to a secure location.
- Deploy the new Solutions Integration Service .
I will actually power the existing VA off and rename it as the new VA will have the same VM name and be running in the same cluster.- Deploy EMC Solutions Integration Service OVA file;
- Power On virtual machine with EMC Solutions Integration Service and wait for the deployment to finish;
- Log in to the new Solutions Integration Service as
admin/ChangeMe(see Default Password for details) and change the default password;
https://<SIS IP Address>:8443/vsi_usm/There is no need to configure the EMC SIS, the configuration will be restored from the DB backup
-
Just to be safe, log in to the new Solutions Integration Service, click Database and select Take a Backup to create a backup of the new Solutions Integration Service database, and save the backup to a secure location.
- Log in to the new Solutions Integration Service, click Database and select Data Migration from the Task drop-down menu. Click Choose File and locate the database backup of the previous version. Click Submit.
It should not matter but in my environment the Data Migration did not work in Mozila FireFox 41.0.2 but worked in Internet Explorer 11.
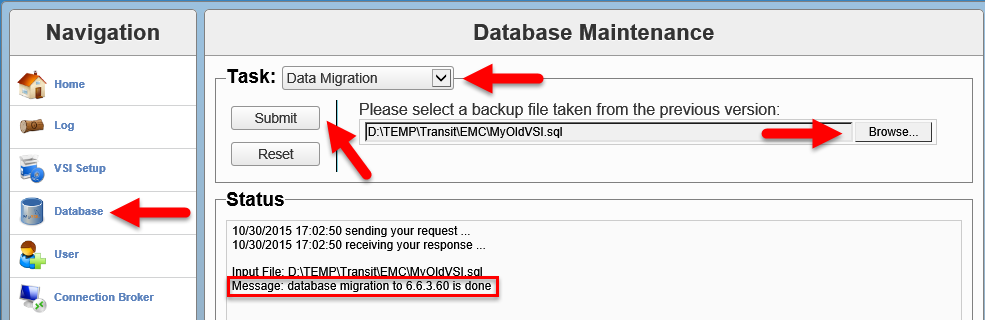
- If the migration is successful, all Solutions Integration Service data for the previous version are moved to the new version, including users, storage systems, and access control information.
If you changed VM name (host name), deactivate the previous version of the Solutions Integration Service.
Follow Step 8. - If the migration fails:
a. Restore the new Solution Integration Service database from the backup file you created in step 4.
b. Manually provision all required elements. - Register the VSI plug-in with vCenter:
- Log in to the new Solutions Integration Service
https://<SIS IP Address>:8443/vsi_usm/admin - Click VSI Setup;
- Enter the values for the following parameters and click Register.
- vCenter IP/Hostname: The IP address that contains the VSI plug-in package.
This is the IP address of the vCenter to which you are registering the VSI plug-in. If you are using the vCenter hostname, ensure that DNS is configured. - vCenter Username: The username that has administrative privileges.
- vCenter Password: The administrator’s password.
- Admin Email (Optional): The email address to which notifications should be sent.
- vCenter IP/Hostname: The IP address that contains the VSI plug-in package.
- If the registration was successful, the following will be displayed in the Status window:
10/30/2015 17:23:12 sending your request ...
10/30/2015 17:23:21 receiving your response ...

The operation was successful.

Registered VSI Plugin:
Key: com.emc.vsi.plugin
Version: 6.6.3.39
Name: EMC VSI Plugin
Description: Integrated management support for EMC storage systems
Admin Email: none
- Browse to the vSphere Web Client address.
After you log in, the VSI plug-in is downloaded and deployed.
Note: The download takes several minutes.
If you have installed previous versions of the VSI plug-in, clear your browser cache to ensure that you use the newest version of VSI.
- Log in to the new Solutions Integration Service
Hope this will help.
Recent Comments