|
|
Cisco UCS Manager certificate expired and we had to re-generate it. See my ‘HOW TO: Regenerate expired UCS Manager certificate‘ blog post for details.
How to replace UCS certificate that was imported into UIM/P?
Well, in UIM/P 3.2 it is dead easy:
 cd /opt/ionix-uim/tools
 ./importUcsCertificate.pl
enter UCS IP address and UIM/P will do the rest. See full output on the “Install and configure EMC UIM/P” blog post, step 8.4.2.
As one of my UIM/P’s is still on 3.1.1, I had to upload new UCSM certificate and install it again:
Upload new UCM certificate to ‘/opt/ionix-uim/conf/CA’ folder and run the following command:
vim001:/opt/ionix-uim/conf/CA # openssl x509 -inform DER -in DC1-VFC01.der -out DC1-VFC01.crt
vim001:/opt/ionix-uim/conf/CA # ./cert_hash.pl
Installing:DC1-VFC01.crt....
Installing:UCSM.crt....
Installing:voyenceca.crt....

You must now restart device services to reload the certificate cache.
Please make sure there are no provisioning or other tasks running and
then issue this command:
service uim-device-services restart

vim001:/opt/ionix-uim/conf/CA #  service uim-device-services restart
Stopping uim-device-services                                done
Starting uim-device-services
Device Master Service started
Device Service started                                      done
I tried to discover Vblock in UIM/P but it failed:
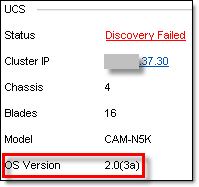
I noticed that two things were not just right. First, UCS software version was not correct. Since this Vblock was discovered, we upgraded USC Manager to 2.0(4b) in line with VCE Support Matrix 3.0.8. and the second is that both, old and new certificates were imported:
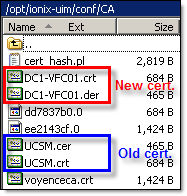
vim001:/opt/ionix-uim/conf/CA # ./cert_hash.pl
Installing:DC1-VFC01.crt....       - new certificate
Installing:UCSM.crt....         - old certificate
Here is the content of ‘/opt/ionix-uim/conf/CA’ folder – both certificates are still there:
The solution is simple – delete old certificate from ‘/opt/ionix-uim/conf/CA’ and run ‘./cert_hash.pl’ again:
UPDATE courtesy of Ziggy: Sometimes it might be necessary to delete *.0 files as well.
pdc1vim001:/opt/ionix-uim/conf/CA # ./cert_hash.pl
Installing:DC1-VFC01.crt....
Installing:voyenceca.crt....

You must now restart device services to reload the certificate cache.
Please make sure there are no provisioning or other tasks running and
then issue this command:
service uim-device-services restart

pdc1vim001:/opt/ionix-uim/conf/CA # service uim-device-services restart
Stopping uim-device-services                                done
Starting uim-device-services
Device Master Service started
Device Service started                                      done
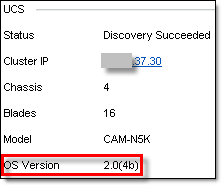
Vblock discovery was successful and the UCS OS version is correct as well:
Hope this will help.
By default certificates are tied to the exact server name they are created for. Which is normally the FQDN of the server. If you create a certificate for the server myserver.vstrong.info and then connect to it by the short name myserver / MyServer or by any other DNS aliases, the certificate will not be seen as a trusted certificate. There is a way to get all aliases included in the certificate.
In order to create a certificate you need an application that can generate certificate request and then send it to the Certification Authority (CA) for signing.
One of the easiest application that can gererate certificate request is OpenSSL. Download and install OpenSSL from this link http://slproweb.com/products/Win32OpenSSL.html
I will be installing OpenSSL on 64-bit OS, so lets download Win64 OpenSSL v1.0.1e Light and its pre-requisite Microsoft Visual C++ 2008 Redistributible (x64).
Installation is straightforward, accept the defaults and select Copy OpenSSL DLLs to The OpenSSL binaries (/bin) directory. Please donate generously!
By default, OpenSSL looks for a configuration file in the user’s local profile directory:
C:OpenSSL-Win64bin>openssl
WARNING: can't open config file: /usr/local/ssl/openssl.cnf
OpenSSL> exit
Run the following SET command to specify the configuration file:
SET OPENSSL_CONF=C:OpenSSL-Win64binopenssl.cfg
Before we create any certificates, lets make a backup of the default OpenSSL configuration file and pre-configure default information that will be applicable to all certificates that we are going to create:
[ req_distinguished_name ]
countryName         = Country Name (2 letter code)
countryName_default = UK

stateOrProvinceName         = State or Province Name (full name)
stateOrProvinceName_default = Greater London

localityName         = Locality Name (eg, city)
localityName_default = London

0.organizationName         = Organization Name (eg, company)
0.organizationName_default = vStrong.info

organizationalUnitName         = Organizational Unit Name (eg, section)
organizationalUnitName_default = IT
By default, OpenSSL create 1024 bit certificate request. You you need stronger certificate, you can do either of these:
- Edit openssl.cfg and amend the following line:
[ req ]
default_bits        = 1024
- Add this command when you run openssl:
-newkey rsa:4096
What about the aliases?
Find the [ req ] section and add/un-comment the following line:
req_extensions = v3_req
Find the [ v3_req ] section and add a new subjectAltName line and list all DNS aliases as in this example:
subjectAltName = "DNS:server001.vstrong.info, DNS:server001, DNS:SERVER001.VSTRONG.INFO, DNS:SERVER001, DNS:CITRIX, DNS:citrix, DNS:10.10.100.150"
As you can see, I added lower- and uppercase, short and FQDN server name, two aliases, ‘CITRIX’ and ‘citrix’. You can also add an IP address of the server or device. I find it quite useful as sometimes IP address is easier to remember.
Lets generate the certificate request!
Open Windows Command Prompt, navigate to the the directory where you installed OpenSSL and run the following:
openssl req -new -nodes -keyout server001.key -out server001.csr
There will be a series of questions. Answer each question and make note of the challenge password; it will be needed later in the process.
The certificate creation process will create 2 files:
- *.crt – the CSR that will be signed by the Certificate Authority to create the final certificate
- *.key – the private key in PEM format
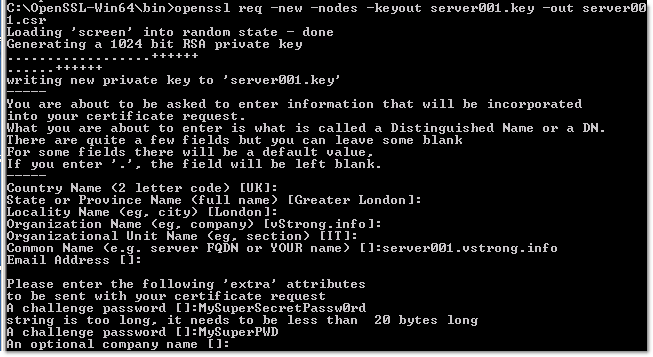
C:OpenSSL-Win64bin>openssl req -new -nodes -keyout server001.key -out server001.csr
Loading 'screen' into random state - done
Generating a 1024 bit RSA private key
..................++++++
......++++++
writing new private key to 'server001.key'
-----
You are about to be asked to enter information that will be incorporated
into your certificate request.
What you are about to enter is what is called a Distinguished Name or a DN.
There are quite a few fields but you can leave some blank
For some fields there will be a default value,
If you enter '.', the field will be left blank.
-----
Country Name (2 letter code) [UK]:
State or Province Name (full name) [Greater London]:
Locality Name (eg, city) [London]:
Organization Name (eg, company) [vStrong.info]:
Organizational Unit Name (eg, section) [IT]:
Common Name (e.g. server FQDN or YOUR name) []:server001.vstrong.info
Email Address []:

Please enter the following 'extra' attributes
to be sent with your certificate request
A challenge password []:MySuperSecretPassw0rd
string is too long, it needs to be less than  20 bytes long
A challenge password []:MySuperPWD
An optional company name []:
Signing the request
You must sign the request with Microsoft Active Directory Certificate Services.
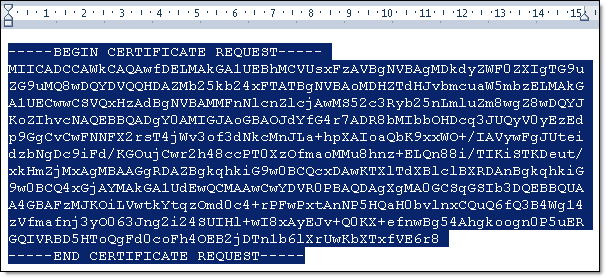
- Open server001.csr with Wordpad (to preserve the formatting) and copy the contents onto the clipboard (Edit > Select all; Edit > Copy).
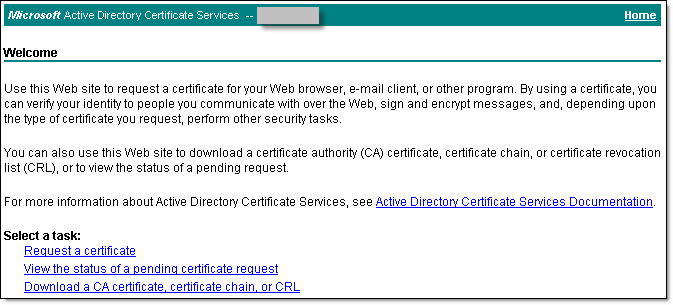
- In Internet Explorer, navigate to the Microsoft CA server.
Enter the following URL:
http://<CA_server_IP_address>/certsrv
The Certificate Services applet starts.
- On the Welcome screen, below the Select a task heading, select Request a certificate.
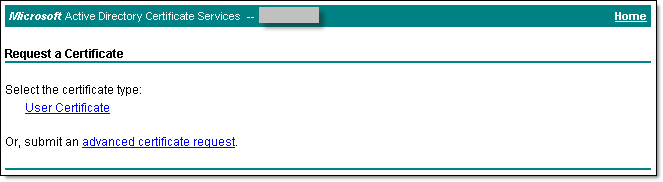
- The Request a certificate page displays. Select advanced certificate request
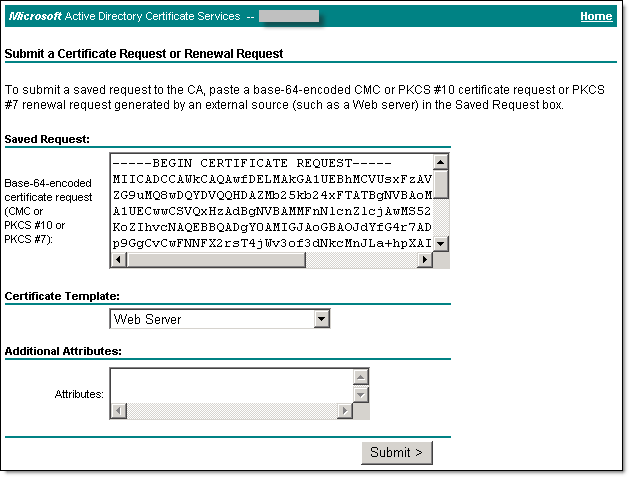
- On the Advanced Certificate Request screen, select Submit a certificate request by using a base-64-encoded CMC.
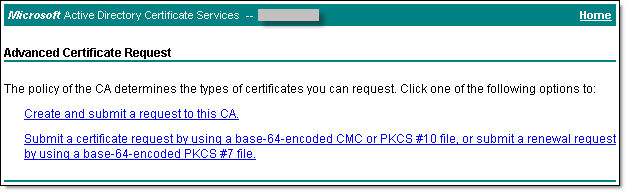
The Submit a Certificate Request or Renewal Request screen displays.
- On the Submit a Certificate Request or Renewal Request screen, paste the content of the server001.csr file (previously placed on the clipboard), in the Certificate Template drop down window select Web Server or other appropriate to your needs template and click Submit.
- The certificate is issued and the Certificate Issued screen displays.
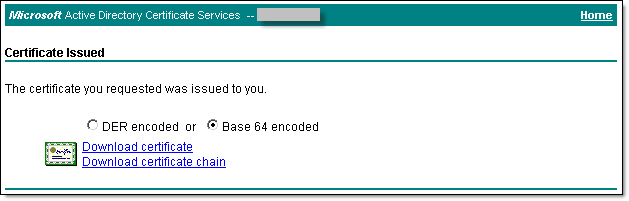
- Select the Base 64 encoded radio button and then select Download certificate. Save the certificate as server001.cer to your desktop.
- Lets confirm the certificate includes the server aliases:

Hope this will help.
After RecoverPoint upgrade, both vCenters were not available in the RecoverPoint Management Console. When I tried to re-add vCenter, it failed with the error message “Operation Failed. Error: Invalid port or Certificate“.
I checked the user can access vCenter and the account is not locked out etc. If I remember correctly, it was not necessary in previous version of RPA (3.4 SP3) to specify vCenter server certificate file but after upgrade to 3.5 SP1 P1, it did not work without the certificate at all.
Here is what you can do to troubleshoot the issue:
- Check vCenter is listening on port 443. I would be surprised if it would not…
netstat -an | find "vCenterIPaddress:443"
- Check vCenter can ping RPA Cluster IP;
- Make sure RPA can ping vCenter IP address:
- SSH to RecoverPoint cluster IP address;
- Login as ‘
boxmgmt‘ user with password ‘boxmgmt‘ and run PING command from following menu options:
** Main Menu **
 [2] Setup
 [8] Advanced options
 [6] System internal operations
 [2] Run internal command
 This is the list of commands you are allowed to use: switch_utils netstat ethtool date telnet ping ssh top
 Enter internal command:
 ping vCenterIPaddress
- When you configure vCenter Server in RecoverPoint Management Console, you must to use vCenter server certificate which can be found in the following directory on the vCenter server:
Windows Server 2003: C:Documents and SettingsAll UsersApplication DataVMwareVMware VirtualCenterSSLrui.crt
Windows Server 2008: C:UsersAll UsersVMwareVMware VirtualCenterSSLrui.crt
You may need to copy the certificate file to the server where you running the RecoverPoint Management Application from or just browse for the certificate in the next step.
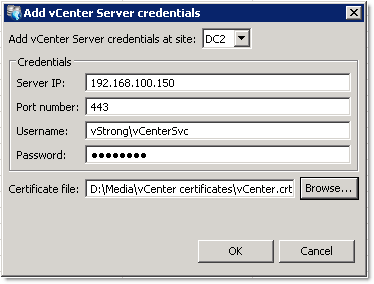
- Using the RecoverPoint Management Application, right-click vCenter Servers, select Add vCenter Server or Edit vCenter Server Credentials:
In the Credentials area specify the following:
Server IP: < vCenter IP address not the FQDN >
Port number: 443
 Username: < User must be able to login to vCenter >

Password: < The password >

Certificate file: < path to vCenter certificate file >
Again, I checked and double checked everything but it still did not work, same error message…
Well, I had to restart RecoverPoint Appliances one by one:
login as: boxmgmt
 Using keyboard-interactive authentication.
 Password:
 Loading RPA settings... done
 Initializing Installation Manager... done
 Installation Manager - RecoverPoint Version 3.5.SP1.P1(o.173) Site 2 RPA 1

** Main Menu **
 [1] Installation
 [2] Setup
 [3] Diagnostics
 [4] Cluster operations
 [5] Shutdown / Reboot operations
 [Q] Quit
 DC2 RPA1: 5

** Shutdown / Reboot operations **
 [1] Reboot RPA
 [2] Shutdown RPA
 [B] Back
 [Q] Quit
 DC2 RPA1: 1
 Reboot in progress, please wait.
After RPA reboot, I added vCenters without any problem.
I hope this will help.
By default, the password for EMC UIM/P sysadmin account is ‘sysadmin‘.
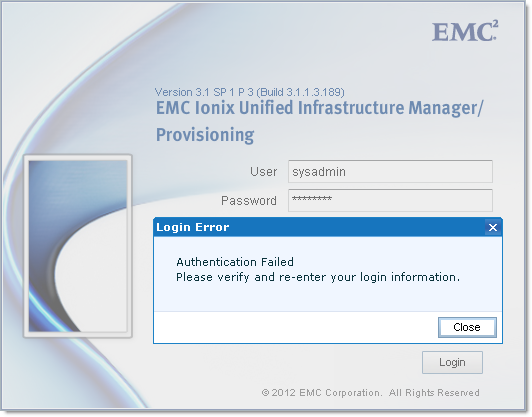
If, for whatever reason, it does not work, ssh or login to the console as root and reset sysadmin password:
login as: root
Using keyboard-interactive authentication.
Password:
Last login: Wed Feb 20 18:42:28 2013
uim001:~ # cd /opt/ionix-uim/tools
uim001:/opt/ionix-uim/tools # perl password-change.pl
+========================================================+
| Password Update Utility                                |
+========================================================+
| Available Commands:                                    |
|     [A]uto-Generate All Passwords                      |
|     [C]hange Single Password                           |
|     [S]ychronize from App Server                       |
|     [R]eset the 'sysadmin' account                     |
|     [Q]uit                                             |
+========================================================+
Command: R
The 'sysadmin' account has been reset.
Sysadmin password will be reset to ‘sysadmin‘.
What if you don’t remember the root password? Root password gets configured when you deploy UIM/P virtual appliance or, if you don’t remember what it is, follow these instructions to reset it:
- Power down UIM/P VA;
- Edit UIM/P VM settings;
- Options tab, under vApp Options select Properties;
- Edit root password and click OK;

- Power UIM/P VA back on.
Hope this will help.
EMC RecoverPoint might not be the equipment you login to every day and, unless you have meticulously documented RecoverPoint installation and config, you may find yourself in a situation when you cannot login to RecoverPoint. What if you 100% sure that the password you use is correct but it still does not work?
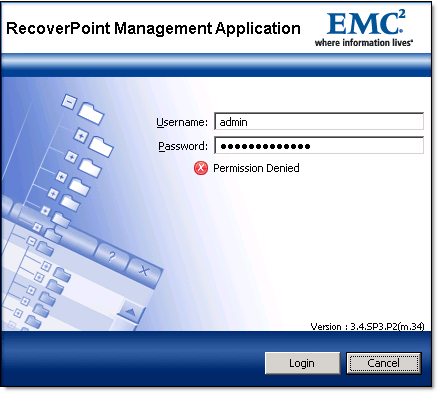
Well, there are several ways for you to re-gain access to RecoverPoint Management Application:
- It is a good practice to configure and use separate RP accounts for application like VMware SRM or Replication Manager. Check if you can login with one of those accounts and reset admin’s password. If it does not work – see next step.
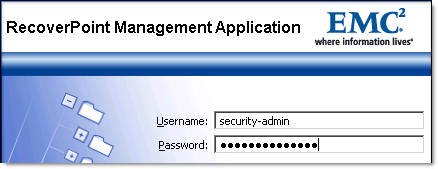
- Login as RecoverPoint
'security-admin'. The password is also 'security-admin'.
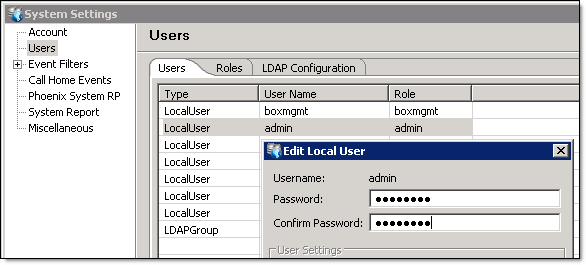
Navigate to System – System Settings – Users – admin, Edit and Change password, OK
- There might not be anything wrong with your
'admin' account’s password. It might be just locked…
- SSH to RecoverPoint and login as ‘security-admin’;
- Run ‘unlock_user’ command. Select the user you would like to unlock and press ENTER:
RP-DC1> unlock_user
Select user(s) to unlock:
1) admin
2) monitor
Select (separate with spaces if more than one), or press 'ENTER': 2
User unlocked successfully.
RP-DC1> unlock_user
Select user(s) to unlock:
1) admin
Select (separate with spaces if more than one), or press 'ENTER': 1
User unlocked successfully.
Hope this will help.
Disclaimer: These instructions are valid for RPA software version 3.4 (SP3) and might be different for other versions.
Trend Micro Deep Security 8.0 SP2 is now released and posted in the download center.
What’s New in Service Pack 2:
- Support for VMware ESXi 5.1 as well as ESXi 5.0
- Windows 8 / Server 2012 Support
- Real time notification from DSA to DSM on AM detection.
- Added a feature to send Anti-Malware detection events from the DSA/DSVA to the DSM in real-time, rather than on the next heart-beat.
- Ability to monitor the size of the rule configuration file that is sent from the DSM to the DSA/DSVA.
- Added Recommendation Scan functionality to the features available in the Web Services API.
- Added a feature to dsa_control to allow proxy support to the DSM.
- An enhancement to Anti-Malware scan on Windows DSA to ensure that when Write-Only mode is enabled that viruses are still detected.
- Added a DPI Rule option that allows directory traversal error checking to be disabled
- PAE support for RedHat 2.6.18 versions. (See the Red Hat Kernel Support document for a list of tested PAE kernels)
- DSVA default memory is now 2GB
- DSVA logs are now moved to the larger /var/opt partition instead of root partition.
- Set Date and Time is now an option on the System Configuration screen of the DSVA splash screen.
- Resolved issues from previous releases. Refer to readme files for more details.
File Location
Deep Security Manager: http://downloadcenter.trendmicro.com/index.php?regs=NABU&clk=latest&clkval=4315&lang_loc=1
Deep Security Agent, Relay and Notifier: http://downloadcenter.trendmicro.com/index.php?regs=NABU&clk=latest&clkval=4317&lang_loc=1
Deep Security Virtual Appliance and Filter Driver: http://downloadcenter.trendmicro.com/index.php?regs=NABU&clk=latest&clkval=4316&lang_loc=1
EMC released new software upgrade for VNXe series arrays
New features and changes
This release includes the following new features or platforms:
Self-encrypting drives
You can now purchase a VNXe system that supports Data at Rest Encryption through Self-Encrypting Drives (SEDs). This feature provides security for stored data when physical control of the drives is lost. All data on a SED is encrypted and requires a valid authentication key for access. The SED encryption/decryption process is transparent and automatic, with no noticeable performance impact.
Jobs
Some of the long running operations are now automatically set as jobs that run asynchronously in the background. This enables you to take control and continue working with the user interface while the job completes. A notification, similar to the alerts feature, appears when a job completes. At any given point, you can view the list of running, completed, or failed jobs by clicking the Jobs icon at the bottom of the screen.
Alert persistence
In earlier versions of VNXe, alerts were lost when the system failed over or restarted. Alerts now persist across system failovers and restarts.
ESRS alerts
VNXe now creates alerts when EMC Secure Remote Support (ESRS) is in an unhealthy state.
Technical advisories
Unisphere now includes a Technical Advisories page that enables you to view up-to-date, real time information, and advisories specific to your system from the knowledge base available on the EMC Online Support website.
Link to the EMC Store
Unisphere now includes a link to the new EMC Store website that offers you the ability to purchase additional storage, I/O modules, and software products quickly and easily. You can access the EMC Store website from the Support page in Unisphere and request a quote for disk drives, software, and other relevant components.
Note: The EMC Store website will be available in 2013.
Writable snapshots for VMware NFS-based datastores
You can now promote existing snapshots of VMware NFS-based datastores to snapshots that can be mounted with read-write access. Such promoted snapshots are also referred to as writable snapshots. Once promoted, a mount point (export path) is exposed in such a manner that the hosts configured for the storage resource can also access the snapshot through the mount point.
Reverse the order of a replication session
The System Replications page and the Replication Details page include the Pause and Resume buttons that enable you to pause and resume a replication session. At any given point in time, only one of the buttons appears on screen based on the state of the replication. You can now reverse the direction of a replication by failing over or switching over the session, and then clicking the Resume button in the System Replication page on the destination storage resource.
Microsoft Windows 8 and SMB 3.0 Support
VNXe now provides support for Microsoft Windows 8 and Server Message Block (SMB) 3.0 protocol. This includes support for continuous availability and CIFS encryption for hosts capable of using CIFS with SMB 3.0. Continuous availability includes several features, such as multi-network path access for the same session, synchronous writes to the backend, and enables applications to be less impacted during a CIFS server failure or recovery of application. CIFS encryption provides security to the data in-flight between the array and host.
Other features such as larger IO size, offload copy, parallel IO on same session, and directory leasing provide improvements to performance and user experience.
With continuous availability enabled, you can achieve a transparent server failover for implementations where the failover time is no longer than the application timeout. In such implementations, hosts can continue to access a CIFS resource without the loss of a CIFS session state, following a failover event.
Customizable Dashboard
The Unisphere dashboard is now customizable. You can now set up multiple tabs and multiple widgets in each tab. These widgets can contain the information you want to monitor, such as system health, capacity, and so on, or tasks that you perform frequently.
VMware SRM Support
VNXe now supports the use of VMware Site Recovery Manager (SRM) for VMware NFS datastores. This is achieved through the use of a Storage Replication Adapter (SRA) client introduced for VNXe systems. This will now enable you to view NFS replication statistics, create or manage writable snapshots for NFS-based datastores, and include additional options in the user interface for the replicated NFS datastores.
Note: The SRA client will be available once the VMware certification testing is completed.
New RAID configurations
VNXe now supports the following RAID configurations:
– RAID 5 (10+1) for SAS and NL-SAS disks
– RAID 6 (10+2) for NL-SAS disks

I could not access the CIMC of the Cisco UCS C210 M2 server and received a “Error 2001: Service unavailable” error message. All menus / options were also greyed out.

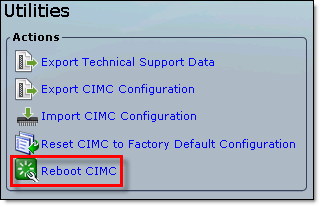
I tried to reboot CIMC (Admin tab, Utilities, Reboot CIMC) but it did not help.
According to Release Notes for UCS C-Series Software, Release 1.4(3), this issue has been resolved in v. 1.4.(3) and here is the workaround:
Symptom You are not able to access the CIMC page of the C210 M2 server and a “Error 2001: Service unavailable” error message is observed.
Workaround Perform the following steps:
Step 1 Reset CIMC to the factory default value. The UUID should display 000000.
Step 2 Change the system to ‘dedicated’ from ‘shared LOM’ so that it uses the same IP address.
Step 3 Reset CIMC.
Step 4 Reset BIOS to boot at Extensible Firmware Interface (EFI).
Step 5 Shut down and restart the server.(CSCtx42549)
You can use CIMC web interface to reset CIMC to Factory Default Configuration, but, as I was still getting “Error 2001: Service unavailable” error message, I had to do it through CLI.
After you reset the CIMC, you are logged off and must log in again. You may also lose connectivity and may need to reconfigure the network settings.
Procedure
- SSH to CIMC IP address;
- Enter the CIMC command mode
ServerName# scope cimc
- After a prompt to confirm, the CIMC resets to factory defaults
ServerName /cimc # factory-default
This operation will reset the CIMC configuration to factory default.
All your configuration will be lost.
Continue?[y|N]y
After factory reset, CIMC will have the following configuration:
- SSH is enabled for access to the CIMC CLI. Telnet is disabled;
- HTTPS is enabled for access to the CIMC GUI;
- A single user account exists (user name is admin, password is password);
- DHCP is enabled on the management port;
- The boot order is EFI, CDROM, PXE (using LoM), FDD, HDD;
- KVM and vMedia are enabled;
- USB is enabled. SoL is disabled.
The server I was working on had the CIMC v. 1.4(2) and therefore resetting CIMC to factory default settings did not resolve the problem.
I had to upgrade CIMC to v. 1.4(3p). Again, as the web interface was not working, I had to upgrade CIMC through CLI. See separate post ‘HOW TO: Upgrade Cisco UCS CIMC via CLI‘.
Hope this helps.
Prerequisites:
- SSH client. Putty, for example;
- TFTP server. 3CDaemon, for example;
- CIMC firmware upgrade file. Please check this blog post for the information how to download CIMC firmware.
Procedure:
- Upload CIMC firmware upgrade file ‘
upd-pkg-c200-m1-cimc.full.1.4.3p.bin‘ to the folder where TFTP server is distributing software from;
- SSH to CIMC IP address and change management mode to firmware, ‘
scope cimc/firmware‘
ServerName# scope cimc/firmware
- Download CIMC firmware upgrade file from TFTP server. It will be stored on CIMC as a Backup Version
 ServerName /cimc/firmware # update 10.129.1.184 /upd-pkg-c200-m1-cimc.full.1.4.3p.bin
 Firmware update has started.
 Please check the status using "show detail".
- The file is 16.4MB in size, please be patient and make sure it has been downloaded and CIMC is ready to activate new firmware.
You may need to run ‘show detail‘ command several times until you see ‘Update Stage: NONE‘ and ‘Update Progress: 100‘.
ServerName /cimc/firmware # show detail
Firmware Image Information:
    Update Stage: INSTALL
    Update Progress: 88
    Current FW Version: 1.4(2)
    FW Image 1 Version: 1.4(3p)
    FW Image 1 State: BACKUP INACTIVATED
    FW Image 2 Version: 1.4(2)
    FW Image 2 State: RUNNING ACTIVATED
    Boot-loader Version: 1.4(2).16

ServerName /cimc/firmware # show detail
Firmware Image Information:
    Update Stage: NONE
    Update Progress: 100
    Current FW Version: 1.4(2)
    FW Image 1 Version: 1.4(3p)
    FW Image 1 State: BACKUP INACTIVATED
    FW Image 2 Version: 1.4(2)
    FW Image 2 State: RUNNING ACTIVATED
    Boot-loader Version: 1.4(2).16
- Activate firmware image 1.
 ServerName /cimc/firmware # activate 1
 This operation will activate firmware 1 and reboot the BMC.
 Continue?[y|N]y
Hope this helps.
UIM/P GA on EMC website Nov 30th – VCE certification December 14, 2012
What is new in UIM/P 3.2?
- Full elastic capability
- Selectively decommission storage, servers
- Add/remove vNICs
- Expand block LUNs and concatenated meta volumes
- Concurrent provisioning
- Provisioning multiple services at the same time
- Perform multiple elastic operations at the same time
- vCenter “unsync”
- Detach a service from one vCenter and attach to a different one
- ESX 5.1 and vCenter 5.1 support
- New hardware support
- B200-M3 blades
- Cisco 1240, 1280 VICs
- VMAX 40k
- Solutions Enabler 7.4
- 5548UP/5596UP
- 2204XP/2208XP
- 6248UP/6296UP
- Infrastructure Configuration Analyzer
- Checks the Vblock system environment for any configuration issues
UIM/O GA on Dec 6th
What will be in UIM/O 3.2?
- Support for all of the new features of UIM/P
- More filter options when using SNMP and Syslog forwarding to enterprise monitoring tools
- Excel spreadsheet style filter
- Multiple criteria
- LDAP configuration changes
- Optional group attribute configurations
- Enhanced tooltips and online help
Download EMC UIM/P 3.2 documentation and software.
UPDATE:
19/12/2012 VCE released a new Certification Matrix 3.5.2 / 3.0.6 / 2.5.11 which supports EMC UIM/P 3.2 on Vblock 300 and 700 series.
|
Subscribe to Blog via Email
Join 169 other subscribers
|
Recent Comments