|
|
EMC UIM/P Shared Storage Service is the new type of service that allows you to create and share storage between multiple Standard Services.
For more in-depth information on the Shared Storage Service please refer to “EMC UIM/P (Nimbus) review” and “UIM/P 4.0 Release” posts.
ATTENTION! The initial release of UIM/P 4.0 had a serious bug! When performing a full decommission on a shared storage service, VMs and datastores were deleted from any attached standard services. This bug has been fixed in UIM/P 4.0 Patch 2. Make sure to upgrade UIM/P to the latest version.
In my environment I have two SSS (Shared Storage Services):
- Shared LUN to facilitate live VM migration (between pre vSphere 5.1 clusters)
- Shared Templates LUN
These shared datastores are attached to two clusters:
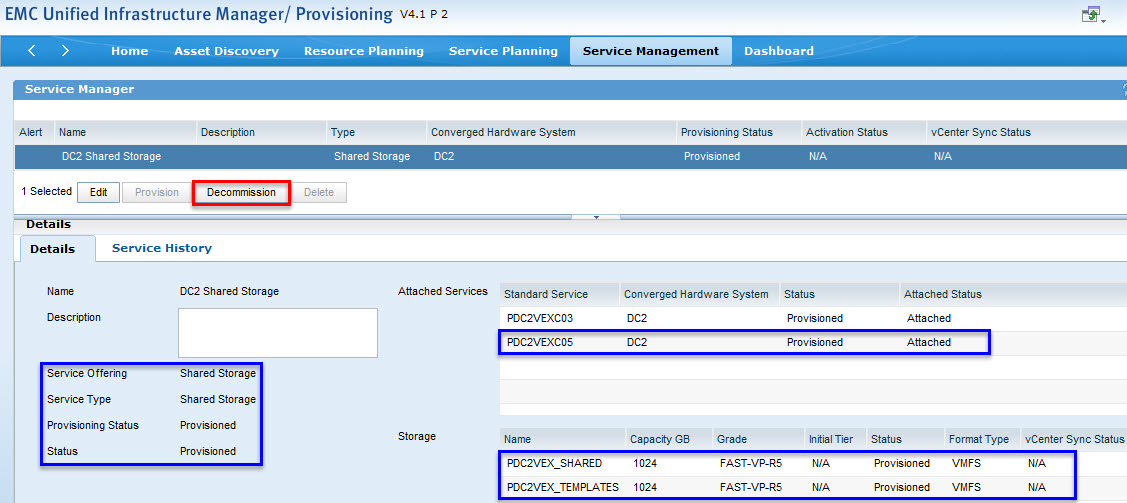
I would like to remove both datastores from PDC2VEXC05 cluster:
- Make sure the Storage I/O Control is disabled on these datastores:

BTW, this is required for decomissioning of datastores attached to the Standard services as well.
- Click Decommission…
Let’s just stop here for a second and discuss the options:
- Detach will remove the Datastore from Standard Service(s). The SS’ hosts will not be able to see it. The LUN will be removed from the hosts’s Storage Group. This process does not delete the data and, if the datastore is Attached to any other Standard Services, it will still be usable.
- Decommission will remove the shared datastore from Standard Services and delete the LUN.
- I would like to keep the shared datastores attached to the second Standard Service, therefore I will select Decommission/Detach Specific Service Components and select the Standard Service I want to detach the shared datastores from:
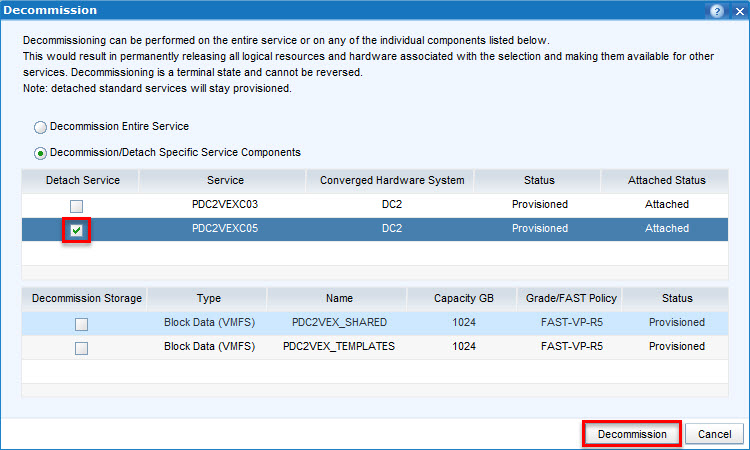
Click Decommission.
- This is where it gets interesting! The following message appears:
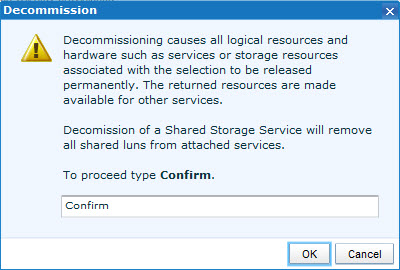
It is not clear if UIM/P is going to Detach or Decomission the datastore! The message is the same for both actions… You may need to go back and double check what option you selected!
- OK, everything is checked and we type Confirm…
- As there are several VMs and Templates on this datastore (obviously, as it is still in use by other clusters) and ever though we are not trying to Decommission the datastore, we get another misleading warning message:
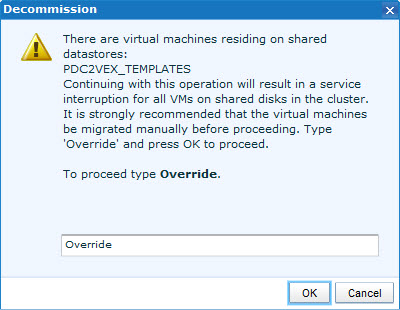
- Although this does not give us any comfort, we type Override and
pray go to the Service History and observe the configuration changes:
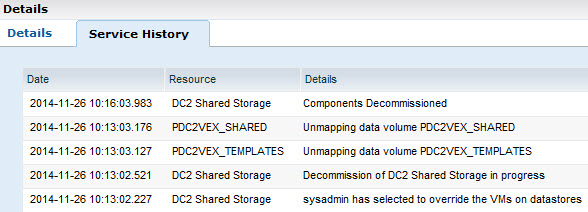
As you can see, UIM did what we ask it to do… Both datastores have been removed from the cluster hosts. Neither the Shared nor the Templates datastore were deleted.
Although this process worked OK, I can see that the lack of clarity of the warning messages and dialog windows may discourage you from using UIM/P to manage Shared Storage. I hope this will be addressed in the future releases.
As an alternative, you can use UIM/P Service Adoption Utility to manage Shared Storage Services…
Hope you will find this useful.
I recently upgraded VMware environment from vSphere 5.0 to vSphere 5.5 and thought I should document the host upgrade process.
For detailed instructions please refer to the “Upgrading and Migrating Your Hosts” topic of the vSphere Upgrade Guide.
- Connect the vSphere Client to a vCenter Server with which Update Manager is registered;
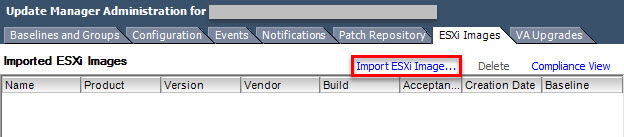
- Open Update Manager, Admin View;
- On the ESXi Image tab click on Import ESXi Image:
- Browse and Select the ISO image that you want to upload.
This can either be:
- a base VMware vSphere ESXi image that you can download from my.VMware.com (please select correct version);
- an ISO image that was customised by the hardware vendor. Customised images include vendor specific NIC, HBA and other device drivers, management utilities etc:
- Your own customised ISO image. See “HOW TO: Create custom vSphere ESXi ISO with VMware vSphere ESXi Image Builder” for details.For the purpose of this guide I will be using VCE Vblock customised image from RCM 4.8.0.
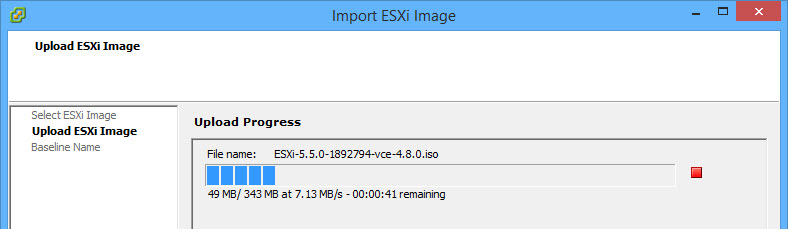
- Import the ISO image
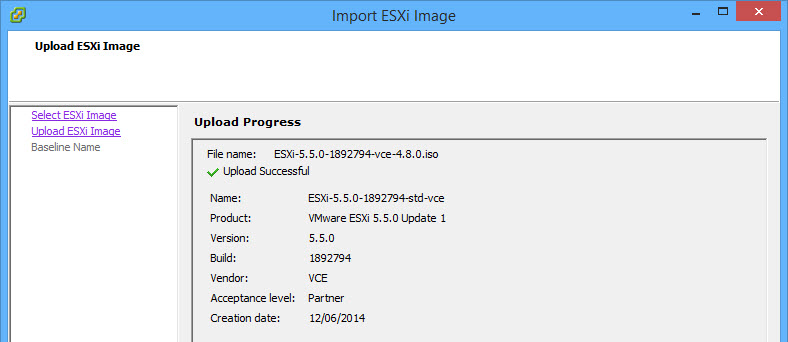
- Upload successful
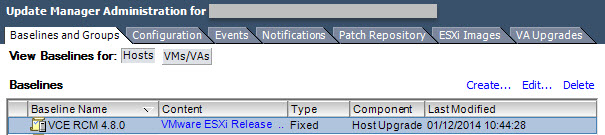
- Create ESXi host upgrade baseline

- New baseline:
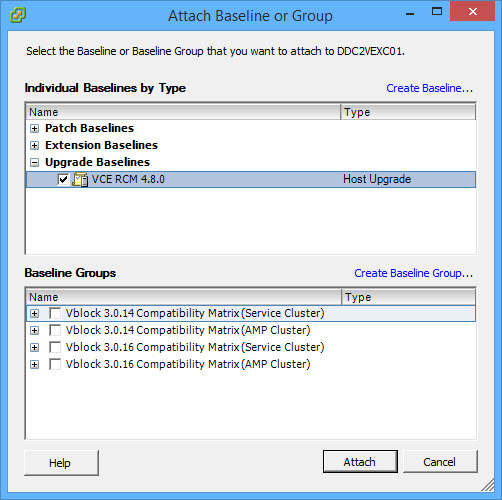
- Select Datacenter / Cluster or individual host and attach the baseline:
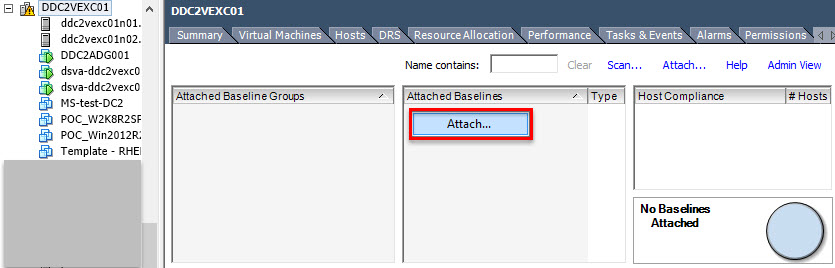
- Select baseline and click Attach.
- In the Hosts and Cluster view right-click on the Cluster you attache the baseline to, select Scan for Updates, select Upgrades and click Scan.

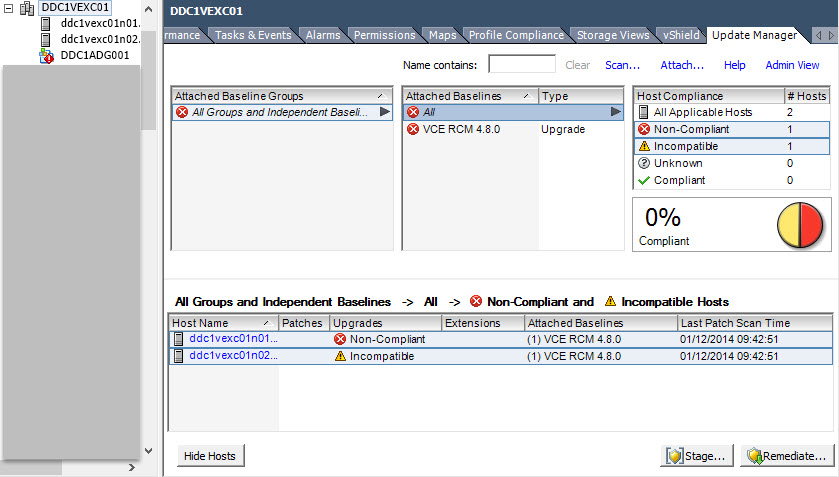
- After Scan is completed, Update Manager will display the Host Compliance status:

- In the majority of cases the status will be Non-Compliant. The reason these two hosts are Incompatible is that there are some outstanding software configuration changes that require a reboot.
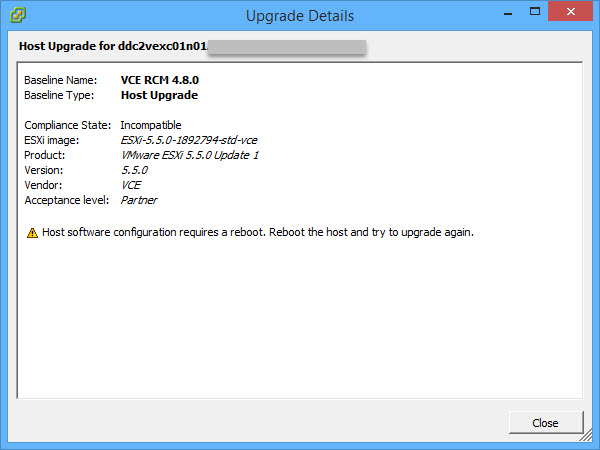
- Reboot the host and re-Scan it for Upgrades:
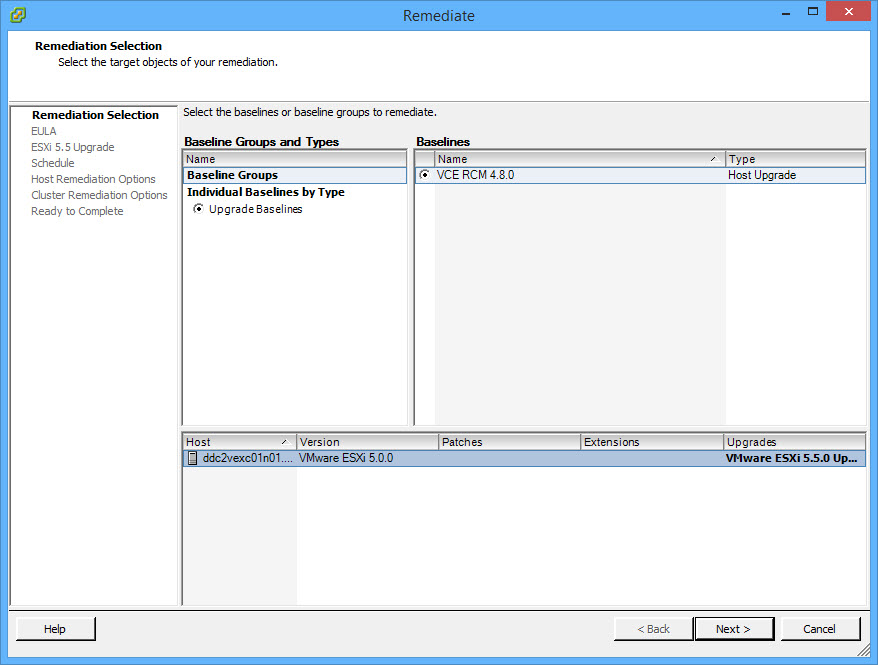
- To upgrade a host, put it in Maintenance Mode, click on Remediate…, select Upgrade Baseline and click Next;
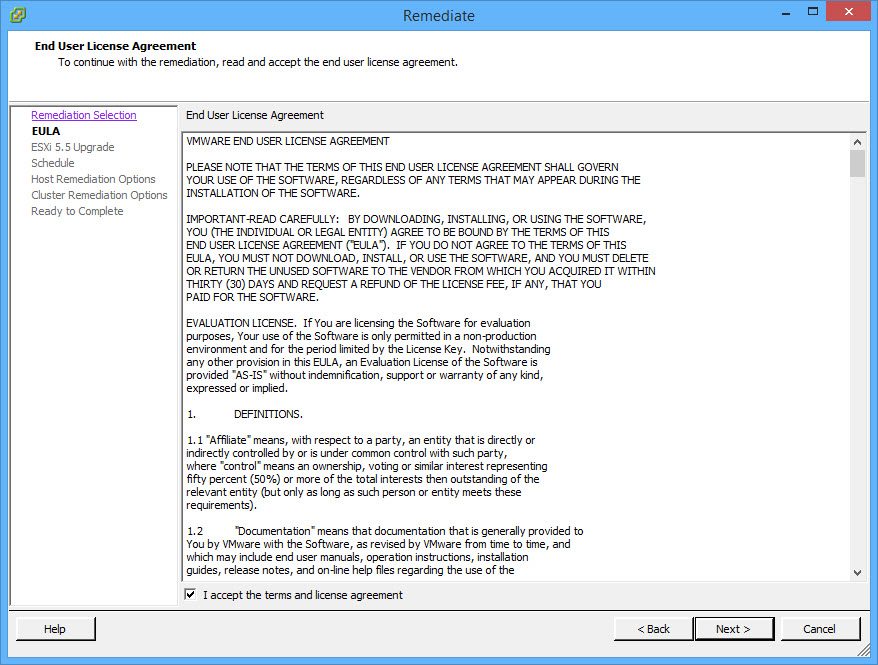
- Accept the License Agreement, click Next;
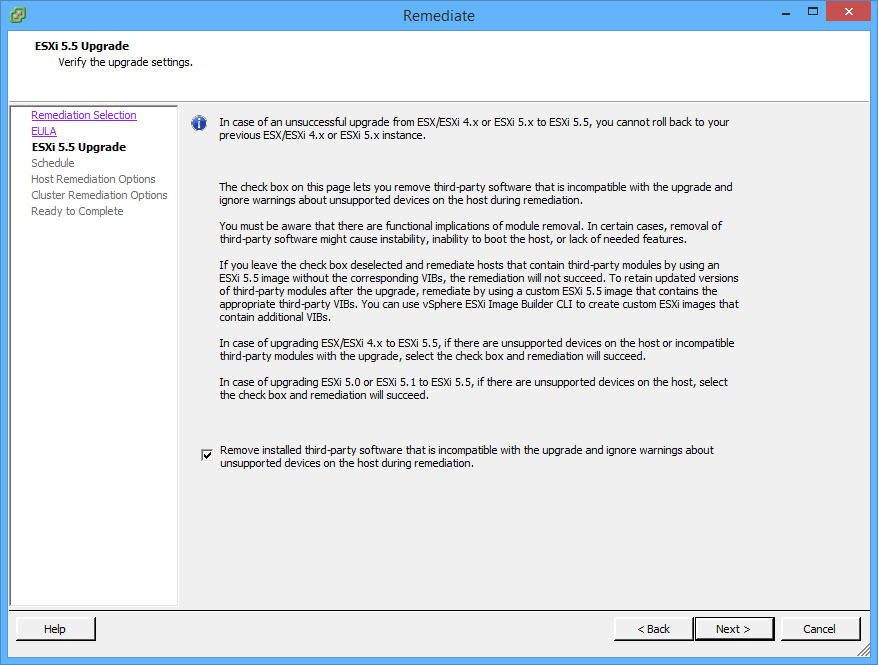
- The ISO image that I am using for host upgrade includes all third-party software and drivers required for the new version of the ESXi (Thank you VCE! :) ) and therefore I will allow the removal of the incompatible software and drivers.
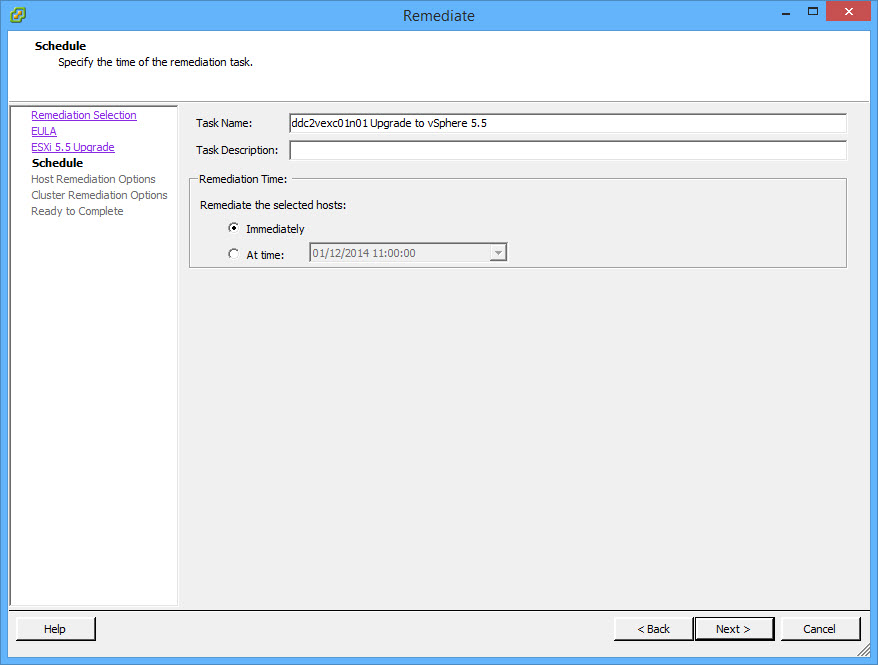
- Schedule the upgrade or run it immediately:
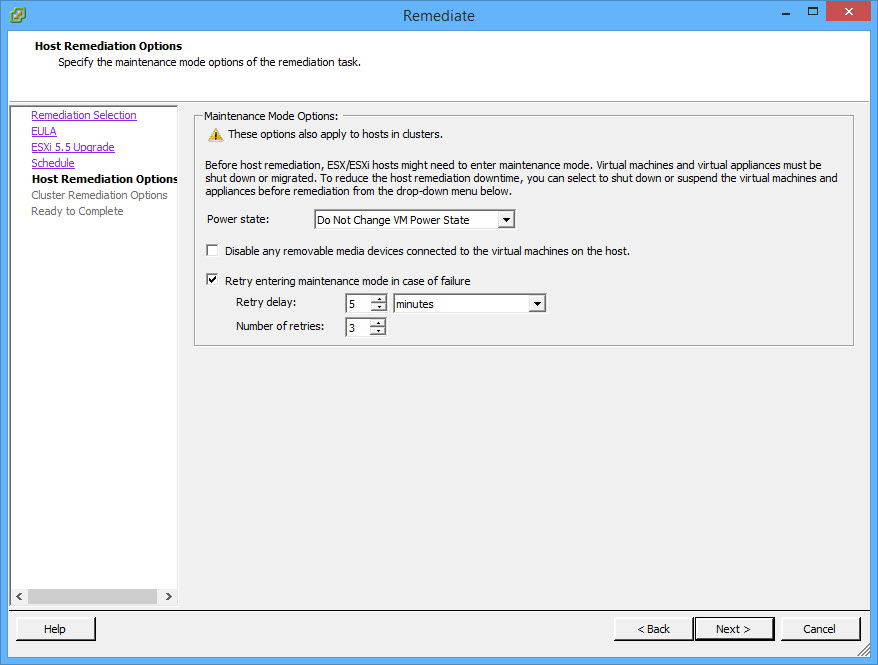
- Change Maintenance Mode options or accept defaults. Click Next;
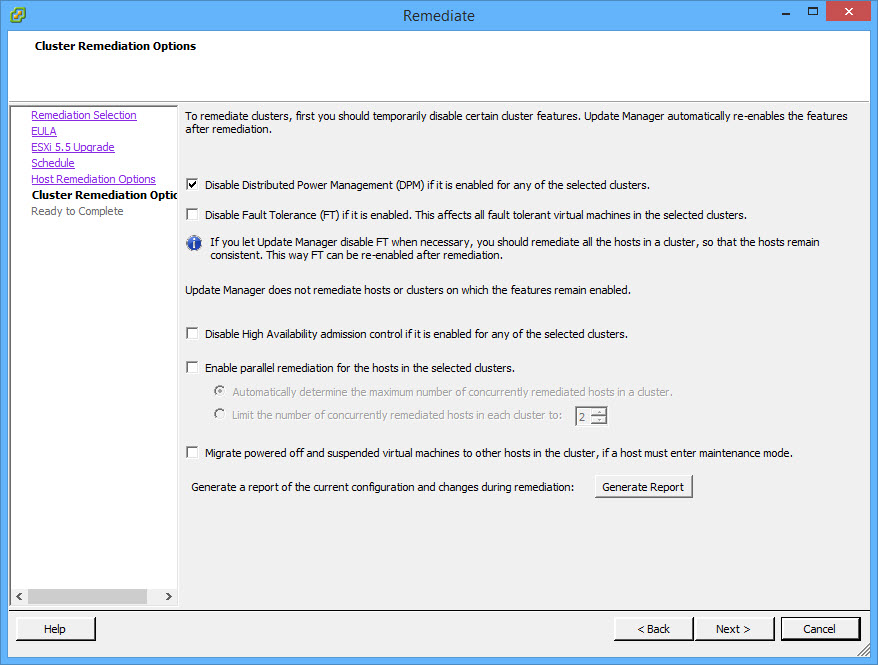
- Change Cluster Remediation options or accept defaults. Click Next;
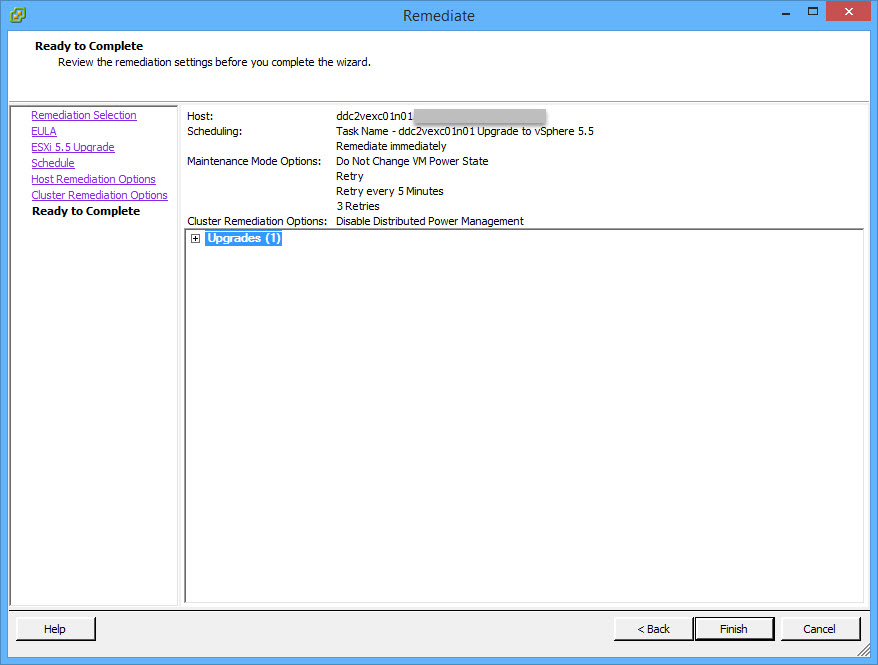
- Confirm the upgrade options and click Finish.
- In the Recent Tasks pane, the remediation task is displayed and will remain at about 22 percent for most of the process. The process is still running and will take approximately 15 minutes to complete;
- After the upgrade the Host compliance status will change to Compliant.
In my previous “PowerShell: Create new Active Directory groups, change group membership” blog post I published a PowerShell script that automates create Active Directory group creation. Today I needed to create multiple test user accounts and, and there were 12 account created already, the TestUser account number should start from 13.
All New-ADUser cmdlet parameters can be found <here>.
Let’s look into different ways user account password can be configured. Mode details on -AccountPassword:
AccountPassword
Specifies a new password value for an account. This value is stored as an encrypted string.
The following conditions apply based on the manner in which the password parameter is used:
$null password is specified – No password is set and the account is disabled unless it is requested to be enabled
No password is specified – No password is set and the account is disabled unless it is requested to be enabled
User password is specified – Password is set and the account is disabled unless it is requested to be enabled
Notes:
User accounts, by default, are created without a password. If you provide a password, an attempt will be made to set that password however, this can fail due to password policy restrictions. The user account will still be created and you may use Set-ADAccountPassword to set the password on that account. In order to ensure that accounts remain secure, user accounts will never be enabled unless a valid password is set or PasswordNotRequired is set to true.
The account is created if the password fails for any reason.
The following example shows one method to set this parameter. This command will prompt you to enter the password.
-AccountPassword (Read-Host -AsSecureString "AccountPassword")
I need all test users passwords to be the same. Before a chosen password can be used with -AccountPassword, you need to convert plain text password into Secure String:
$password = "Passw0rd"
$SecurePassword = ConvertTo-SecureString -String $password -AsPlainText -Force
…and, of course, I would like to have them enabled:
-Enabled $true
The script:
# If you need to use another account that has permissions to create AD users
# $LoginPassword = Get-Credential - prompts you for credentials.
# -Credential $LoginPassword - add this to New-ADUser and Add-ADGroupMember

$password = "Passw0rd"
$SecurePassword = ConvertTo-SecureString -String $password -AsPlainText -Force

$prefix = "TestUser"
foreach ($number in (13..23)) {
$user = $prefix+$number
	New-ADUser -SamAccountName $user -Name $user -EmailAddress "$user@test.vStrong.info" -AccountPassword $SecurePassword -Path “OU=TestUsers,DC=test,DC=vStrong,DC=info” -HomeDrive "H:" -HomeDirectory "\file001home$$user" -Enabled $true
 	Add-ADGroupMember TestUsersGroup -Members $user # OPTIONAL - Add user to a group
}
I hope you will find this useful.
The following script helps you to:
- Import Active Directory groups and their descriptions from a CSV file;
- Create Active Directory Groups and add Description
- If the Group is flagged (Yes or No), it will be added to another group (e.g. User groups –> Application provisioning group)
Excel view:
| AD Group Name |
AD Group Description |
Add to Group |
| ROLE-G-APPLICATION-Users |
Application Users |
NO |
| ROLE-G-APPLICATION-PowerUsers |
Application Power Users |
YES |
| ROLE-G-APPLICATION-Administrators |
Application Administrators |
YES |
CSV file:
AD Group Name,AD Group Description,Add to Group
ROLE-G-APPLICATION-Users,Application Users,NO
ROLE-G-APPLICATION-PowerUsers,Application Power Users,YES
ROLE-G-APPLICATION-Administrators,Application Administrators,YES
The script:
# Prompts you for Domain Admin like credentials
$LoginPassword = Get-Credential

# Imports groups and description list from CSV file
$groups = Import-CSV "D:groups.csv"

foreach ($item in $groups) {
# Map variables from CSV
$group = $item.'AD Group Name'
$description = $item.'AD Group Description'
# Creates Active Directory Group
New-ADGroup –name $group –groupscope Global -Description $description –path “OU=Application,OU=Groups,DC=internal,DC=vstrong,DC=info” -Credential $LoginPassword
# Adds newly created group to existing group
if ($item.'Add to Group' -eq "YES")
{Add-ADGroupMember APP-APPLICATION-Publish -Members $group -Credential $LoginPassword}
}
I hope you will find this useful.
Today I am wearing my “Keen Upgrader” hat!
I have been upgrading my lab environment and got stuck with VMware vCenter Operations Manager upgrade. The procedure is quite straight forward and is well documented.
The procedure consists of two steps (see here):
- Upgrade vCenter Operations Manager vApp;
- Upgrade the OS to SUSE Linux Enterprise Server 11 to SPx.
I tried to upgrade vCenter Operations Manager from v. 5.8.3 to 5.8.4. Yes…, I know,… Hence the “Keen Upgrader” badge… :)
The first step of the upgrade went well, no issues whatsoever but when I tried to upgrade the OS, it stopped straight after the launch without any errors or messages:
firstvm-external:/data # /usr/lib/vmware-vcops/user/conf/upgrade/va_sles11_spx_init.sh /data/VMware-vcops-SP3-2191616.pak
Started applying upgrade..
firstvm-external:/data #
That was odd! Upon close inspection of the scripts, the issues has been identified! vCenter Operations Manager v. 5.8.3 comes with SUSE Linux Enterprise Server 11 Patch 3 already installed and the OS upgrade is not required!
You can actually check current version of the OS by running the following command:
firstvm-external:~ # cat /etc/SuSE-release
SUSE Linux Enterprise Server 11 (x86_64)
VERSION = 11
PATCHLEVEL = 3
Here is what actually happened during the upgrade:
- When you apply vCOPs vApp patch (as per upgrade procedure) it changes scripts:
Old ones:
rwxrwxrwx  1 root  root  1729 Nov 27  2013 va_sles11_sp2_common.sh
-rwxrwxrwx  1 root  root  1091 Nov 27  2013 va_sles11_sp2_common_defs.sh
-rwxrwxrwx  1 root  root  4174 Nov 27  2013 va_sles11_sp2_init.sh
-rwxrwxrwx  1 root  root  1001 Nov 27  2013 va_sles11_sp2_postupgrade.sh
-rwxrwxrwx  1 root  root  3504 Nov 27  2013 va_sles11_sp2_upgrade.sh
-rwxrwxrwx  1 root  root   247 Nov 27  2013 va_sles11_sp2_upgrade_required.sh
Replaced with:
-rwxrwxrwx  1 admin admin 1956 Nov 13 14:02 va_sles11_spx_common.sh
-rwx------  1 root  root  1947 Nov 13 13:51 va_sles11_spx_common.sh.old
-rwxrwxrwx  1 admin admin  991 Oct 10 06:12 va_sles11_spx_common_defs.sh
-rwxrwxrwx  1 admin admin 4337 Oct 10 06:12 va_sles11_spx_init.sh
-rwxrwxrwx  1 admin admin 1425 Oct 10 06:12 va_sles11_spx_postupgrade.sh
-rwxrwxrwx  1 admin admin 3695 Oct 10 06:12 va_sles11_spx_upgrade.sh
-rwxrwxrwx  1 admin admin  247 Oct 10 06:12 va_sles11_spx_upgrade_required.sh
- For the OS upgrade you launch: ‘
./va_sles11_spx_init.sh /data/VMware-vcops-SP3-2191616.pak‘
Then ‘va_sles11_spx_init.sh' calls ‘va_sles11_spx_common.sh':
#Checks the SLES version to see if the upgrade is needed
checkSLESversionAsString()
{
    OS_MAJOR_VERSION=`awk '/^VERSION = /{print $NF}' /etc/SuSE-release`
    OS_SP_VERSION=`awk '/^PATCHLEVEL = /{print $NF}' /etc/SuSE-release`
    if expr match "$OS_MAJOR_VERSION" "11" > /dev/null; then
        if ( expr match "$OS_SP_VERSION" "1" || expr match "$OS_SP_VERSION" "2" ) > /dev/null; then
            return $SPx_UPGRADE_REQ
        else
            return $SPx_UPGRADE_NOT_REQ
        fi
    else
        return $SPx_UPGRADE_NOT_REQ
    fi
}
- And there is a procedure:
log_and_echo()
{
        log_info $1
}
in the old script the procedure is slightly different:
log_and_echo()
{
        log_info $1
        echo $1
}
The “echo $1” is missing!!!
- When you add it back and run upgrade again you get:
firstvm-external:/usr/lib/vmware-vcops/user/conf/upgrade # ./va_sles11_spx_init.sh /data/VMware-vcops-SP3-2191616.pak
Started applying upgrade..
SLES upgrade not required on Analytics VM hence skipping..
I hope you will find this entertaining! :)
I would like to thank Zbigniew ‘Ziggy’ Misiak for his help with the upgrade scripts!
In April, VCE unveiled the VCE Certification Program, a brand-new technology curriculum to train IT professionals in designing, deploying and managing converged infrastructures.
On the 1st of December 2014 VCE advanced the certification program even further, focusing on IT pros who manage the operations of their organization’s converged infrastructure. This new “Manage Track” includes three certifications:
- VCE Certified Converged Infrastructure Associate (VCE-CIA) – Confirms basic skills and knowledge associated with Vblock Systems
This certification is open and available to all professionals who would like to validate their understanding of what differentiates VCE converged infrastructure environment. Get to know the basics of VCE Vblock® Systems components and solutions, and the underlying investor technologies used to create VCE Vblock Systems.1. Exam: Included in the VCE Vblock Systems Foundations eLearning course. Course registration is required in order to access the exam. However, completing the eLearning course is not a prerequisite. A candidate can by-pass the course and go directly to the exam.
Exam available now
- VCE Certified Converged Infrastructure Administration Engineer (VCE-CIAE) – Validates day-to-day skills in operating Vblock Systems for administration
This level is open and available to administration and management professionals who would like to validate their understanding of the important knowledge, skills, and abilities necessary to administer and manage VCE Vblock Systems on a day-to-day basis. Knowledge and skills include concepts, such as utilizing service profiles and service catalogues to more efficiently deploy resources to meet SLAs, manage pooled resources to effectively meet capacity and performance requirements, and use system management software to validate configurations and perform common management tasks.The ideal candidate has earned the VCE-CIA credential and has cross-domain product experience that spans servers, networking, virtualization, and storage.
Certification Requirement(s)
Prerequisitesa. VCE Certified Converged Infrastructure Associate (VCE-CIA)1. Exam
a. VCE Vblock Systems Administration Exam (220-010)
Exam available now
- VCE Certified Converged Infrastructure Master Administration Engineer (VCE-CIMAE) – Certifies highly advanced knowledge and skills in administering Vblock Systems
This level is open and available to administration and management professionals who have broad, multidisciplinary skills needed to expertly perform administration and management of Vblock Systems. Candidates have demonstrated significant competencies in areas related to Vblock Systems management and can substantiate the expert skills needed to manage Vblock Systems at a master level with best practices and proven methodology to guarantee optimal performance.The ideal candidate has earned the VCE-CIAE credential and has demonstrated cross-domain product integration and customization experience that spans all areas: compute, storage, virtualization, and network.
Certification Requirement(s)
Prerequisitesa. VCE Certified Converged Infrastructure Associate (VCE-CIA)b. VCE Certified Converged Infrastructure Administration Engineer (VCE-CIAE)
1. Exam
a. VCE Vblock Systems Master Administration Exam (320-010) Available 2015
Exam expected in early 2015
Use discount code VCEAM2014 to get 50% off VCE Vblock Systems Administration Exam, 220-010.
The code is valid between 01/12/2014 – 28/02/2015.

Good luck!
When using third-party management products for vCenter Server, these plug-ins appear in the Available Plug-ins list. Some of these products may not have an uninstaller to remove the entry under Available Plug-ins or have been deleted/uninstalled before the plug-in was unregistered from vCenter.
For example, we ran a PoC for vFabric Data Director in the test environment some time ago but somehow managed to delete the vFDD vApp before unconfiguring and uninstalling it properly. It would not be an issue but it appeared that ALL VMs in that test environment fell under the vFDD radar management (My guess is that the whole cluster was selected during System Resource Bundle configuration…).
VMware KB article 1025360 “Removing unwanted plug-ins from vCenter Server” describes this procedure in details. For the purpose of this blog post I will be removing vFabric Data Director and EMC VSI (Virtual Storage Integrator) Plug-Ins.
To remove unwanted plug-ins from the Available Plug-ins list:
- In a web browser, navigate to http://vCenter_Server_name_or_IP/mob.
Where vCenter_Server_name_or_IP is the name of your vCenter Server or its IP address.
- Click Content.
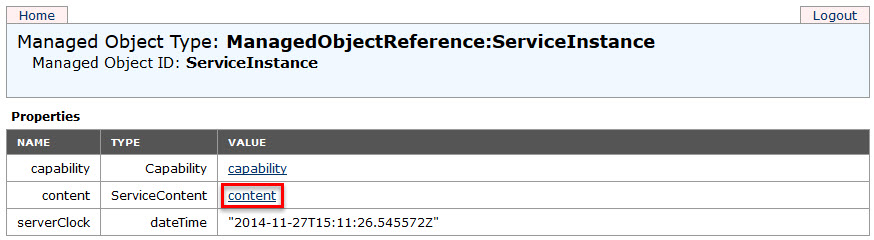
- Click ExtensionManager.
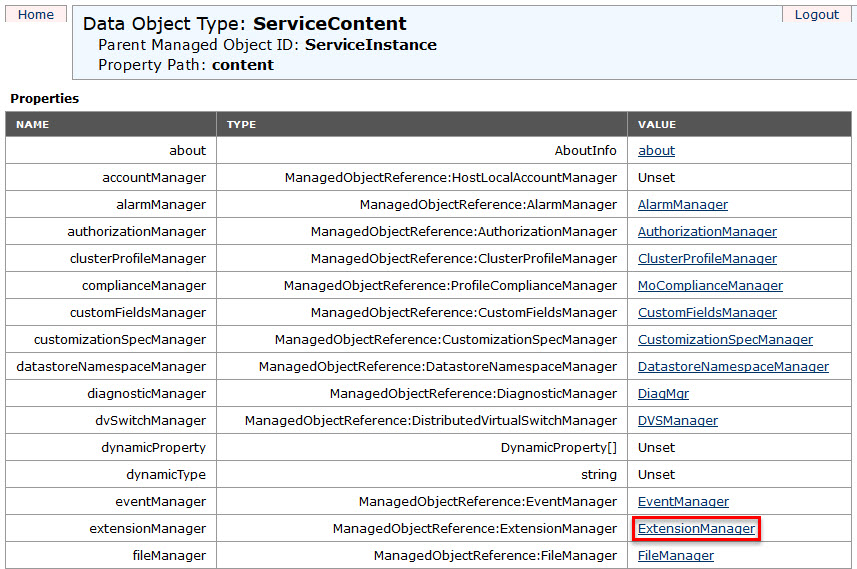
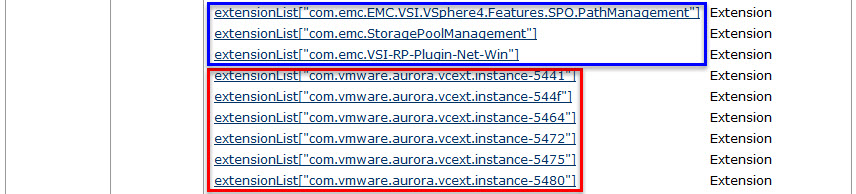
- Select and copy the name of the plug-in you want to remove from the list of values under Properties. For a list of default plug-ins, see the Additional Information section of VMware KB article 1025360 “Removing unwanted plug-ins from vCenter Server”.
- vFabric Data Director Plug-In: com.vmware.aurora.vcext.instance-XXXX
The vFDD’s codename is “Project Aurora“!
- EMC VSI (Virtual Storage Integrator) Plug-Ins:
- com.emc.vsi.plugin
- com.emc.EMC.VSI.VSphere4.Features.SPO.PathManagement
- com.emc.StoragePoolManagement
- com.emc.VSI-RP-Plugin-Net-Win

WOW! Someone’s been busy!
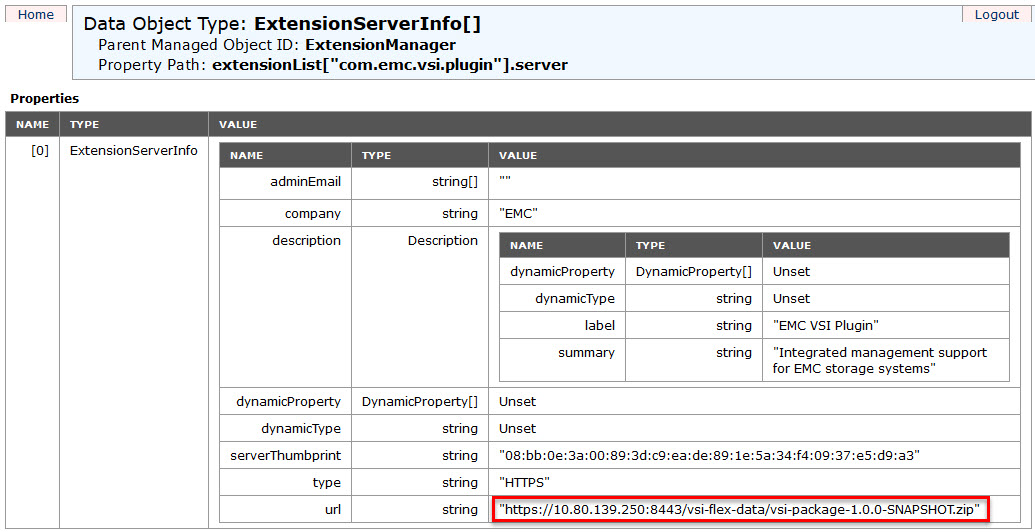
BTW, if you click on the extension link, you will get Plug-In properties. The ‘lastHeartbeatTime‘ tells you when it was used last time. The ‘server‘ shows the connection URL details – very useful for troubleshooting.
- Scroll down the page and click UnregisterExtension. A new window appears.
- Paste the name of the plug-in and click Invoke Method. This removes the plug-in.

- Close the window.
- Refresh the Managed Object Type: ManagedObjectReference:ExtensionManager window to verify that the plug-in is removed successfully.
- Restart vCenter Web Client service.
Note: If the plug-in still appears, you may have to restart the vSphere Client.
If you have vCenter Server in linked mode, perform this procedure on the vCenter Server that is used to install the plug-in initially, then restart the vCenter Server services on the linked vCenter Server.
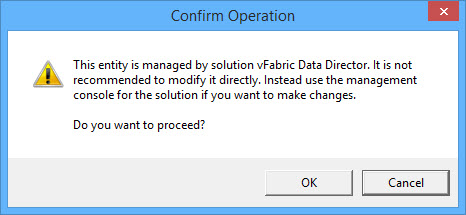
OK, let’s get back on the subject of removing all references to vFabric Data Director! We removed the plug-in but it did not remove the fact that vCenter still thinks that vFDD manages some VMs – the “Managed by / Solution: com.vmware.aurora.vcext.instance-544f” is still there:
There are two ways how you can amend this:
- Change the ‘
MANAGED_BY_EXT_KEY‘ and ‘MANAGED_BY_TYPE‘ columns for all ‘affected’ VMs in the dbo.VPX_VM table of the vCenter database to ‘NULL‘:
Run this query to list all VMs managed by vFDD:
SELECT [DNS_NAME],[MANAGED_BY_EXT_KEY],[MANAGED_BY_TYPE]
FROM [vcenter].[dbo].[VPX_VM]
WHERE MANAGED_BY_EXT_KEY = 'com.vmware.aurora.vcext.instance-544f'
DNS_NAME    MANAGED_BY_EXT_KEY                       MANAGED_BY_TYPE
TST001      com.vmware.aurora.vcext.instance-544f    dbvm
SQL001      com.vmware.aurora.vcext.instance-544f    dbvm
NULL        com.vmware.aurora.vcext.instance-544f    dbvm
- Power VM off, remove it from vCenter Inventory and add it back again.
I hope you will find this useful.
VMware vCenter Support Assistant Appliance installation step 1 – Configure “Lookup Service address” failed with the error message: “Cannot connect to the lookup service at the specified URL. Check if the URL is correct”.
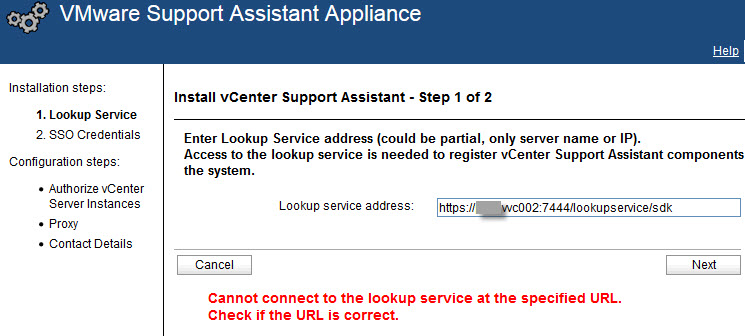
I tested the URL and DNS configuration on the VA – all OK. Tried the FQDN of the vCenter Server server name but it failed. I also tried to configure the lookup service address with the IP address rather than a server name and it worked OK! The documentation refers to the address (the IP address ?!), but what about the server name:
Provide Lookup Service Address and Review Certificate
To establish connection to the lookup service server and review the lookup service certificate details, you
must provide the lookup service address.
vCenter Support Assistant must know the location of the vCenter Server instances that it monitors. To get
the list of the vCenter Server instances in your environment you must provide the vCenter Server lookup
service address.
Procedure
- In the Lookup Service Address text box, type the vCenter Lookup Service address.
You must provide the lookup service address to register vCenter Support Assistant components with vSphere.
For example, https://vCenter_Server_IP:7444.
vCenter Support Assistant establishes a connection to the server.
- (Optional) Click Show Details to view the full certificate details and click OK.
- Click Next.
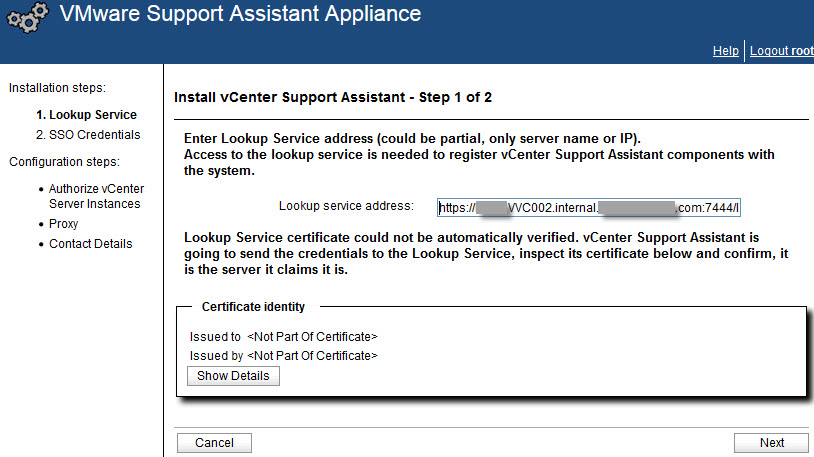
Yes, you can use the server name, BUT you must use the FQDN! And it is not just that I afraid! The service address is CASE SENSITIVE! I.e. if your vCenter Server is using self-signed certificate and during the VM deployment computer name was typed in capital letters, then the certificate would be issued to something like SERVER.domain.com.
So, I typed the vCenter Server name in the “correct” way and Support Assistant VA accepted it and allowed me to proceed to the next step:
I hope this will help.
This simple PowerShell/PowerCLI script calculates the average CPU, Memory, Network and Disk usage for powered on virtual machines over the last 30 days, 5 minutes interval.
Amend ‘AddDays(-N)‘ and ‘-IntervalMins 5‘ if needed.
Get-VM | Where {$_.PowerState -eq "PoweredOn"} | Select Name, Host, NumCpu, MemoryMB, `
@{N="CPU Usage (Average), Mhz" ; E={[Math]::Round((($_ | Get-Stat -Stat cpu.usagemhz.average -Start (Get-Date).AddDays(-30) -IntervalMins 5 | Measure-Object Value -Average).Average),2)}}, `
@{N="Memory Usage (Average), %" ; E={[Math]::Round((($_ | Get-Stat -Stat mem.usage.average -Start (Get-Date).AddDays(-30) -IntervalMins 5 | Measure-Object Value -Average).Average),2)}} , `
@{N="Network Usage (Average), KBps" ; E={[Math]::Round((($_ | Get-Stat -Stat net.usage.average -Start (Get-Date).AddDays(-30) -IntervalMins 5 | Measure-Object Value -Average).Average),2)}} , `
@{N="Disk Usage (Average), KBps" ; E={[Math]::Round((($_ | Get-Stat -Stat disk.usage.average -Start (Get-Date).AddDays(-30) -IntervalMins 5 | Measure-Object Value -Average).Average),2)}} |`
Export-Csv -Path d:AverageUsage.csv
Example of the script output:
| Name |
Host |
NumCpu |
MemoryMB |
CPU Usage (Average), Mhz |
Memory Usage (Average), % |
Network Usage (Average), KBps |
Disk Usage (Average), KBps |
| dsva02 |
esxc02n02.vStrong.local |
2 |
2048 |
61.91 |
5.63 |
28.7 |
17 |
| VSR001 |
esxc02n01.vStrong.local |
2 |
4096 |
63.66 |
9.7 |
6.86 |
15.11 |
| SQL100 |
esxc02n02.vStrong.local |
2 |
8192 |
40.64 |
2.67 |
0.07 |
3.75 |
| VCS001 |
esxc02n03.vStrong.local |
2 |
8192 |
177.84 |
5.59 |
0.14 |
15.53 |
| VCS002 |
esxc02n02.vStrong.local |
2 |
8192 |
36.47 |
1.85 |
0.09 |
6.14 |
I hope you find this useful.
In this guide I will take you through the vCloud Networking and Security / vShield Manager and components upgrade to version 5.5.3.1. This release addresses Shellshock vulnerability (VMware KB 2091218).
Before you proceed with the upgrade, please confirm the new version is compatible with the existing VMware and other security products in your environment (Trend Micro Deep Security, for example):
Download VMware vShield Manager Upgrade bundle from my.VMware.com :
You must first upgrade the vShield Manager, then update the other components.
vShield Manager Upgrade
- First, take a snapshot of vShield Manager virtual appliance!
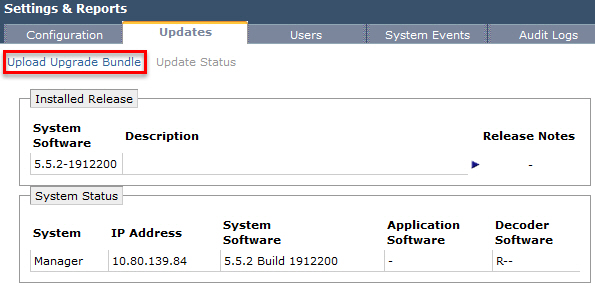
- Login to vShield Manager, navigate to inventory panel, View: > Host & Clusters, click Settings & Reports.
- Click the Updates tab.
- Click Upload Upgrade Bundle.
- Click Browse and select the VMware-vShield-Manager-upgrade_bundle-buildNumber.tar.gz file.
- Click Open.
- Click Upload File.
- After the file is uploaded, click Update Status.
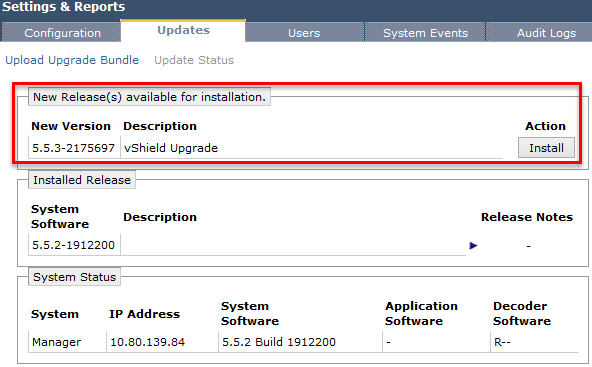
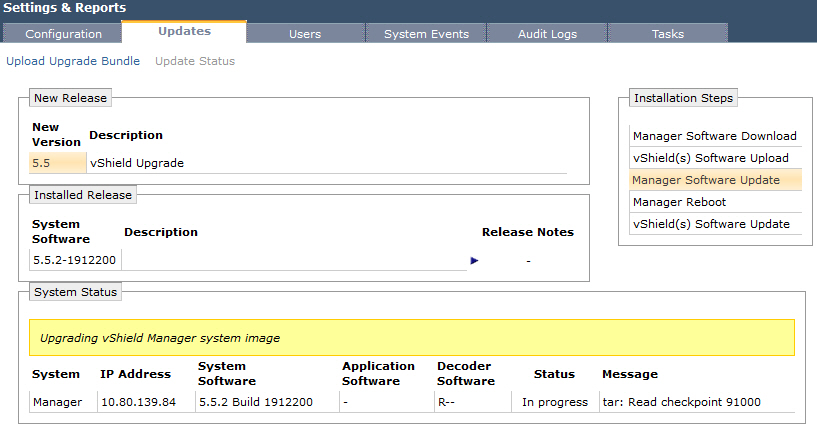
- Click Install to begin the upgrade process.
- Click Confirm Install.
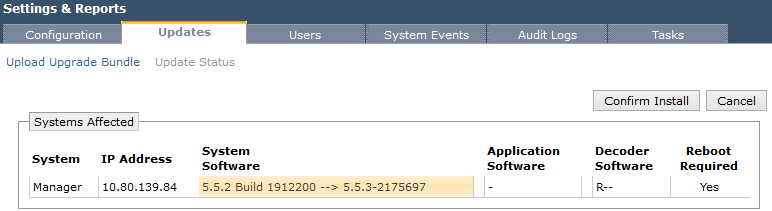
The upgrade process reboots vShield Manager, so you might lose connectivity to the vShield Manager user interface. None of the other vShield components are rebooted.
 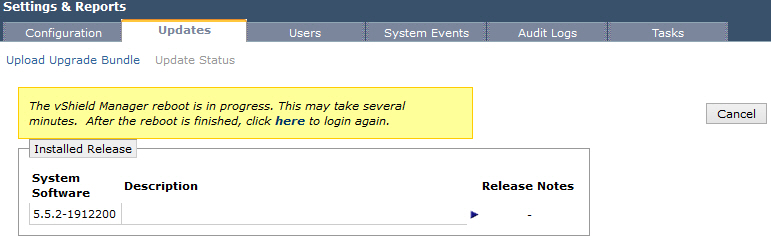
- After the reboot, log back in to the vShield Manager.
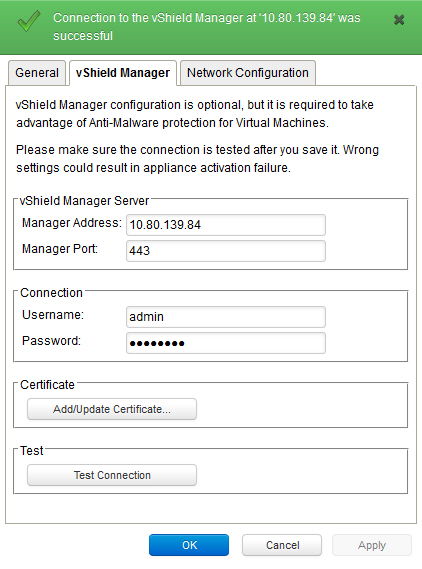
- OPTIONAL: Login to Trend Micro Deep Security Manager and make sure it still can connect to vSM.
Although this upgrade looks straightforwards and, in the majority of cases, runs OK, I have a couple of tips for you:
- ALWAYS take a snap of vShield Manager!
- vShield Manager upgrade from 5.0.x to 5.1.x is different as you need to upgrade its virtual hardware. See VMware KB 2044458 for detailed instructions.
- Make sure vShield Manager VA hardware spec is correct (I experienced an issue with the upgrade when someone manually changed vSM VA configuration)
- A minimum of 2.5 GB free disk space is available in the
/common partition. Login to vSM console and run show filesystems:
FAIL:
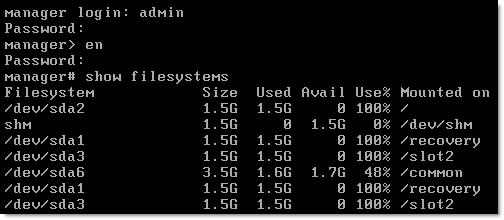
OK:

vShield App and vShield Endpoint Upgrade
You must upgrade vShield App and vShield Endpoint on each host in your datacenter. Both can can be upgraded either through vSphere Client or vShield Manager interface. I personally prefer the later.
- Login vShield Manager, navigate to inventory panel, select View: > Hosts & Clusters.
- Select Inventory > Hosts and Clusters.
- Under Datacenters / Your_Datacenter / Your_Cluster click the host on which you want to upgrade vShield App / vShield Endpoint.
- The Summary tab displays each vShield component that is installed on the selected host and the available upgrade version.
- Select Update next to vShield App or vShield Endpoint.

- Select the vShield App or vShield Endpoint checkbox. You can also select both and upgrade them in one go.

- Click Install. During vShield App upgrade, the ESXi host is placed into Maintenance Mode and rebooted. Ensure that virtual machines on the ESXi host are migrated (using DRS or vMotion), or that they are powered off to allow the host to be placed into Maintenance Mode.
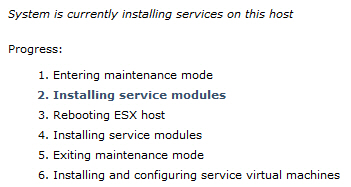 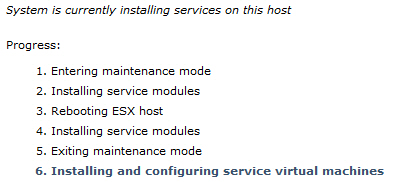
- All done:

- OPTIONAL: Again, it may be a good idea to check the host in Trend Micro Deep Security Manager…
vShield Edge Upgrade
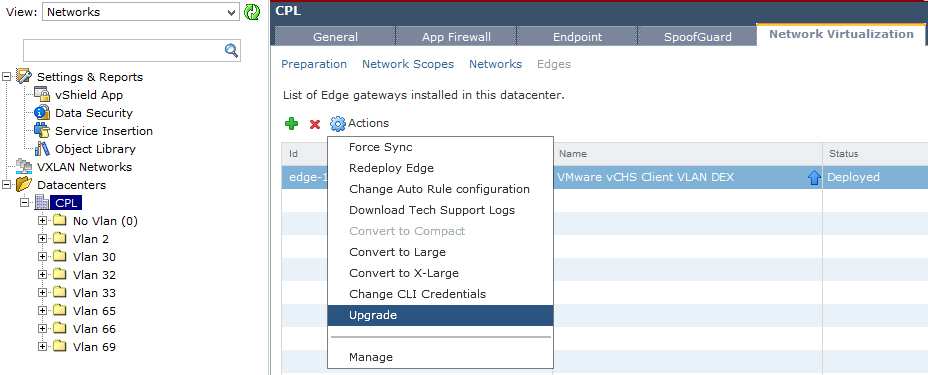
- Log in to the vShield Manager, navigate to View: > Networks.
- Select the Datacenter, Network Vistualization, Edges.
- Select the vShield Edge. Notice the up arrow – Upgrade available.
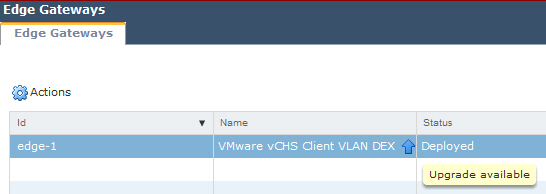
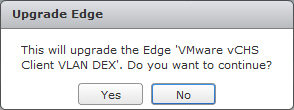
- Click the Actions and select Upgrade.
- Click Yes to continue.
- This is where it gets interesting! vShield Manager will NOT upgrade vShield Edge virtual appliance, instead it will deploy a new appliance, copy the config and then deleted the old appliance.
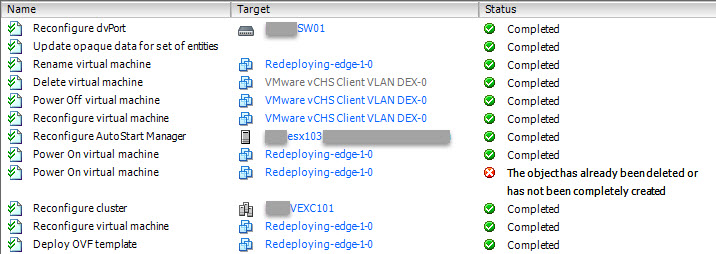
I hope this helps.
|
Subscribe to Blog via Email
Join 169 other subscribers
|
Recent Comments