|
|
- Login to the UCS Manager as admin and navigate to Admin / User Management:

- Right-click on LDAP Providers and select Create LDAP Provider
Bind DN: CN=DirectoryBind,OU=ServiceAccounts,OU=Administration,DC=internal,DC=vstrong,DC=local
Base DN: DC=internal,DC=vstrong,DC=local
Filter: sAMAccountName=$userid
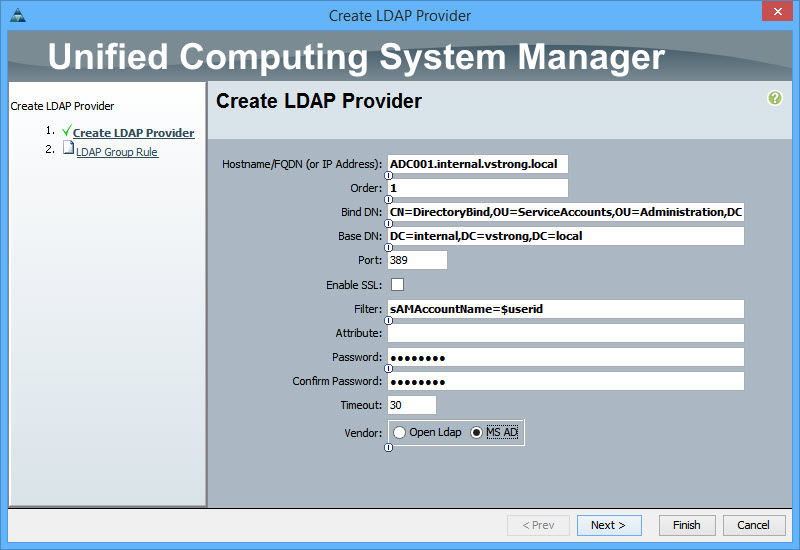
Click Next
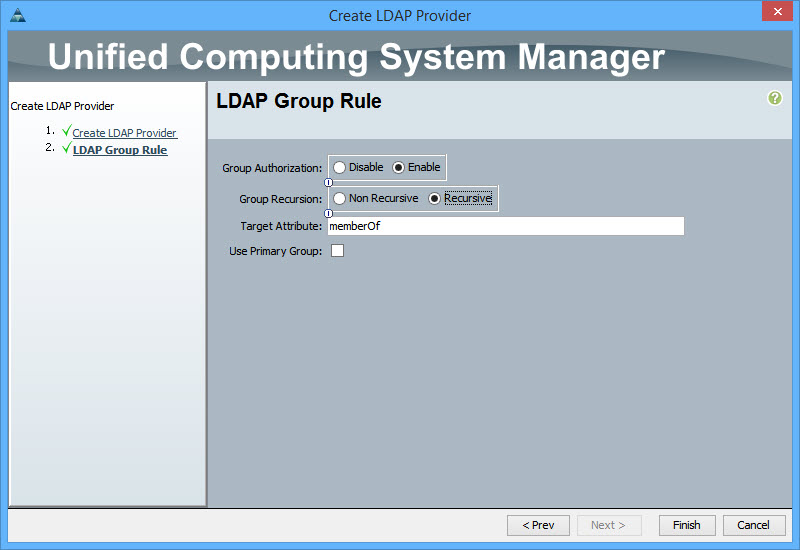
Click Finish
- Right-click on LDAP Provider Groups and select Create LDAP Provider Group
Type the Group name and include appropriate LDAP providers
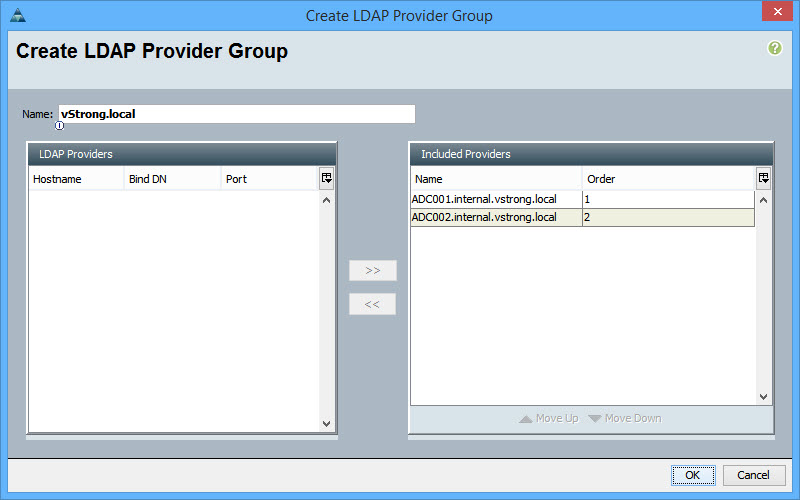
Click OK
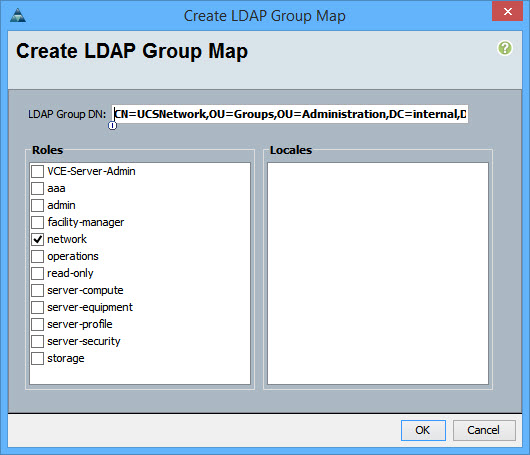
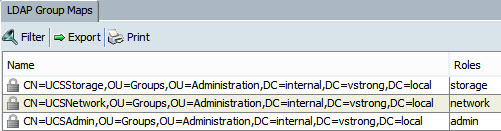
- Right-click on LDAP Group Maps and select Create LDAP Group Map
Select LDAP Group Distinguish Name and map it to the appropriate role

Click OK
Click OK
- Right-click on Authentication/Authentication Domain and select Create a Domain
Type the name
Change Realm to ldap
Select Provider Group

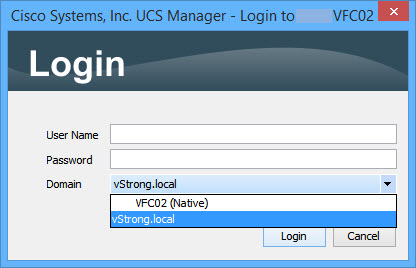
- Launch UCS Manager again and select the authentication domain
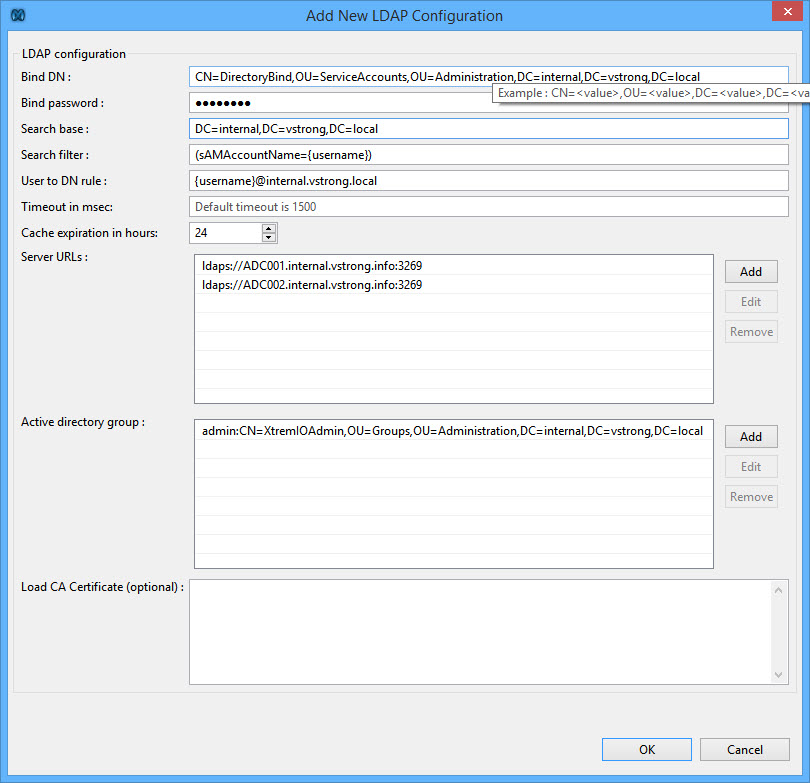
The EMC XtremIO Storage Array supports LDAP users’ authentication. Once configured for LDAP authentication, the XMS redirects users’ authentication to the configured LDAP or Active Directory (AD) servers and allows access to authenticated users only. Users’ XMS permissions are defined, based on a mapping between the users’ LDAP/AD groups and XMS roles.
The XMS server LDAP Configuration feature allows using single or multiple servers for the external users’ authentication for their login to the XMS server.
The LDAP operation is performed once when logging with external user credentials to an XMS server. The XMS server operates as an LDAP client and connects to an LDAP service running on an external server. The LDAP Search is performed using the pre-configured LDAP Configuration profile and the external user login credentials.
If the authentication is successful, the external user logs in to the XMS server and accesses the full or limited XMS server functionality (according to the XMS Role that was assigned to the AD user’s Group). The external user’s credentials are saved in the XMS server cache and a new user profile is created in the XMS User Administration configuration. From that point, the external user authentication is performed internally by the XMS server without connecting to an external server. The XMS server will re-perform the LDAP Search only after the LDAP Configuration Cache time expires or at the next successful external user login if the external user credentials were removed from the XMS server User Administration manually.
Here is the list of mandatory parameters:
- Bind DN – A full Distinguished Name of a user that has permissions for querying groups and perform searches on behalf of other users
CN=DirectoryBind,OU=ServiceAccounts,OU=Administration,DC=internal,DC=vstrong,DC=local
- Bind Password – A password for the Bind DN
- Search Filter – An LDAP expression that defines which user object attribute is checked against which part of the user input
(sAMAccountName={username})
- Cache Expire – The time in hours (1 to 24) before the cached user authentication expires and re-authentication is required
- Server URLs – LDAP server addresses. Format can be either
ldap://<IP> or ldap://<hostname>, ldaps://, ldaptls://
ldaps://ADC001.internal.vstrong.local:3269
- Active Directory Groups – XMS roles assignment to DS groups (represented by their DN)
CN=XtremIOAdmin,OU=Groups,OU=Administration,DC=internal,DC=vstrong,DC=local
Compliance Checker
The Compliance Checker is a Security Content Automation Protocol (SCAP) based engine that provides compliance audit functionality for a target Vblock System. The Compliance Checker, which you can access using the Plug-in for vCenter, provides a set of criteria that determines Vblock System compliance with a specific content pack.
Available compliance content packs
The Compliance Checker uses the following content packs to assess Vblock System compliance:
- Vblock System Release Certification Matrix (RCM)
RCMs define software, firmware, and hardware that VCE tests and validates as supported for a Vblock System.
You can run compliance scans against an RCM to easily identify Vblock System compliance with that RCM.
- VCE security hardening guidelines (Security Compliance Validation)
VCE security hardening guidelines optionally provide security best practices that help you identify risks that might exist on the Vblock System. The scan uses the VCE security standards described in the VCE Vblock System Security Guide: Configuration.
- VCE Security Alert (VSA) and VCE Technical Alert (VTA)
The VSA and VTA content packs provide targeted, specific technical alerts or vulnerabilities that VCE have identified for particular Vblock System components.
The VSA enables you to rapidly identify and remediate security vulnerabilities while the VTA enables you to quickly assess and resolve technical issues.
Note: If your Vblock System contains optional components, they are not included in compliance scans by default. Refer to the Plug-in for vCenter online help for more information on including optional components in compliance scans.
Updating compliance content
You should update compliance content to the most recent version so that the Compliance Checker is up to date when you run compliance scans on your Vblock System. Compliance content includes rules for Release Certification Matrices (RCM), security hardening, and VCE Technical Alerts compliance.
Download the RPM Package Manager (RPM) file that contains the updated compliance content you plan to install.
To access RPM files, log in to the VCE Support site, VCE Download Center and then navigate to the ‘VCE™ Software and VCE™ Software Documentation for VCE™ Converged Infrastructure Systems‘.
- Copy the RPM file(s) to any location on the VCE Vision virtual machine.
- Install the compliance content:
- Change directory to: cd /opt/vce/compliance/content
[root@vio001 tmp]# cd /opt/vce/compliance/content
- Install the compliance content by running the following command:
sh install_content.sh. You will be prompted to type admin’s password.
[root@vio001 content]# sh install_content.sh
Enter CAS password for admin user:
<!DOCTYPE HTML PUBLIC "-//W3C//DTD HTML 4.01 Transitional//EN"
"http://www.w3.org/TR/html4/loose.dtd">
<html>
<head>
<meta http-equiv="Content-Type" content="text/html; charset=UTF-8">
<title>VCE Vision(TM) Compliance Checker</title>
</head>
<body>
<h4>The VCE Vision™ Compliance Checker has been successfully installed</h4>
<!-- <a href="index.html">Documentation</a> -->
</body>
</html>
** Installing content from /opt/vce/compliance/content/rcm...
Importing RCM Content for VCE Vblock(TM) System 540...
Import Successful
** Setting the version for RCM Content for VCE Vision(TM) Compliance Checker...
** Installing content from /opt/vce/compliance/content/techalert...
Importing VCE Technical Alert Content for VCE Vblock(TM) System 540...
Import Successful
** Setting the version for Technical Alerts for VCE Vision(TM) Compliance Checker...
##################################################
CONTENT INSTALL RESULTS
Successfully imported content:
------------------------------
RCM Content for VCE Vblock(TM) System 540
VCE Technical Alert Content for VCE Vblock(TM) System 540
##################################################
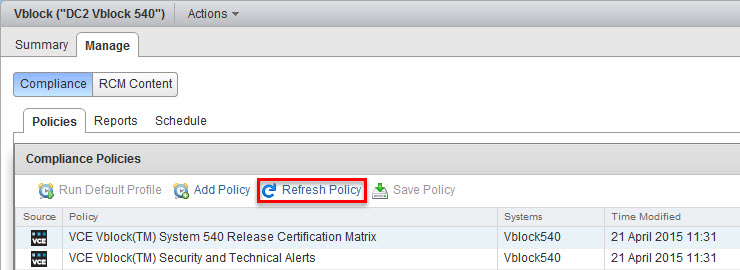
- You can now refresh Vblock Compliance Policies in the vSphere Web Client:
Home – Vblock System – Select Vblock – Manage tab – Compliance – Policies
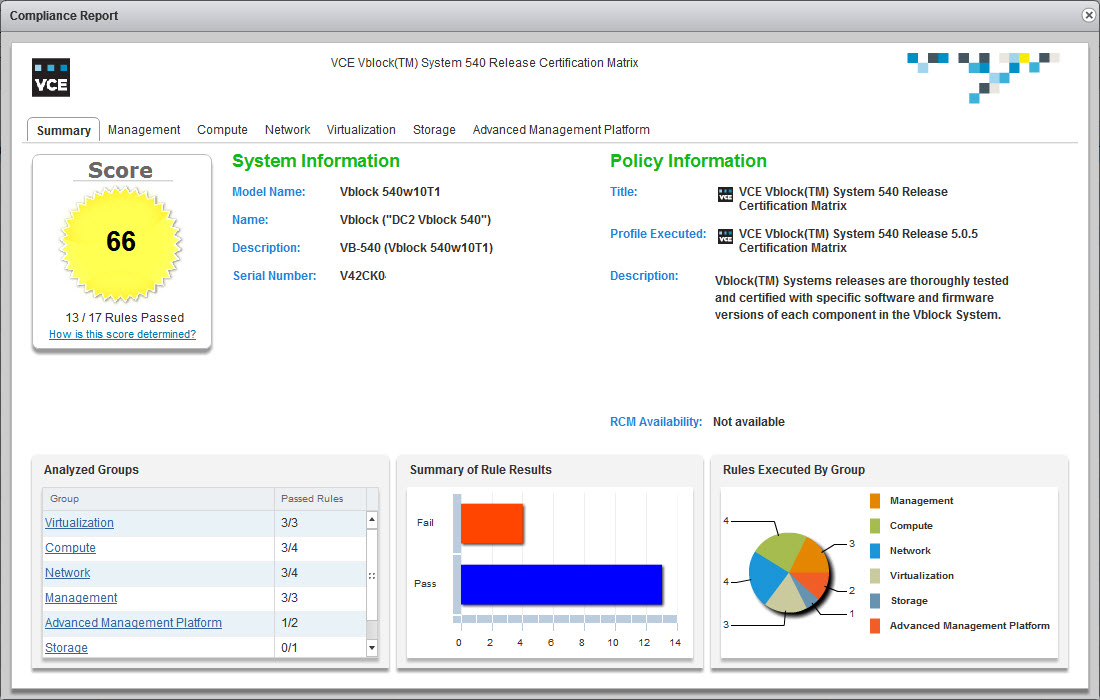
Check Vblock RCM compliance:
- Highlight RCM policy and select compliance profile from the bottom list and click on Run Scan:

Click Yes to confirm
- Navigate to the Reports tab to view the results of the scan
- Wait for the scan status to change to COMPLETED and check the Score
- Click on Compliance Report to view compliance scan details.
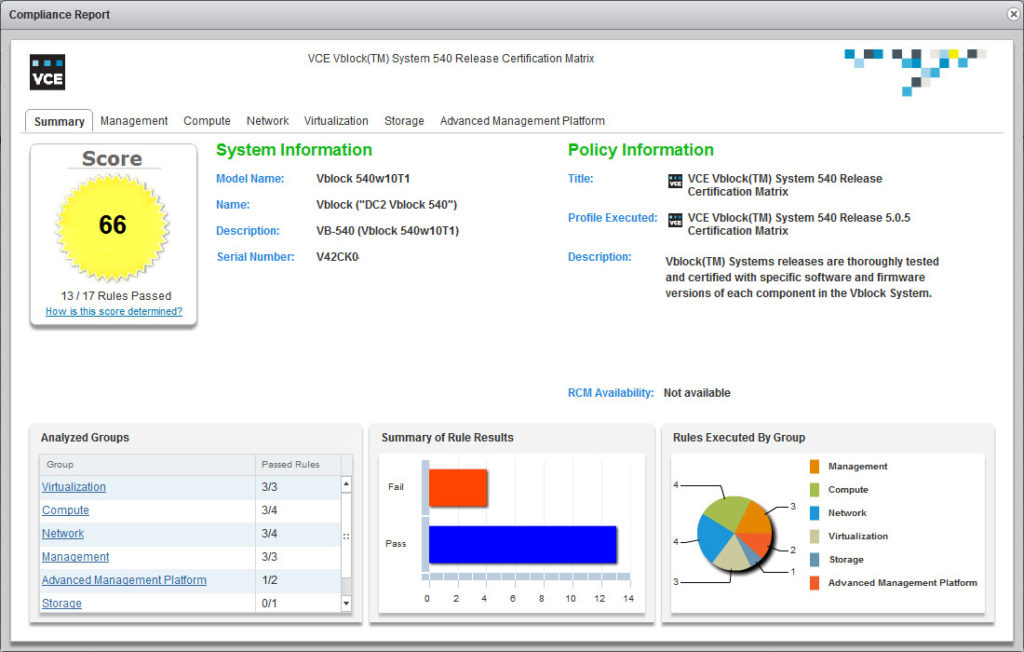
- You may also go through the tabs to view more detailed information about a selected components. When you select an item from the list of items tested, you can see the actual values of each item, including any expected values
Here are a couple of examples:
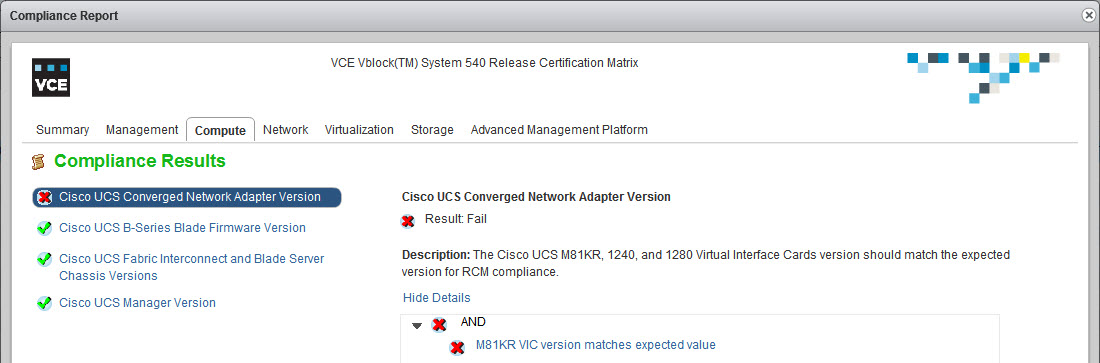
- The compliance checker picked up that the Cisco UCS CNA firmware version is not as expected:
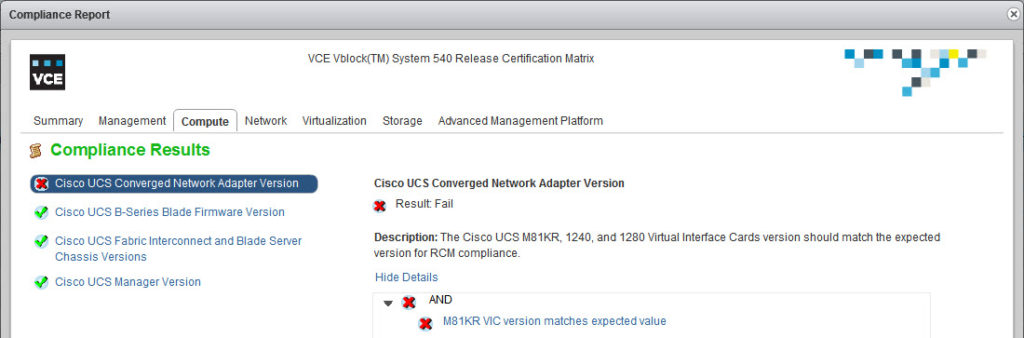

Well, that is not exactly true:
- VCE RCM 5.0.5 specifies the following:
Compute
Cisco UCS Converged Network Adapters: Cisco UCS 1240, 1280, 1340, and 1380 Virtual Interface Cards
Version certified: in Cisco UCS Manager 2.2(3d)
“in” Cisco UCS Manager 2.2(3d) does not mean the firmware version must be 2.2(3d)!
- Login to UCS Manager and check CNA firmware version that comes with 2.2(3d):
Cisco UCS M81KR – 2.2(3b)
Cisco UCS VIC 1240, 1340, 1280 and 1380 – 4.0(1d)
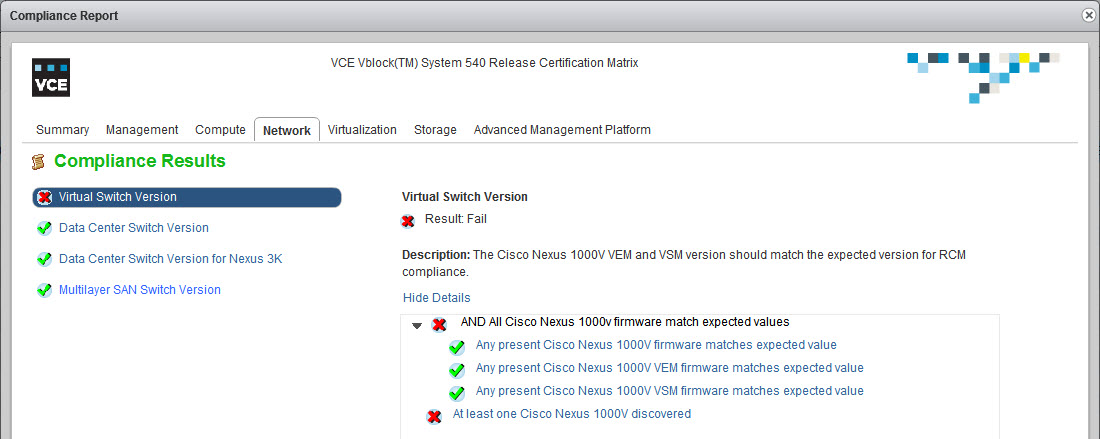
- Cisco Nexus 1000v is missing…

This is actually an expected behavior as this particular Vblock does not have Cisco Nexus 1000v…
Customize the Compliance Checker to reflect your environment
VCE provides you with a set of pre-defined policies and profiles. To customize the Compliance Checker to reflect your environment, use the Profile Tailoring feature.
Profile Tailoring allows you to take an existing compliance policy and tailor it to your environment. The new policies are saved, evaluated, and reported on as if they were the original policies.
A policy is a compliance policy that contains information about what to check in the environment. You can add a new policy, save a policy, or delete it. You cannot edit or delete any policy that VCE provides. However, a policy can have one or more profiles.
A profile is a grouping of rules to audit and the desired target values according to VCE standards.
You define a new profile to specify the rules that reflect your environment. Any profile you create can be edited, saved, and deleted. You can copy a VCE-created profile (they can be identified by the VCE logo in the Source column) to make a change for that profile to fit your environment. Any profile that is created by VCE cannot be edited or deleted. You can select a profile and run a scan from the Profiles area on the compliance policies page.
- Create a copy of the compliance profile:
- highlight VCE-created profile and click Copy Profile, choose Profile Title and Description (optional) and click OK;
- edit the custom profile: Change the CNA version from 2.2(3d) to 4.0(1d) and remove the check box for Cisco Nexus 1000v switch:
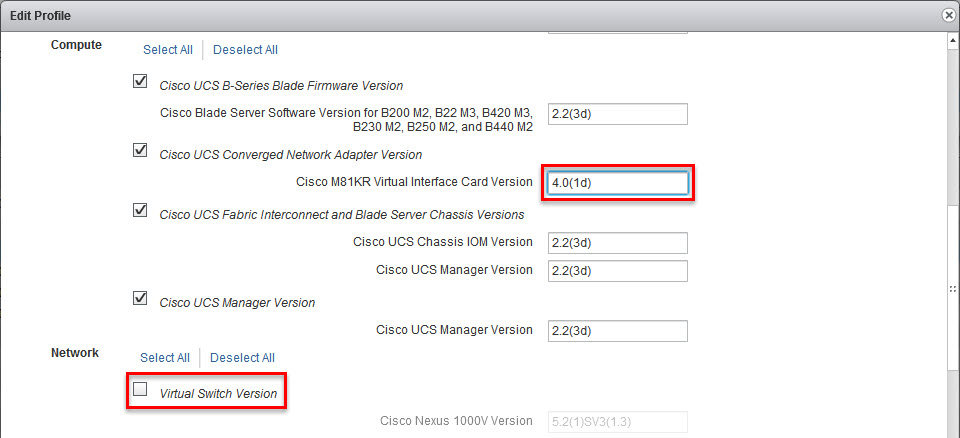
Click Finish to save the profile.
- Run the compliance scan against the custom profile.
The same procedure is also applicable to the Security and Technical Alerts compliance policy as well.

VCE Vision software retrieves credentials from a configuration file to connect to the Vblock System components.
In this way, VCE Vision software can access the components for discovery and health polling.
If the credentials to access a Vblock System component change, you must update the vblock.xml file to reflect that change.
Let’s login to the VCE Vision and validate the UCS Manager is configured correctly:
[root@vio001 ~]# cd /opt/vce/fm/conf
[root@vio001 conf]#  ls -lh
{skipped}
-rwxr-xr-x 1 root root  22K Apr 15 16:25 vblock.xml
Run ‘configTool.sh -v vblock.xml‘ to verify all logon details for all vblock components are configured correctly:
[root@vio001 conf]# configTool.sh -v vblock.xml
Validating: 'vblock.xml'
Validating UCS connection. Please wait...
Validating MDS9000 connection. Please wait...
Validating MDS9000 connection. Please wait...
Validating Nexus9000 connection. Please wait...
Validating Nexus9000 connection. Please wait...
Validating Nexus3000 connection. Please wait...
Validating Nexus3000 connection. Please wait...
Validating C220M3 connection. Please wait...
Validating C220M3 connection. Please wait...
Validating VCenter connection: url=https://192.168.38.77/sdk, user=administrator@vsphere.local. Please wait...
Validating SNMP connection for ComponentTag=MGMT-N3B ipAddress=192.168.36.3, community=MY_SNMP_Comm_String. Please wait...
Validating SNMP connection for ComponentTag=N9A ipAddress=192.168.36.4, community=MY_SNMP_Comm_String. Please wait...
Validating SNMP connection for ComponentTag=M9B ipAddress=192.168.36.21, community=MY_SNMP_Comm_String. Please wait...
Validating SNMP connection for ComponentTag=MGMT-N3A ipAddress=192.168.36.2, community=MY_SNMP_Comm_String. Please wait...
Validating Rack connection. Please wait...
Validating SSH connection. Please wait...
Validating SSH connection. Please wait...
Validating SNMP connection for ComponentTag=SERVER-A ipAddress=192.168.36.8, community=MY_SNMP_Comm_String. Please wait...
Validating SNMP connection for ComponentTag=SERVER-B ipAddress=192.168.36.9, community=MY_SNMP_Comm_String. Please wait...
Validating SNMP connection for ComponentTag=M9A ipAddress=192.168.36.20, community=MY_SNMP_Comm_String. Please wait...
Validating SSH connection. Please wait...
Validating Rack connection. Please wait...
Validating SSH connection. Please wait...
Validating SSH connection. Please wait...
Validating XmlApi connection. for ComponentTag=VMABO-UCS-1 ipAddress=192.168.36.30. Please wait...
Validating XtremIO connection. Please wait...
Validating SNMP connection for ComponentTag=N9B ipAddress=192.168.36.5, community=MY_SNMP_Comm_String. Please wait...
Validating XmlApi connection. for ComponentTag=SERVER-A ipAddress=192.168.36.8. Please wait...
Validating SSH connection. Please wait...
Validating SSH connection succeeded!
Validating XmlApi connection. for ComponentTag=SERVER-B ipAddress=192.168.36.9. Please wait...
Validating SSH connection succeeded!
Validating SSH connection succeeded!
Validating SSH connection succeeded!
Validating SSH connection succeeded!
Validating SSH connection succeeded!
Validating UemCli connection. Please wait...
Validating Rack connection succeeded!
Validating Rack connection succeeded!
Validating XtremIO connection succeeded!
Validating SNMP connection succeeded!
Validating SNMP connection succeeded!
Validating SNMP connection succeeded!
Validating SNMP connection succeeded!
Validating SNMP connection succeeded!
Validating SNMP connection succeeded!
Validating SNMP connection succeeded!
Validating SNMP connection succeeded!
Validating XmlApi connection succeeded!
Validating XmlApi connection succeeded!
Validating UemCli connection succeeded!
Validating XmlApi connection failed for componentTag=VMABO-UCS-1 userName=admin, address=https://192.168.36.30/nuova.
Validating VCenter connection succeeded!

Validation Failed due to incorrect configuration.
Validating XmlApi connection failed for componentTag=VMABO-UCS-1 userName=admin, address=https://192.168.36.30/nuova.
The validation script confirms the UCS Manager password may not be configured correctly.
Reconfigure VCE Vision Vblock details using configTool.sh:
- Run
stopFMagent to stop System Library services
- Run
configTool.sh
[root@vio001 conf]# configTool.sh
- Select Vblock configuration file
Press Enter to display the list of available templates, or Enter the full path of an existing vblock.xml file:  [/opt/vce/fm/conf/template] :/opt/vce/fm/conf/vblock.xml
(1)     vblock.xml
Enter the number that corresponds to the system you are configuring ['0' to specify new file or directory]: 1
Loaded: /opt/vce/fm/conf/vblock.xml
- go through all Vblock components and amend them as needed. If you are happy with the configuration, you can type ‘0’ (zero) to continue to next step)
Vblock                                  null                0    componentTag: 'VB-540', serialNumber: 'V42CK0999999', type: '540w10T1'
        (1) componentTag, 'VB-540'
        (2) serialNumber, 'V42CK0999999'
To change an attribute enter the corresponding number from the list ('0' to continue to next step): 0

VblockLocation                          Vblock              1    building: '350 Campus', floor: '1rd', geo: 'Marlborough, MA', room: 'Eisenhower', row: 'Dev', tile: 'X'
        (1) building, '350 Campus'
        (2) floor, '1rd'
        (3) geo, 'Marlborough, MA'
        (4) room, 'Eisenhower'
        (5) row, 'Dev'
        (6) tile, 'X'
To change an attribute enter the corresponding number from the list ('0' to continue to next step): 0

RackManager                             Rack                3    gatewayIpAddress: '192.168.36.6'
        (1) gatewayIpAddress, '192.168.36.6'

To change an attribute enter the corresponding number from the list ('0' to continue to next step):
- Keep pressing ‘0’ until you get to the component you need to amend.
Server                                  Compute             3    address: '192.168.36.30', componentTag: 'VMABO-UCS-1', ipaddress: '192.168.36.30', name: 'sys', type: 'UCS'
        (1) ipaddress, '192.168.36.30'

To change an attribute enter the corresponding number from the list ('0' to continue to next step): 0

Credentials                             Server              4    community: 'MY_SNMP_Comm_String', method: 'xml', username: 'admin',
        (1) community, 'MY_SNMP_Comm_String'
        (2) password, '*********'
        (3) username, 'admin'

Enter selection ('0' to continue to next step, or 'v' to validate ):
- In this example, I will be changing UCS Manager admin password:
Credentials                             Server              4    community: 'MY_SNMP_Comm_String', method: 'xml', username: 'admin',
        (1) community, 'MY_SNMP_Comm_String'
        (2) password, '*********'
        (3) username, 'admin'

Enter selection ('0' to continue to next step, or 'v' to validate ): 2

Enter new value for attribute 'password' [*********] (Press [ENTER] to Skip) :Enter value for attribute 'password':
************* <--- type new password.

Credentials                             Server              4    community: 'MY_SNMP_Comm_String', method: 'xml', username: 'admin',
        (1) community, 'MY_SNMP_Comm_String'
        (2) password, '*************'
        (3) username, 'admin'

Enter selection ('0' to continue to next step, or 'v' to validate ):
- Press ‘v’ to validate the password:
Enter selection ('0' to continue to next step, or 'v' to validate ): v
Validating XmlApi connection. for ComponentTag=VMABO-UCS-1 ipAddress=192.168.36.30. Please wait...
Validating XmlApi connection succeeded!
- …and keep pressing ‘
0‘ until you go through all Vblock components…
- When you reach the end (the end of vblock.xml file that is!), the script will go and validate all components again.
{skipped}
No validation errors on current Vblocks object tree.
- Enter a new filename for the Vblock configuration or press Enter and ‘
y‘ to overwrite existing config file:
Enter full path of a valid filename or Press Enter to save in [/opt/vce/fm/conf/vblock.xml] :
File exists would you like to overwrite (y/n)? y
Saved to: /opt/vce/fm/conf/vblock.xml
[root@vio001 conf]#
- Run
startFMagent to start System Library services.
- Refresh vSphere Web Client view:
PS In the previous versions of VCE Vision (prior to 2.6.2) you could also use the sedit to edit secured xml files but it has been removed.
Hope you will find this helpful.
EMC World 2015 returns to The Venetian in Las Vegas, NV on May 4-7.
There are special offers and discount available to those who will be taking exams at the EMC World:
EMC Customers and Partners
Take an EMC Proven Professional exam ($200 value) for free. This exclusive offer can be applied toward your first attempt on any EMC Proven Professional certification exam at EMC World 2015.
To take advantage of this offer, be sure to enter this promotion code* EMCE100 during the pre-registration.
You may also use previously issued EMC exam vouchers for exam pre-registration.

Pivotal, VCE and VMware Exams
NEW! Pivotal Exams
Pivotal certification exams will be available at EMC World 2015 for free. To take advantage of this offer, be sure to enter this promotion code* during pre-registration: PIV100
Pivotal Exam pre-registration »
VCE Exams
VCE certification exams will be available at EMC World 2015 for free. To take advantage of this offer, be sure to enter this promotion code* during pre-registration: VCE100
VCE Exam pre-registration »
VMware VCP Exams
Select VMware certification exams will be available at EMC World 2015 at a 50% discount.To take advantage of this offer, be sure to schedule your appointment at EMC World via pre-registration. Walk-in registrations will not be allowed for these exams at EMC World.
VMware VCP Exam pre-registration »
VMware requires that candidates complete an authorization process before registering for their exam appointment. If you have not already completed the exam authorization process, follow the instructions posted on the VMware Certification FAQ website prior to completing your conference exam registration. Complete Steps 1 – 3 posted on the FAQ. After you receive your authorization, click here to pre-register for the VCP EMC World conference testing discount. Walk-in registrations will not be allowed for these exams at EMC World.
Follow these links for more detailed information:
Good luck!
VCE RCM 5.0.5 adds support for the VCE Vision Intelligent Operations v. 2.6.2.
The upgrade procedure includes the following tasks:
- Downloading the files you need to perform the upgrade.
- Installing an upgrade bundle on the VCE Vision virtual machine.
The upgrade bundle does the following:
- Applies security updates.
- Updates VCE Vision software, including the VCE Vision™ System Library and the VCE Vision™ Compliance Checker.
- Upgrading the VCE Vision™ Plug-in for vCenter.
- Upgrading the compliance content on the VCE Vision virtual machine.
- Upgrading the VCE Vision™ Adapter for vCenter Operations Manager, if required.
Ok, let’s get started:
- Download VCE Vision upgrade files:
- vcevision_upgrade-2.6.2.0-16469.vce – VCE Vision virtual appliance upgrade
- vblock_adapter3-2.6.2-1261.pak – Adapter for vCenter Operations Manager. N.B. VCE supports VMware vCenter Operations Manager version 5.8 only!
- vce-compliance-content-2.6.0.0-2015.03.00.x86_64.rpm – The latest VCE RCM compliance content file
VCE Support Portal / VCE Download Center/ VCE™ Software and VCE™ Software Documentation for VCE™ Converged Infrastructure Systems:
- VB500 family – VCE Software
- VB540 – VCE Software Documentation. The folder is quite misleading labeled “VCE Vision (TM) Intelligent Operations Documentation for Vblock System 540 in French” but contains documentation in English, up to version 2.6.0 though…
- Upgrade VCE Vision virtual appliance:
- Shutdown VCE Vision VA and take a snapshot;
- Use WinSCP or similar tools to upload vcevision_upgrade-2.6.2.0-16469.vce to the
/root folder on the VCE Vision VA;
- Run
sh vcevision_upgrade-version_build.vce --argument.
Where:
- version_build is the version and build number for the VCE Vision software upgrade bundle.
- argument is one of the following optional arguments:
check – Performs a check for minimum requirements such as available disk space.noprompt – Runs the upgrade process without prompting you to confirm if:
- You have taken a virtual machine snapshot.
- You want to reboot the virtual machine.
version – Displays the currently installed version, the version of the upgrade, and the list of RPM files that the upgrade bundle includes.help – Displays help usage.
-
[root@vim001 ~]# sh vcevision_upgrade-2.6.2.0-16469.vce --version

Self Extracting Installer

20150415-16:09:16: Running VCE Vision(TM) Intelligent Operations upgrade.  Please wait...
20150415-16:09:17: See /opt/vce/fm/logs/patch-20150415-16:09:16.log for details
20150415-16:09:17: Currently installed OVA version is 2.6.0.0
20150415-16:09:17: This bundle version is 2.6.2.0-16469
20150415-16:09:17:
20150415-16:09:17: Security updates:
20150415-16:09:19: ntp-4.2.6p5-2.el6.centos.x86_64.rpm
20150415-16:09:19: ntpdate-4.2.6p5-2.el6.centos.x86_64.rpm
20150415-16:09:19:
20150415-16:09:19: Plugins:
20150415-16:09:19: vce-plugin-2.6.2.0-3210.x86_64.rpm
20150415-16:09:19:
20150415-16:09:19: Vision IO updates:
20150415-16:09:19: FMagent-2.6.2.0-16515.x86_64.rpm
20150415-16:09:19: VblockVision-2.6.2.0-16515.x86_64.rpm
20150415-16:09:19: flyway-2.1.1-1826.x86_64.rpm
20150415-16:09:19: jboss-7.1.1.Final-8.x86_64.rpm
20150415-16:09:19: jre-7u67-linux-x64.rpm (already installed)
20150415-16:09:19: snmpri-17.3.0.9-1826.x86_64.rpm
20150415-16:09:19: vce-asset-manager-2.6.2.0-4493.x86_64.rpm
20150415-16:09:20: vce-compliance-api-2.6.2.0-3549.x86_64.rpm
20150415-16:09:20: vce-puppetmodules-2.6.2.0-1881.x86_64.rpm
20150415-16:09:20: vce-upgrade-manager-2.6.0-4478.x86_64.rpm
20150415-16:09:20: vce-vision-release-2.6.2.0-16469.x86_64.rpm
20150415-16:09:20: vce-vision-repo-2.6.2.0-4498.x86_64.rpm
20150415-16:09:20: vpm-2.6.2.0-1889.x86_64.rpm
20150415-16:09:20:
- You can also confirm the current version of the VA by running the following command:
[root@vim001 conf]# getFMagentInfo
OVA version: 2.6.0.0-1258
Name        : FMagent                      Relocations: (not relocatable)
Version     : 2.6.0.0                           Vendor: VCE
Release     : 15661                         Build Date: Wed Dec  3 18:01:03 2014
Install Date: Sun Feb  1 18:02:06 2015         Build Host: fmdev08.iaas.lab
Group       : VCE Applications/System       Source RPM: FMagent-2.6.0.0-15661.src.rpm
Size        : 63747031                         License: Commercial
Signature   : RSA/SHA1, Wed Dec  3 18:01:09 2014, Key ID e01792e3d99b5d06
URL         : http://www.vce.com
Summary     : VCE FMagent
Description :
VCE FMagent build for System Library Integration
'rpm -qi FMagent' will get the same information.
-
[root@vim001 ~]# sh vcevision_upgrade-2.6.2.0-16469.vce --noprompt
Self Extracting Installer
20150415-16:11:17: Running VCE Vision(TM) Intelligent Operations upgrade.  Please wait...
- You need to accept the EULA:
Do you accept the End User License Agreement: [yes/no]
yes
Softcopy of End User License Agreement File created in:
/opt/vce/fm/eula/VCE_EULA_V2_2.txt
20150415-16:12:38: EULA has been accepted
- After you accept the EULA, the upgrade process continues and the script displays a summary of the upgrade:
20150415-16:12:38: EULA has been accepted
20150415-16:12:39: Available disk space: 158845124608
20150415-16:12:39: Patch size: 537163299
20150415-16:12:39: Currently installed OVA version is 2.6.0.0
20150415-16:12:39: This bundle version is 2.6.2.0-16469
- The script then prompts you to authenticate to the CAS service (the
admin password):
20150415-16:13:16: The CAS password is required to upgrade the VCE Software
Please enter the CAS password (attempt 1 of 3):
20150415-16:13:39: Validating CAS password...
20150415-16:13:40: Running pre-upgrade steps
If you do not enter the correct CAS password after three attempts, the upgrade process stops. You must then restart the upgrade.
- For Log Collection to work, you must perform the following steps depending on your Vblock System model, please refer to VCE Vision Upgrade Guide.
You may configure 0 to 2 additional ApplicationHosts. Enter the number of additional application hosts you are configuring  (Enter number or 's' to skip): s
Do you want to include ISILON in this configuration?  ('0' to include 's' to skip) [s] :s
- VCE Vision will validate Vblock configuration and restart the appliance.
- When VCE Vision virtual appliance comes back online, ensure that the Version field displays the version of VCE Vision software you just installed:
[root@vim001 ~]# getFMagentInfo
OVA version: 2.6.0.0-1258
Name        : FMagent                      Relocations: (not relocatable)
Version     : 2.6.2.0                           Vendor: VCE
Release     : 16515                         Build Date: Fri Feb 27 17:30:48 2015
Install Date: Wed Apr 15 16:15:45 2015         Build Host: fmbuild01.iaas.lab
Group       : VCE Applications/System       Source RPM: FMagent-2.6.2.0-16515.src.rpm
Size        : 74944464                         License: Commercial
Signature   : RSA/SHA1, Fri Feb 27 17:30:55 2015, Key ID e01792e3d99b5d06
URL         : http://www.vce.com
Summary     : VCE FMagent
Description :
VCE FMagent build for System Library Integration
'rpm -qi FMagent' will get the same information.
- Upgrading the VCE Vision™ Plug-in for vCenter.
Removing older versions of the Plug-in for vCenter
If version 2.5.x or version 2.1.x of the VCE Vision™ Plug-in for vCenter is installed on VMware vCenter Server, you must remove it before you deploy the Plug-in for vCenter with the VCE Vision Plug-in Manager (VPM).
Note: Do not remove version 2.6 of the Plug-in for vCenter.
For information about how to remove earlier versions of the Plug-in for vCenter, refer to the VCE Vision™ Intelligent Operations Version 2.6 Upgrade Guide.
-
[root@vio001 /]# cd /opt/vce/plugins
[root@vio001 plugins]# ls -lh
total 53M
-rw-r--r-- 1 root root 26M Dec  3 18:46 vce-plugin-2.6.0.0-3029.x86_64.rpm
-rw-r--r-- 1 root root 27M Apr 15 16:14 vce-plugin-2.6.2.0-3210.x86_64.rpm
- Run
rpm -Uvh vce-plugin-2.6.2.0-build_number.x86_64.rpm to install the Plug-in for vCenter.
[root@vio001 plugins]# rpm -Uvh vce-plugin-2.6.2.0-3210.x86_64.rpm
Preparing...                ########################################### [100%]
Upgrading VCE Vision (TM) plugin
Successfully unregistered 'vce-plugin-2.6.0.0.zip'
Successfully undeployed 'vce-plugin-2.6.0.0.zip'
Successfully deleted 'vce-plugin-2.6.0.0.zip'
1:vce-plugin             ########################################### [100%]
Successfully imported 'vce-plugin-2.6.2.0.zip'
Successfully deployed 'vce-plugin-2.6.2.0.zip'
Successfully registered 'vce-plugin-2.6.2.0.zip'
- Restart VMware vSphere Web Client service
- Here is an interesting bit: Although we have just upgraded VCE Plug-in for vCenter to v 2.6.2, the plug-in folder name is actually “com.vce.vblock-2.6.1.0” and if you check plug-in’s version in the vCenter Extension Manager, it is also2.6.1.0. The plug-in server URL points to “https://VCE_Vision_FQDN:8443/vpm/vce-plugin-2.6.2.0.zip” and the plug-in folder contains 2.6.2.0.jar files…
UPDATE: This issues has been resolved in VCE Vision v. 2.6.3, see Vblock VCE Vision 2.6.3 Release Notes for details
- In vSphere Web Client go to the Home window and make sure the Vblock System icon is visible in the Inventories section. If you cannot see the Vblock, check plug-in settings, see next point.
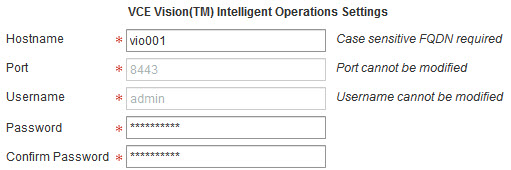
- Configure the Plug-in for vCenter:
- Log in to the vSphere Web Client with administrative privileges;
- On the Home window select Administration in the left navigation pane;
- Locate the VCE Vision(TM) Plug-in for vCenter section and then select Settings.
- Confirm the setting are correct and click Update Settings and then click OK when prompted.
- Upgrading the compliance content on the VCE Vision virtual machine.
Although this is an easy procedure, I will publish a separate post on that, please stay tuned!
UPDATE: please see VCE Vision: How to check Vblock System RCM and Security compliance for details
- Upgrading the VCE Vision™ Adapter for vCenter Operations Manager, if required.
Note: VCE supports VMware vCenter Operations Manager version 5.8 only. Before you upgrade the Adapter for vCenter Operations Manager to version 2.6.2, you must upgrade VMware vCenter Operations Manager to version 5.8
Stay tuned for other VCE Vision related articles…
What is VCE Vision ™ Intelligent Operations?
Vblock™ Systems provide the world’s most advanced converged infrastructure — bringing together compute, network, storage, and virtualization for efficient and productive cloud computing environments. VCE Vision™ Intelligent Operations software enables and simplifies converged operations by dynamically providing a high level of intelligence to your existing management toolset.
N.B. VCE Vision admin and root default passwords
- Vblock gone missing from the VMware vCenter Web Client [Home / Vblock System]:
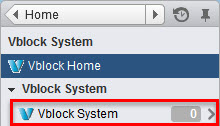
- VCE Vision settings appear to be correct. Well, at lease the host name…:
 FQDN has been removed to “protect the innocent”…
- The VCE Vision IO virtual appliance restart did not help
- All services are up and running:
[root@vim001 ~]# cd /etc/init.d/
[root@vim001 init.d]# ./vce-fm-all-services status
vce-fm-master is running (pid=11093 )
vce-fm-adapter is running (pid=11599 )
vce-fm-agent is running (pid=11854 )
vce-fm-net-snmpd (pid=11349 ) is running
vce-fm-naaagent is running (pid=12101 )
- BTW, the scripts are in “
/etc/init.d/“
- You can also start/stop VCE Visiosn services by running stopFMagent and startFMagent (case sensitive, can be launched from any directory):
-
[root@vio001 init.d]# stopFMagent
Disabling FMagent services from starting automatically...
Waiting for the FMagent services to stop.
vce-fm-master is not running
vce-fm-adapter is not running
vce-fm-agent is not running
vce-fm-net-snmpd is not running
vce-fm-naaagent is not running</li>
-
[root@vim001 init.d]# startFMagent
Enabling FMagent services to start automatically...
Waiting for the FMagent services to start.......................................
vce-fm-master is running (pid=10205 )
vce-fm-adapter is running (pid=10724 )
vce-fm-agent is running (pid=10983 )
vce-fm-net-snmpd (pid=10466 ) is running
vce-fm-naaagent is running (pid=11284 )
- VCE Vision periodically discovers Vblock components and one of the ways to check if it is running OK is to check when was the last successful discovery:
[root@vim001 init.d]# cd /opt/vce/fm/logs/
[root@vim001 logs]# grep Performance FMAgent.log |grep "discoverAll and all"
[root@vim001 logs]#
Nothing in the most recent log… :(
- Let’s check previous logs to find the last successful discovery:
[root@vim001 logs]# grep Performance FMAgent.log* |grep "discoverAll and all"
FMAgent.log.2015-03-16.4: INFO  2015-03-16 09:54:52,574 [main] [update2Listeners] : scheduler.VblocksDiscoveryService - Performance:update2Listeners finished with discoverAll and all(1592ms) totalMem:1053 freeMem:667
FMAgent.log.2015-03-16.4: INFO  2015-03-16 10:04:46,407 [main] [update2Listeners] : scheduler.VblocksDiscoveryService - Performance:update2Listeners finished with discoverAll and all(1216ms) totalMem:1053 freeMem:667
FMAgent.log.2015-03-16.4: INFO  2015-03-16 10:09:49,039 [main] [update2Listeners] : scheduler.VblocksDiscoveryService - Performance:update2Listeners finished with discoverAll and all(1439ms) totalMem:1053 freeMem:648
FMAgent.log.2015-03-16.4: INFO  2015-03-16 10:19:47,603 [main] [update2Listeners] : scheduler.VblocksDiscoveryService - Performance:update2Listeners finished with discoverAll and all(1473ms) totalMem:1053 freeMem:667
FMAgent.log.2015-03-16.4: INFO  2015-03-16 10:24:49,372 [main] [update2Listeners] : scheduler.VblocksDiscoveryService - Performance:update2Listeners finished with discoverAll and all(1245ms) totalMem:1053 freeMem:647
FMAgent.log.2015-03-16.4: INFO  2015-03-16 10:34:39,326 [main] [update2Listeners] : scheduler.VblocksDiscoveryService - Performance:update2Listeners finished with discoverAll and all(1458ms) totalMem:1053 freeMem:666
FMAgent.log.2015-03-16.4: INFO  2015-03-16 10:39:36,794 [main] [update2Listeners] : scheduler.VblocksDiscoveryService - Performance:update2Listeners finished with discoverAll and all(1598ms) totalMem:1053 freeMem:682
[root@vim001 logs]#
Rrrrright, the last successful discovery was on the 16th of March…
If I remember correctly, someone may have re-installed VMware vCenter for this environment on that date… :)
- Ok, let’s “tail” the log and see if we can spot something obvious:
[root@vim001 logs]# tail -f FMAgent.log
ERROR 2015-04-15 13:43:14,721 [main] [startVblocksDiscoveryService] : scheduler.VblocksDiscoveryService - EULA has not been accepted. discovery/health poll is disabled
ERROR 2015-04-15 13:43:14,721 [main] [startVblocksDiscoveryService] : scheduler.VblocksDiscoveryService - Issue startEulaAcceptance to begin EULA acceptance
INFO  2015-04-15 13:43:14,722 [main] [logEvent] : event.FMEventServiceFactory - publish event: id=EulaEULA has not been accepted. You must accept End User License Agreement to enable discovery/health poll.
Aha! EULA has not been accepted! Although during initial deployment the EULA was accepted, after vCenter re-install you need to accept it again…
- This is an easy fix. You will need to go through a couple of screens of the License Agreement and press q to continue:
[root@vim001 logs]startEulaAcceptance
Starting EULA acceptance: Wed Apr 15 13:50:18 UTC 2015
Enter Name> Mark Strong
Enter Title> Master of the Universe
Enter Licensee Company Name> vStrong
Enter Accepting Company Name> vStrong
Do you accept the End User License Agreement:[yes/no]> yes
Softcopy of End User License Agreement File created in: /opt/vce/fm/eula/VCE_EULA_V2_2.txt
Wed Apr 15 13:50:58 UTC 2015 EULA has been accepted.
- VCE Vision can now discover Vblock:
[root@vim001 logs]# grep Performance FMAgent.log |grep "discoverAll and all"
 INFO  2015-04-15 13:54:49,895 [main] [update2Listeners] : scheduler.VblocksDiscoveryService - Performance:update2Listeners finished with discoverAll and all(3992ms) totalMem:158 freeMem:95
 INFO  2015-04-15 14:02:08,445 [main] [update2Listeners] : scheduler.VblocksDiscoveryService - Performance:update2Listeners finished with discoverAll and all(3512ms) totalMem:163 freeMem:115
 INFO  2015-04-15 14:16:59,372 [main] [update2Listeners] : scheduler.VblocksDiscoveryService - Performance:update2Listeners finished with discoverAll and all(551ms) totalMem:234 freeMem:161
- It is all done!
There are a couple of tips:
- The status “discoverAll and all” does not indicate all Vblock components have been discovered correctly – more on this in the next post;
- VCE Vision version 2.x.x supports one Vblock/vCenter only and you have vCenters configured in Linked Mode, you may see some inconsistencies in the vSphere Web Client. Especially if one Vision VA and therefore the vCenter Web Client plug-in was upgraded.
EMC UIM/P displays the following error message:
ID returned is Invalid request – Invalid Disk.key and Disk.uuid and Disk.lun – Must specify one
In /opt/ionix-uim/slm/log/slm.log you can see error similar to:
2014-12-11 10:42:27,464 I TP-Processor22 VcenterImportUtilityService Built import request
<ImportRequest name="Management-Cluster" url="https://10.208.23.20:443/sdk" username="SSO_U_UIMP_MGMT_VC_ADMIN" password="oYilo2_Iqv9AUcCkmqF7LF8kRVBfzaLPPJW8AM1MOZfj5FHTcg" path="Management-DC/Management-Cluster">
<Cluster drsEnabled="true" drsAutomationLevel="fullyAutomated" drsMigrationThreshold="1" dpmEnabled="true" dpmEnablement="automated" dpmThreshold="1" haEnabled="true" enableHostMonitoring="true" enableAdmissionControl="false" acp="resourcePercentage" acpHostFailoverLevel="3" acpCpuFailoverPercent="25" acpMemoryFailoverPercent="75" vmRestartPriority="high" hostIsolationResponse="powerOff" vmMonitoringStatus="vmAndAppMonitoring" vmMonitoringSensitivity="medium" swapPlacement="vmDirectory" evc="Disabled"/>
<Host name="ESX01.local" username="root" password="SqMSVFxKBBl7UE-hutBk3V8kRVBfMqt6-b0CxeAl4XvPBDHFlQ"/>
<Host name="ESX02.local" username="root" password="SqMSVFxKBBl7UE-hutBk3V8kRVBfMqt6-b0CxeAl4XvPBDHFlQ">
<Disk name="vbb_vplex_general_6" lun="7"/>
<Disk name="LUN1_DS02" uuid="600601601CA03200082EADC08591E211" lun="4"/>
<Disk name="LUN0_DS01" uuid="600601601CA03200F2C926C98591E211" lun="1"/>
<Disk name="LUN1_DS01" uuid="600601601CA03200062EADC08591E211" lun="3"/>
<Disk name="vba_vplex_general_6" lun="5"/>
<Disk name="removeme2" lun="8"/>
<Disk name="vbb_vplex_general_5" lun="6"/>
<Disk name="LUN0_DS02" uuid="600601601CA032000A2EADC08591E211" lun="2"/>
<Disk name="vba_vplex_general_5"/>
</Host>
<Host name="esx01.local" username="root" password="SqMSVFxKBBl7UE-hutBk3V8kRVBfMqt6-b0CxeAl4XvPBDHFlQ"/>
<Host name="esx02.local" username="root" password="SqMSVFxKBBl7UE-hutBk3V8kRVBfMqt6-b0CxeAl4XvPBDHFlQ"/>
</ImportRequest>

2014-12-11 10:42:27,465 I TP-Processor22 VcenterSyncController Built payload
2014-12-11 10:42:27,465 I TP-Processor22 VcenterImportUtilityService Run import request against VIU instance http://localhost:11881/VcenterImportUtility/importRequest
2014-12-11 10:42:27,492 I TP-Processor22 VcenterImportUtilityService Response status HTTP/1.1 200 OK data Invalid request - Invalid Disk.key and Disk.uuid and Disk.lun - Must specify one
2014-12-11 10:42:27,493 E TP-Processor22 VcenterImportUtilityService Import request id is not a number indicitive of a successful request made but actual workload failed - ID returned is Invalid request - Invalid Disk.key and Disk.uuid and Disk.lun - Must specify one
Note that line:
<Disk name="vba_vplex_general_5"/>
does not have ‘lun=”id”‘
If it’s VPLEX Metro cluster make sure that problematic LUNs (in this case vba_vplex_general_5 on both clusters) has LUN ID 0
Warning! From now on you need to be very careful as incorrect action can cause DL/DU – if you unsure how to perform it STOP at this point!
This can be fixed in many ways but there must be no LUN with id 0 in VPLEX Storage View.
Possible solutions:
- decommission LUN using UIM/P and provision new one, UIM/P will assign different ID
- remove LUN ID 0 (please follow VPLEX procedure and VMware KB http://kb.vmware.com/kb/2004605)
- assign different ID for problematic LUNs
(c) Zbigniew ‘Ziggy’ Misiak
In my “The Diary of a Keen Upgrader” post I already mentioned the steps required to upgrade vCenter Operations Manager. I have another environment where vCOPs upgrade was required and I thought I should document it.
The procedure consists of two steps (here):
- Upgrade vCenter Operations Manager vApp;
- Upgrade the OS to SUSE Linux Enterprise Server 11 to SPx.
Download the upgrade media file from my.VMware.com:
- PAK file to upgrade vCOPs vAPP from 5.0.x, 5.6, 5.7 or 5.8
Name: VMware-vcops-5.8.4-2199700.pak
Release Date: 2014-10-28
Build Number: 2199700
- PAK file to upgrade the OS to SLES 11 SP3 for vCenter Operations Manager 5.8.4
Name: VMware-vcops-SP3-2191616.pak
Release Date: 2014-10-28
Build Number: 2191616
Upgrade vCenter Operations Manager vApp
I will be upgrading vCenter Operations Manager v. 5.7.2 to 5.8.4:

- Open vCOPs administration page https://<vCOPS_UI_VM_IP_address_or_DNS_name>/admin ;
- Login as admin;
- Click the Update tab;
- Click Browse…, select the VMware-vcops-X.X.X-build.pak file, Select Open.

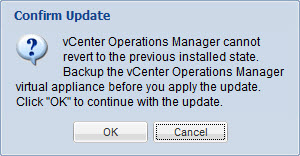
- Click Update;
- Click OK to confirm;
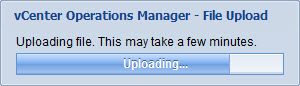
- vCenter Operations Manager upgrade file will be uploaded to the appliance;
- Accept the EULA by selecting the check box and click OK;
- Click OK to proceed with the upgrade;
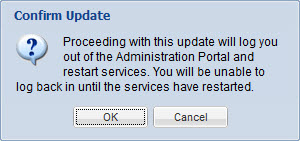
- This will commence the upgrade;
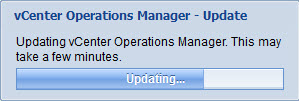
- You can monitor the status of the upgrade;
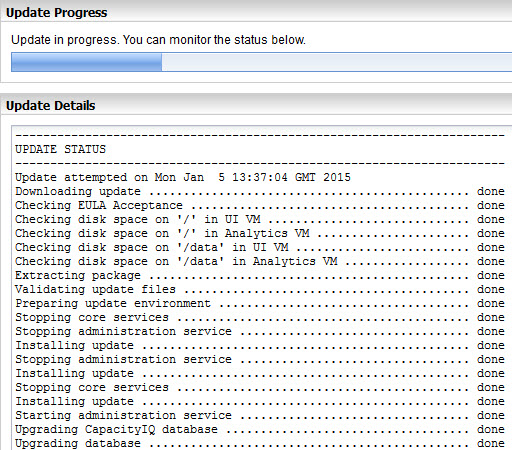
The full upgrade log:
----------------------------------------------------------------------
UPDATE STATUS
----------------------------------------------------------------------
Update attempted on Mon Jan  5 13:37:04 GMT 2015
Downloading update .............................................. done
Checking EULA Acceptance ........................................ done
Checking disk space on '/' in UI VM ............................. done
Checking disk space on '/' in Analytics VM ...................... done
Checking disk space on '/data' in UI VM ......................... done
Checking disk space on '/data' in Analytics VM .................. done
Extracting package .............................................. done
Validating update files ......................................... done
Preparing update environment .................................... done
Stopping core services .......................................... done
Stopping administration service ................................. done
Installing update ............................................... done
Stopping administration service ................................. done
Installing update ............................................... done
Stopping core services .......................................... done
Installing update ............................................... done
Starting administration service ................................. done
Upgrading CapacityIQ database ................................... done
Upgrading database .............................................. done
Deleting stale VM entities from database ........................ done
Starting core services .......................................... done
Updating obsolete license of vcops for all registered vCenters ... done
Update tomcat logging configuration ............................. done
Update operation for included adapters ....................... started
	--------------------------------------
	UPDATE STATUS
	--------------------------------------
	Update attempted on Mon Jan  5 14:13:01 GMT 2015
	Downloading update .............................................. done
	Checking EULA Acceptance ........................................ done
	Checking disk space on '/' in UI VM ............................. done
	Checking disk space on '/' in Analytics VM ...................... done
	Extracting package .............................................. done
	Validating update files ......................................... done
	Installing update ............................................... done
	Update operation ................................................ done
Installing vmware-vcops-5.0.0-MPforLogInsight-1.0-1859927.pak ... done
Stopping core services .......................................... done
Starting core services .......................................... done
Importing Dashboards/Templates .................................. done
Update operation ................................................ done
Starting administration service ................................. done
Starting core services .......................................... done
- Log in to the Administration portal and verify that the Update tab indicates successful upgrade.
Last update completed successfully
- You might need to refresh the browser to view the updated product version and build number on the Status tab.
vCenter Operations Manager Info
--------------------
Database Version               = 1.0.3900
Version                        = 5.8.4
Build                          = 2199700
- Log in to the vCenter Server that manages the license for vCenter Operations Manager, and apply the new vCenter Operations Manager 5.8.x license key.
You must re-apply the new license key in the vCenter Server after the upgrade. If you do not, you will see reduced functionality in the vCenter Operations Manager interface.
- If the license has to be reapplied, the services must be restarted. Go to the Status tab and click on the Restart button.In the Administration portal, navigate to the Status tab and restart all services;
- Log in to the vSphere Client or the custom UI to verify that the vCenter Operations Manager interface is displayed properly.
Upgrade the OS to SUSE Linux Enterprise Server 11 to SPx
Upgrade the OS to SLES 11 SP3 for vCenter Operations Manager 5.8.x:
This procedure is applicable when performing an in-place vApp OS upgrade to SUSE Linux Enterprise Server (SLES) 11 SP3. An OS upgrade is required to run vCenter Operations Manager 5.8.4.
- Copy the PAK file (VMware-vcops-SP3-2191616.pak) to the data drive of the UI VM. You can use SCP or WinSCP to copy the file. The file is 3.35 GB so make sure you have the disk resources to copy this into the vApp. The vApp should have been provisioned with plenty of space, but confirm the sufficient disk space on the underlying physical disk if the vApp was thin-provisioned.
- Log on as root (not admin!) to the UI VM console.
- Check the root password expiration date verify the password will not expire during the upgrade process. You can also set the root password to not to expire:
firstvm-external:~ # chage -l root
  Minimum: 0
  Maximum: 365
  Warning: 7
  Inactive: -1
  Last Change: Oct 20, 2014
  Password Expires: Oct 20, 2015
  Password Inactive: Never
  Account Expires: Never
firstvm-external:~ # chage -M 99999 -E -1 root
  Aging information changed.
firstvm-external:~ # chage -l root
  Minimum: 0
  Maximum: 99999
  Warning: 7
  Inactive: -1
  Last Change: Oct 20, 2014
  Password Expires: Never
  Password Inactive: Never
  Account Expires: Never
- OPTIONAL: You can check the current version:
firstvm-external:~ # cat /etc/SuSE-release
SUSE Linux Enterprise Server 11 (x86_64)
VERSION = 11
PATCHLEVEL = 1
- Run the following command on the UI VM to start the upgrade process:
/usr/lib/vmware-vcops/user/conf/upgrade/va_sles11_spx_init.sh /data/VMware-vcops-SP3-2191616.pak
This will upgrade both the UI and Analytics VM. Upgrade will start on the Analytics VM and then the UI VM. The entire process can be quite lengthy. The upgrade process is complete when the command prompt returns on the UI VM console.
firstvm-external:~ # /usr/lib/vmware-vcops/user/conf/upgrade/va_sles11_spx_init.sh /data/VMware-vcops-SP3-2191616.pak
Started applying upgrade..
VMware-vcops-SP3-2191616.pak       100% 3273MB  26.6MB/s   02:03

Shutting down the listening SSH daemon..done
Starting SSH daemon..done
Correct common-auth symlinks
Completed.

Shutting down the listening SSH daemon    done
Starting SSH daemon                       done
Correct common-auth symlinks
Completed.
Confirm the OS has been upgraded:
firstvm-external:~ # cat /etc/SuSE-release
SUSE Linux Enterprise Server 11 (x86_64)
VERSION = 11
PATCHLEVEL = 3
- Restart the vCOps vApp.
- Log back into the vCOps User Interface to verify the service is back up and running.
Upgrade is complete!
The WordPress.com stats helper monkeys have been busy putting together a personalised report detailing how www.vStrong.info did in 2014!

The Louvre Museum has 8.5 million visitors per year. This blog was viewed about 136,000 times in 2014. If it were an exhibit at the Louvre Museum, it would take about 6 days for that many people to see it.
The busiest day of the year was December 30th with 798 views. The most popular post that day was Default Passwords. I hope that saved you a lot of time! :)
Click here to view the full report.
Thank you for your continues support!
|
Subscribe to Blog via Email
Join 169 other subscribers
|
Recent Comments