|
|
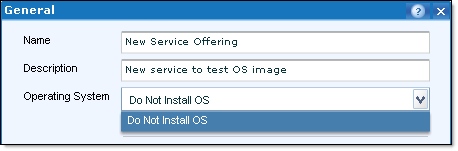
I discovered another post-upgrade problem with UIM/P. I could not select OS image when configuring a new Service Offering in UIM/P.
- UIM/P 3.2:
- UIM/P 4.0 BETA (Nimbus):
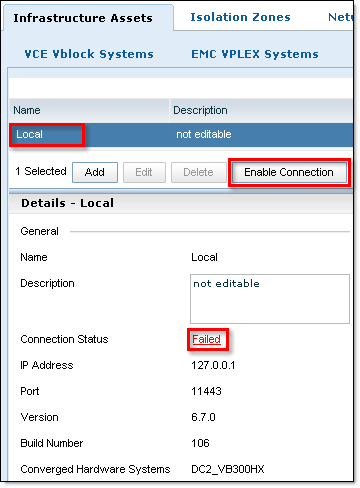
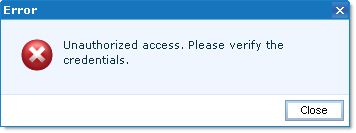
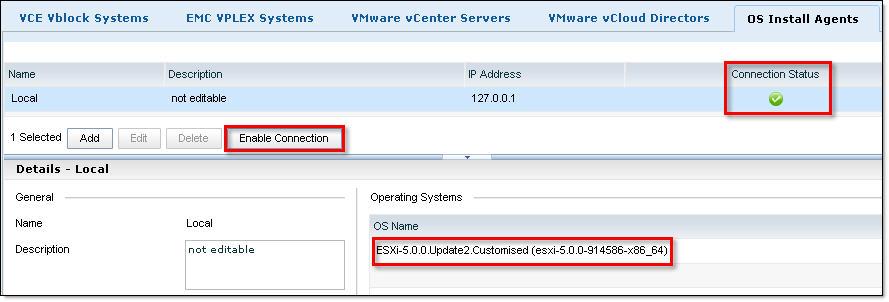
When you click on ‘Enable Connection’ the following error messages displayed:
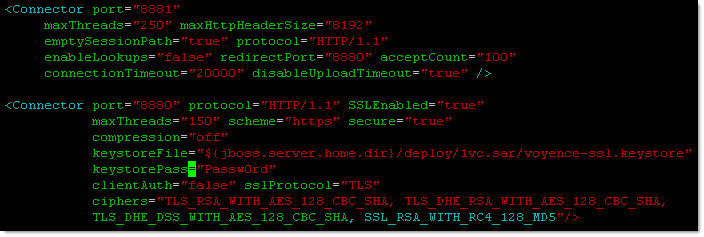
The passphrase used in both of the following files did not match, causing the password failure for homebase server and therefore could not provide UIM with the available ESXi ISOs:
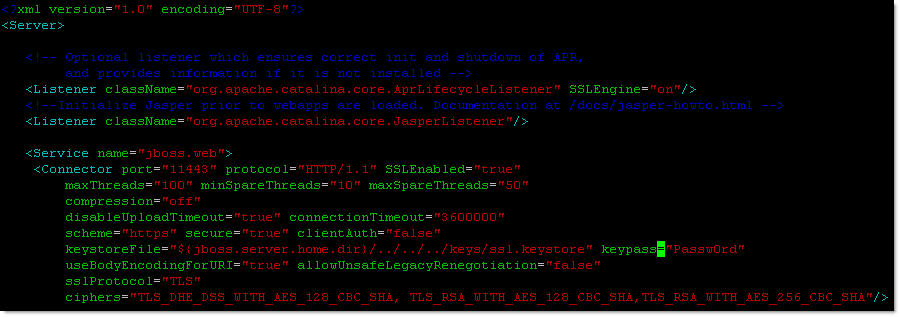
- Make sure the passphrase match:
/opt/ionix-uim/bmp/jboss/server/standard/deploy/jbossweb.sar/server.xml:
<Service name="jboss.web">
<Connector port="11443" protocol="HTTP/1.1" SSLEnabled="true"
maxThreads="100" minSpareThreads="10" maxSpareThreads="50"
compression="off"
disableUploadTimeout="true" connectionTimeout="3600000"
scheme="https" secure="true" clientAuth="false"
keystoreFile="${jboss.server.home.dir}/../../../keys/ssl.keystore" keypass="Passw0rd"                  <--- PASSPHRASE
useBodyEncodingForURI="true" allowUnsafeLegacyRenegotiation="false"
sslProtocol="TLS"
ciphers="TLS_DHE_DSS_WITH_AES_128_CBC_SHA, TLS_RSA_WITH_AES_128_CBC_SHA,TLS_RSA_WITH_AES_256_CBC_SHA"/>
/opt/ionix-uim/jboss/server/vc-server/deploy/jboss-web.deployer/server.xml:
    <Connector port="8880" protocol="HTTP/1.1" SSLEnabled="true"
maxThreads="150" scheme="https" secure="true"
compression="off"
keystoreFile="${jboss.server.home.dir}/deploy/1vc.sar/voyence-ssl.keystore"
keystorePass="Passw0rd"                                                    <--- PASSPHRASE
clientAuth="false" sslProtocol="TLS"
ciphers="TLS_RSA_WITH_AES_128_CBC_SHA, TLS_DHE_RSA_WITH_AES_128_CBC_SHA,
TLS_DHE_DSS_WITH_AES_128_CBC_SHA, SSL_RSA_WITH_RC4_128_MD5"/>
uim001:/opt/ionix-uim/bmp/bin # ./hb_reset_database.sh
=====================================
hb_reset_database.sh
version: 2.0
=====================================
Resetting the Operating System Installation database: /opt/ionix-uim/bmp/databases/derby
-------------------------------------
==> stopping emc-homebase-server
Stopping EMC HomeBase Server...
Stopped EMC HomeBase Server.
done
-------------------------------------
==> stopping emc-homebase-server
Stopping EMC HomeBase Server (Database)...
Stopped EMC HomeBase Server (Database).
done
-------------------------------------
==> Waiting for 30 seconds in order for the services to completely stop
-------------------------------------
==> Removing the database so it can be reset
-------------------------------------
==> starting emc-homebase-server
Starting EMC HomeBase Server (Database)...

done
-------------------------------------
==> starting emc-homebase-server
Starting EMC HomeBase Server...

done
-------------------------------------
==> Waiting for 60 seconds in order for the services to completely start
-------------------------------------
==> Indexing the packages
HomeBase Server 6.7

Server 6.7.0

Starting reindex of all packages as a background task...
Package reindex scheduled, packages will be reindexing in the background.

Completed in 1.5 secs
-------------------------------------
==> Setting credentials
-------------------------------------
Done
- This fixes the issue but if you still experience it, there are two additional steps that you might need to perform as well:
- Reset homebase.admin password:
uim001:/opt/ionix-uim/tools # ./password-change.pl
+========================================================+
| Password Update Utility                                |
+========================================================+
| Available Commands:                                    |
|     [A]uto-Generate All Passwords                      |
|     [C]hange Single Password                           |
|     [S]ychronize from App Server                       |
|     [R]eset the 'sysadmin' account                     |
|     [Q]uit                                             |
+========================================================+
Command: c
+========================================================+
| List of Users                                          |
+--------------------------------------------------------+
| 1. system                                              |
| 2. controlDaemon                                       |
| 3. int_mod_user                                        |
| 4. homebase.admin                                      |
| 5. smi.admin                                           |
| 6. uimadaptadmin                                       |
| 7. internal                                            |
| 8. msa_user                                            |
| 9. jmx-user                                            |
+========================================================+
User (1-9): 4
New Password:
- Restart Tomcat process:
uim001:/ # service uim-slm-tomcat restart
Stopping uim-slm-tomcat
done
Starting uim-slm-tomcat
done
- We can now re-import VMware ESXi ISO image:
uim001:/opt/ionix-uim/tools # ./uim_loadesx.sh -i /tmp/ESXi-5.0.0.Update2.Customised.iso
=====================================
uim_loadesx.sh
version: 2.0
=====================================
==> Importing ISO media
HomeBase Server 6.7

Scanning paths...
You have chosen to upload 319.8 MB of packages using this operating system:

Note: OS information is rarely complete within the packages so it is
recommended to fill in all applicable details for maximum accuracy

Linux distributions in particular need the real os name specified
to ensure proper function of package matching

Server 6.7.0

Uploading: esxi_ESXi-5.0.0.Update2.Customised-5.0.0-esxi-5.0.0-x86_64.disc (319.8 MB)

Successes: 1
Duplicates: 0
Failures: 0

Completed in 40.4 secs
-------------------------------------
Done
- OS image is now available:
- UIM/P 3.2:
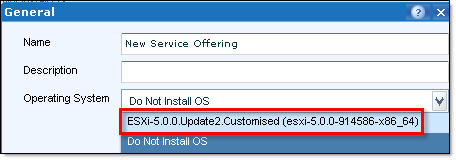
- UIM/P 4.0 BETA (Nimbus):
Hope this will help.
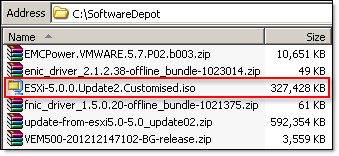
In this tutorial I will be building a custom VMware ISO image that includes VMware vSphere 5.0 Update 2, EMC PowerPath 5.7 P02, Cisco Nexus 1000v VEM and Cisco UCS M81KR VIC fnic and enic drivers.
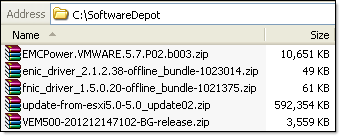
- Download all modules you are planning to add to the image and store them in a folder;
You can also use these online VIB repositories / Software depots from Dell, HP and VMware:
- Make sure VMware Image Builder PowerCLI SnapIn / library has been added:
Get-PSSnapin -Name VMware.ImageBuilder
If not – add VMware Image Builder PowerCLI SnapIn:
Add-PSSnapin VMware.ImageBuilder
- Import the software depot(s) using Add-EsxSoftwareDepot:VMware vSphere 5.0 Update 2:
Add-EsxSoftwareDepot C:SoftwareDepotupdate-from-esxi5.0-5.0_update02.zip
 Depot Url
 ---------
 zip:C:SoftwareDepotupdate-from-esxi5.0-5.0_update02.zip?index.xml
Cisco VIC fnic driver:
Add-EsxSoftwareDepot C:SoftwareDepotfnic_driver_1.5.0.20-offline_bundle-1021375.zip
 Depot Url
 ---------
 zip:C:SoftwareDepotfnic_driver_1.5.0.20-offline_bundle-1021375.zip?index.xml
Cisco VIC enic driver:
Add-EsxSoftwareDepot C:SoftwareDepotenic_driver_2.1.2.38-offline_bundle-1023014.zip
 Depot Url
 ---------
 zip:C:SoftwareDepotenic_driver_2.1.2.38-offline_bundle-1023014.zip?index.xml
EMC PowerPath:
Add-EsxSoftwareDepot C:SoftwareDepotEMCPower.VMWARE.5.7.P02.b003.zip
 Depot Url
 ---------
 zip:C:SoftwareDepotEMCPower.VMWARE.5.7.P02.b003.zip?index.xml
Cisco 1000V VEM:
Add-EsxSoftwareDepot C:SoftwareDepotVEM500-201212147102-BG-release.zip
 Depot Url
 ---------
 zip:C:SoftwareDepotVEM500-201212147102-BG-release.zip?index.xml
- List the Software Packages that you added using Get-EsxSoftwarePackage and make a note of the package name(s):
List only EMC and Cisco packages:
Get-EsxSoftwarePackage | where {$_.Vendor -eq "Cisco" -or $_.Vendor -eq "EMC" } | Format-Table -AutoSize
Name                 Version                      Vendor Release Date
----                 -------                      ------ ------------
scsi-fnic            1.5.0.20-1OEM.500.0.0.472560 Cisco  27/09/2012 20:24:19
net-enic             2.1.2.38-1OEM.500.0.0.472560 Cisco  15/08/2012 17:01:58
powerpath.cim.esx    5.7.0.02.00-b003             EMC    23/07/2012 12:23:55
cisco-vem-v147-esx   4.2.1.1.5.2b.0-3.0.1         Cisco  12/12/2012 21:05:08
powerpath.plugin.esx 5.7.0.02.00-b003             EMC    23/07/2012 12:23:36
powerpath.lib.esx    5.7.0.02.00-b003             EMC    23/07/2012 12:23:56
Or get the full list:
Get-EsxSoftwarePackage | Format-Table -AutoSize
Name                 Version                            Vendor Release Date
------               ------                             ------ ------
esx-base             5.0.0-2.26.914586                  VMware 18/11/2012 19:43:02
ata-pata-atiixp      0.4.6-3vmw.500.0.0.469512          VMware 19/08/2011 01:59:24
net-nx-nic           4.0.557-3vmw.500.1.11.623860       VMware 17/02/2012 21:33:25
scsi-rste            2.0.2.0088-1vmw.500.1.11.623860    VMware 17/02/2012 21:13:28
scsi-mptsas          4.23.01.00-5vmw.500.1.18.768111    VMware 29/06/2012 20:43:56
net-ixgbe            2.0.84.8.2-10vmw.500.0.0.469512    VMware 19/08/2011 01:59:12
scsi-megaraid2       2.00.4-9vmw.500.0.0.469512         VMware 19/08/2011 01:59:16
uhci-usb-uhci        1.0-3vmw.500.0.0.469512            VMware 19/08/2011 01:59:36
net-r8168            8.013.00-3vmw.500.0.0.469512       VMware 19/08/2011 01:59:30
ohci-usb-ohci        1.0-3vmw.500.0.0.469512            VMware 19/08/2011 01:59:36
ipmi-ipmi-si-drv     39.1-4vmw.500.2.26.914586          VMware 18/11/2012 19:38:58
net-e1000            8.0.3.1-2vmw.500.1.18.768111       VMware 29/06/2012 20:43:33
scsi-fnic            1.5.0.20-1OEM.500.0.0.472560       Cisco  27/09/2012 20:24:19
scsi-qla4xxx         5.01.03.2-3vmw.500.0.0.469512      VMware 19/08/2011 01:59:30
ata-pata-sil680      0.4.8-3vmw.500.0.0.469512          VMware 19/08/2011 01:59:26
scsi-megaraid-mbox   2.20.5.1-6vmw.500.0.0.469512       VMware 19/08/2011 01:59:16
scsi-aic79xx         3.1-5vmw.500.0.0.469512            VMware 19/08/2011 01:58:31
esx-tboot            5.0.0-2.26.914586                  VMware 18/11/2012 19:38:18
scsi-mpt2sas         06.00.00.00-6vmw.500.1.11.623860   VMware 17/02/2012 21:33:07
net-bnx2             2.0.15g.v50.11-5vmw.500.0.0.469512 VMware 19/08/2011 01:58:30
ata-pata-serverworks 0.4.3-3vmw.500.0.0.469512          VMware 19/08/2011 01:59:26
net-enic             2.1.2.38-1OEM.500.0.0.472560       Cisco  15/08/2012 17:01:58
scsi-fnic            1.5.0.3-1vmw.500.0.0.469512        VMware 19/08/2011 01:58:58
scsi-lpfc820         8.2.2.1-18vmw.500.0.0.469512       VMware 19/08/2011 01:59:18
scsi-hpsa            5.0.0-17vmw.500.0.0.469512         VMware 19/08/2011 01:58:59
scsi-aacraid         1.1.5.1-9vmw.500.1.11.623860       VMware 17/02/2012 21:32:19
scsi-lpfc820         8.2.2.1-18vmw.500.2.26.914586      VMware 18/11/2012 19:39:07
net-igb              2.1.11.1-3vmw.500.0.0.469512       VMware 19/08/2011 01:59:05
sata-sata-nv         3.5-3vmw.500.0.0.469512            VMware 19/08/2011 01:59:31
net-bnx2x            1.61.15.v50.1-2vmw.500.2.26.914586 VMware 18/11/2012 19:38:45
net-forcedeth        0.61-2vmw.500.0.0.469512           VMware 19/08/2011 01:59:00
powerpath.cim.esx    5.7.0.02.00-b003                   EMC    23/07/2012 12:23:55
scsi-qla2xxx         901.k1.1-14vmw.500.0.0.469512      VMware 19/08/2011 01:59:30
scsi-bnx2i           1.9.1d.v50.1-3vmw.500.0.0.469512   VMware 19/08/2011 01:58:31
net-tg3              3.123b.v50.1-1vmw.500.2.26.914586  VMware 18/11/2012 19:39:29
scsi-adp94xx         1.0.8.12-6vmw.500.0.0.469512       VMware 19/08/2011 01:58:23
net-sky2             1.20-2vmw.500.0.0.469512           VMware 19/08/2011 01:59:36
cisco-vem-v147-esx   4.2.1.1.5.2b.0-3.0.1               Cisco  12/12/2012 21:05:08
powerpath.plugin.esx 5.7.0.02.00-b003                   EMC    23/07/2012 12:23:36
ehci-ehci-hcd        1.0-3vmw.500.1.11.623860           VMware 17/02/2012 21:32:36
sata-ahci            3.0-6vmw.500.1.11.623860           VMware 17/02/2012 21:32:19
ipmi-ipmi-devintf    39.1-4vmw.500.0.0.469512           VMware 19/08/2011 01:59:03
net-e1000e           1.1.2-3vmw.500.1.11.623860         VMware 17/02/2012 21:32:36
misc-drivers         5.0.0-2.26.914586                  VMware 18/11/2012 19:39:35
ipmi-ipmi-si-drv     39.1-4vmw.500.0.0.469512           VMware 19/08/2011 01:59:05
scsi-megaraid-sas    5.34-1vmw.500.1.11.623860          VMware 17/02/2012 21:33:07
tools-light          5.0.0-1.25.912577                  VMware 16/11/2012 19:48:47
powerpath.lib.esx    5.7.0.02.00-b003                   EMC    23/07/2012 12:23:56
sata-sata-promise    2.12-3vmw.500.0.0.469512           VMware 19/08/2011 01:59:31
net-bnx2x            1.61.15.v50.1-1vmw.500.0.0.469512  VMware 19/08/2011 01:58:46
scsi-ips             7.12.05-4vmw.500.0.0.469512        VMware 19/08/2011 01:59:06
ata-pata-cmd64x      0.2.5-3vmw.500.0.0.469512          VMware 19/08/2011 01:59:25
net-e1000e           1.1.2-3vmw.500.2.26.914586         VMware 18/11/2012 19:38:49
net-be2net           4.0.88.0-1vmw.500.0.7.515841       VMware 15/12/2011 00:00:00
sata-sata-sil        2.3-3vmw.500.0.0.469512            VMware 19/08/2011 01:59:34
sata-sata-svw        2.3-3vmw.500.0.0.469512            VMware 19/08/2011 01:59:35
ata-pata-via         0.3.3-2vmw.500.0.0.469512          VMware 19/08/2011 01:59:26
esx-tboot            5.0.0-0.0.469512                   VMware 19/08/2011 01:58:15
ata-pata-pdc2027x    1.0-3vmw.500.0.0.469512            VMware 19/08/2011 01:59:25
misc-cnic-register   1.1-1vmw.500.0.0.469512            VMware 19/08/2011 01:58:38
net-s2io             2.1.4.13427-3vmw.500.0.0.469512    VMware 19/08/2011 01:59:35
sata-ata-piix        2.12-4vmw.500.1.11.623860          VMware 17/02/2012 21:32:19
net-enic             1.4.2.15a-1vmw.500.0.0.469512      VMware 19/08/2011 01:58:54
net-igb              2.1.11.1-3vmw.500.2.26.914586      VMware 18/11/2012 19:38:57
misc-drivers         5.0.0-1.22.821926                  VMware 26/08/2012 01:34:20
ata-pata-hpt3x2n     0.3.4-3vmw.500.0.0.469512          VMware 19/08/2011 01:59:25
block-cciss          3.6.14-10vmw.500.0.0.469512        VMware 19/08/2011 01:58:42
ipmi-ipmi-msghandler 39.1-4vmw.500.0.0.469512           VMware 19/08/2011 01:59:06
net-cnic             1.10.2j.v50.7-2vmw.500.0.0.469512  VMware 19/08/2011 01:58:42
esx-base             5.0.0-1.25.912577                  VMware 16/11/2012 19:52:29
net-ixgbe            2.0.84.8.2-11vmw.500.2.26.914586   VMware 18/11/2012 19:39:01
ima-qla4xxx          2.01.07-1vmw.500.0.0.469512        VMware 19/08/2011 01:59:44
tools-light          5.0.0-2.26.914586                  VMware 18/11/2012 19:38:41
net-tg3              3.110h.v50.4-4vmw.500.0.0.469512   VMware 19/08/2011 01:59:38
ata-pata-amd         0.3.10-3vmw.500.0.0.469512         VMware 19/08/2011 01:59:24
net-r8169            6.011.00-2vmw.500.0.0.469512       VMware 19/08/2011 01:59:31
scsi-mptspi          4.23.01.00-5vmw.500.0.0.469512     VMware 19/08/2011 01:59:21
- List all Image profiles Get-EsxImageProfile:
Get-EsxImageProfile | Format-Table -AutoSize
 Name                             Vendor       Last Modified       Acceptance Level
 ----                             ------       -------------       ----------------
 ESXi-5.0.0-20121202001-no-tools  VMware, Inc. 18/11/2012 21:17:19 PartnerSupported
 ESXi-5.0.0-20121202001-standard  VMware, Inc. 18/11/2012 21:17:19 PartnerSupported
 ESXi-5.0.0-20121201001s-no-tools VMware, Inc. 18/11/2012 21:17:19 PartnerSupported
 ESXi-5.0.0-20121201001s-standard VMware, Inc. 18/11/2012 21:17:19 PartnerSupported
- Create a new (
-NewProfile) or clone existing (-CloneProfile) Image Profile using ‘New-EsxImageProfile‘ :
New-EsxImageProfile -CloneProfile ESXi-5.0.0-20121202001-standard -Name ESXi-5.0.0.Update2.Customised -AcceptanceLevel PartnerSupported
Name                           Vendor          Last Modified   Acceptance Level
----                           ------          -------------   ----------------
ESXi-5.0.0.Update2.Customised  VMware, Inc.    18/11/2012 2... PartnerSupported
N.B. Select correct Acceptance Level – some light reading for you: http://pubs.vmware.com/vsphere-50/index.jsp?topic=%2Fcom.vmware.vsphere.install.doc_50%2FGUID-0410FAFA-A007-4BD5-A0CC-B1D7303853A3.html
- Use the ‘Add-EsxSoftwarePackage’ and ‘Remove-EsxSoftwarePackage‘ cmdlets to add and remove VIBs to/from Image Profile you created.
Add-EsxSoftwarePackage -ImageProfile ESXi-5.0.0.Update2.Customised -SoftwarePackage scsi-fnic,net-enic,powerpath.cim.esx,cisco-vem-v147-esx,powerpath.plugin.esx,powerpath.lib.esx
Name                           Vendor          Last Modified   Acceptance Level
----                           ------          -------------   ----------------
ESXi-5.0.0.Update2.Customised  VMware, Inc.    10/04/2013 1... PartnerSupported
N.B.: Each VIB contains an XML file that has information about the VIB to include any dependencies or conflicts it may have with other VIBs. When adding and removing VIBs you will need to ensure that conflicts are avoided and dependencies are met.
Get-EsxSoftwarePackage net-enic | Select -ExpandProperty Depends
- The final step is to export Image Profile to .ZIP or .ISO file. Export-EsxImageProfile
You can use the ISO file to boot your new hosts and install ESXi. You can use the ZIP file with Update Manager or Auto Deploy. When new hosts are installed using the custom image profile all the VIBs you added will be installed on the host as part of the install.
Export-EsxImageProfile -ImageProfile ESXi-5.0.0.Update2.Customised -ExportToIso -FilePath c:SoftwareDepotESXi-5.0.0.Update2.Customised.iso
Product description
The EMC RecoverPoint product family provides a comprehensive data protection solution for enterprise and commercial customers, providing integrated continuous data protection and continuous remote replication to recover applications to any point in time.
RecoverPoint systems enable reliable replication locally with one RPA cluster, and over any distance to up to four remote RPA clusters. RecoverPoint systems support replication of data that applications are writing to SAN-attached storage using existing Fibre Channel (FC) and iSCSI infrastructure to integrate seamlessly with existing host applications and data storage subsystems. For remote replication, the systems use existing connections to send the replicated data over FC and WAN, and uses FC and IP infrastructure to replicate data asynchronously or synchronously. The systems provide failover of operations to another cluster in the event of a disaster at the production cluster.
The RecoverPoint family consists of three licensing offerings:
- RecoverPoint/CL for EMC and non-EMC storage platforms.
- RecoverPoint/EX for EMC storage platforms (Block), licensed by storage array.
- RecoverPoint/SE for VNX series, CLARiiON CX3 and CX4 series, and Celerra unified storage environments.
New features and changes for release 4.0
- Support for data protection on up to five RPA clusters
RecoverPoint now provides the capability to concurrently protect data to multiple disaster recovery sites using a single management point. For example, data can be protected locally on one RPA cluster and concurrently copied to up to four remote RPA clusters (“fan out”), or replicated from up to four remote RPA clusters to one, central RPA cluster (“fan in”). For installation and deployment information, refer to the EMC RecoverPoint Installation and Deployment Guide. For administration and replication configuration information, refer to the EMC RecoverPoint 4.0 Administrator’s Guide.
- Virtual RPA (vRPA) with VNX splitter
vRPA is a virtual RPA that runs as a virtual machine on VMware ESX servers. Almost all RPA functionality is available in vRPA with little or no additional limitations. Instead of HBAs and Fibre Channel, the vRPA uses iSCSI over a standard IP network; therefore, there are no hardware requirements for the vRPA other than a standard ESX server. For installation, deployment, and operating instructions, refer to EMC RecoverPoint vRPA Technical Notes.
- SRM AnyPIT
SRM AnyPIT enables VMware Site Recovery Manager to access point-in-time images, not only the latest RecoverPoint image. Use EMC Virtual Storage Integrator 5.5 for RecoverPoint from within the vCenter to select the image. Refer to Virtual Storage Integrator documentation for instructions.
- Replicating the same device with both SRDF and RecoverPoint
From RecoverPoint 4.0 and later and Symmetrix Enginuity 5876 Q2 2013 SR and later, it is permitted to replicate the same device with both SRDF and the RecoverPoint Symmetrix splitter, as long as SRDF and RecoverPoint are replicating to two different devices, and RecoverPoint is replicating only to a local copy. For details, refer to the EMC RecoverPoint Deploying with Symmetrix Arrays and Splitter Technical Notes.
- Scale and performance improvements
- Maximum replication throughput for a distributed consistency group, over Fibre Channel or WAN, of 400 MB/s.
- Up to 8K production volumes, when using VNX splitters with VNX OE for Block later than 05.32.000.5.201, and when using VPLEX splitters with VPLEX GeoSynchrony 5.2.
- Intelligent fabric-based splitters (Brocade and SANTap) and host-based splitters are not supported with RecoverPoint 4.0.
- Unisphere for RecoverPoint (new Management Application GUI)
The RecoverPoint GUI, renamed to Unisphere for RecoverPoint, has been completely re-developed using Adobe Flash technology and simplified to promote ease of use and a common user experience between RecoverPoint, VNX, VPLEX, and Symmetrix products.
The new protection and recovery wizards have been streamlined and optimized for a simpler and more intuitive user experience. User inputs have been reduced, more default values have been added, preferred RPAs are automatically defined, and a dashboard has been added to provide an overall view of the system health status.
Furthermore, all of the information displayed in the new GUI is consistently auto-refreshed and the new GUI is aligned with Unisphere’s internationalization support. Detailed information can be found in the EMC RecoverPoint 4.0 Administrator’s Guide.
- RecoverPoint/SE is now customer upgradable – !!!
With the release of Deployment Manager 2.0, RecoverPoint/SE 3.5 and later releases are now customer upgradable. The upgrade process has been greatly simplified and customers can now perform the RecoverPoint/SE software upgrades on their own schedule and without the need to schedule and rely on external resources. To perform the upgrade, you must download the RecoverPoint/SE Upgrade Kit and follow the instructions in the RecoverPoint/SE Upgrade Guide contained within the kit.
- Deployment Manager 2.0
Deployment Manager 2.0, which replaces Deployment Manager 1.1, introduces a number of changes and new features, including a new wizard to connect RPA clusters running release 4.0, the ability to install virtual RPAs, and integration with EMC Online Support site for upgrades. Furthermore, as of 4.0, deployment operations – such as installation, upgrade, and modification – are performed per RPA cluster, not per system. Refer to the RecoverPoint Installation and Deployment Guide and RecoverPoint Deployment Manager 2.0 Release Notes for more information.
- REST API access to the RecoverPoint functional API
The REST API provides a simple-to-use Web interface to the RecoverPoint API that third-party developers can use to integrate RecoverPoint functionality into their own applications and to script RecoverPoint operations. The REST API is documented in the EMC RecoverPoint REST API Programming Guide and Reference Technical Notes.
- SyR improvements
new schema has been developed that supports the new RecoverPoint multi-cluster and eLicensing features, doesn’t change whenever a class in the schema changes, and only contains fields that are required by SyR clients. When testing connectivity, the user is now prompted for a verification email address. If the connectivity test is successful, a service request containing call home event number 30999 is opened and an email is sent to the entered email address from EMC Customer Support to verify that the system reports mechanism (SyR) has been successfully configured.
- Lag Optimizer
RecoverPoint’s consistency group priority with regards to bandwidth allocation has been improved to substantially minimize any business damages customers may incur due to data loss in the actual case of a disaster.
- Licensing improvements
This feature introduces eLicensing. For existing RecoverPoint users, this enhances license tracking and management, improves overall user experience, enables less complex license upgrades, reduces the risk of non-compliance, eliminates the paper right-to-use (RTU) cards and enables self-service license creation. For licensing information, refer to the EMC RecoverPoint 4.0 Administrator’s Guide.
- Journal and repository volumes can now be located on non-licensed arrays
In RecoverPoint/SE and RecoverPoint/EX, journal and repository volumes can now be located on non-licensed arrays.
- Support for sync over IP
RecoverPoint now supports synchronous replication over IP to a remote RPA cluster.
- FIPS 140-2 compliance
The following FIPS (Federal Information Processing Standard) 140-2 validated cryptographic modules are used in RecoverPoint 4.0:
- RSA BSAFE® Crypto-J, JSAFE, and JCE Software Modules
- RSA® BSAFE Crypto-C Micro Edition
- OpenSSL FIPS Object Module
For more information about RecoverPoint security, refer to the EMC RecoverPoint 4.0 Security Configuration Guide.
- User experience enhancements
Many improvements have been made to ensure a better overall total customer experience in RecoverPoint 4.0:
- Splitters residing on licensed arrays are automatically added to the system.
- When recovering production, there is no longer a need to enable image access tothe production and resume production.
- Snapshots now carry a consistency tag that enables the user to mark snapshots that are known to be application-consistent as such. Snapshots created using KVSS are automatically marked as application-consistent.
- Image access is now part of the flow of the recovery wizards and is no longer performed as a separate function. An image access progress indicator and an image access log capacity indicator have both been added to the recovery wizards.
- Users can now select an event in the event log and click “Collect System Information” to open the Collect System Information wizard and RecoverPoint will automatically set the collection start time and end time fields to 10 minutes before and after the selected event.
- Additional RPA cluster information has been added, including; the RecoverPoint version, RPA type (physical or virtual), number of RPAs in the cluster, cluster management (LAN) IPv4 and IPv6, and the time zone of the RPA cluster.
- Bottleneck detection and load balancing analysis are now available from the GUI.
- Read access to replication volumes
When using VNX or Symmetrix splitters, 4.0 supports read access to replication volumes at local and remote copies, without disrupting normal distribution of replicated data to the same volumes. As a result, the Cluster Shared Volumes feature is supported for consistency groups managed by RecoverPoint/CE 4.1.3 or later, for which “read-only” is the default splitter setting. Note that when in read-only mode, consistency and data integrity of the copy volumes are guaranteed only if the user does not mount, unmount, or otherwise manipulate those volumes. For other groups, “fail-all” continues to be the default splitter setting.
- Multipathing performance and robustness improvements
In 4.0, multipathing performance and robustness is improved, thereby simplifying the procedure for changing the mapping of LUNs that have already been exposed to RecoverPoint. This feature is implemented both with FC and iSCSI protocols.
RecoverPoint 4.0 product documentation:
RecoverPoint 4.0 Release Notes
RecoverPoint 4.0 Administrator’s Guide
RecoverPoint 4.0 Security Configuration Guide
RecoverPoint Replicating VMware Technical Notes
RecoverPoint Adapter for VMware vCenter Site Recovery Manager Release Notes
RecoverPoint Deploying with VNX/CLARiiON Arrays and Splitter Technical Notes
RecoverPoint SE Upgrade Kit
RecoverPoint 4.0 ISO
EMC Education Services is offering a limited-time, globally available discount on exam fees in conjunction with EMC World 2013.
Starting on May 5, 2013, you can use the code EMCFB50 to register to take a certification exam at any PearsonVUE testing center worldwide, at a 50% discount. This code will be active until May 31, 2013. During this time, you can register to take exams, which can be scheduled for any date from May 5, 2013 to December 31, 2013.
| Date |
Event |
What It Means |
| May 5, 2013 |
Code Becomes Active |
Register to take an exam at a 50% discount |
| May 12, 2013 |
Promotional Pricing Ends |
This is the last day that you can register for and schedule an exam at a 50% discount |
| December 31, 2013 |
Scheduled Exams Expire |
This is the last available day for scheduling an exam at a discounted rate |
Keep in mind that while you don’t have to actually take the exam between May 5 and May 31, 2013, you must register for an exam to take advantage of this discounted pricing.
Link to the original post: https://community.emc.com/thread/173400
Not so long ago we experienced a very strange outage on our old EMC VNX 5300. All NFS shares went down and the following alerts were present in Unisphere:
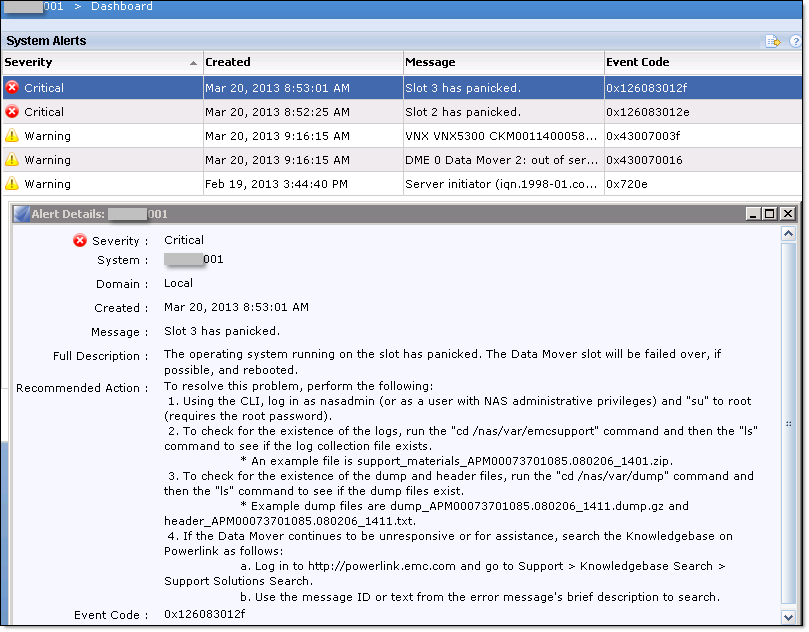
Data Mover failed over to standby:

EMC responded to ESRS alert and after short investigation, advised that both Storage Processors rebooted themselves as per the following EMC Knowledgebase article.
“ETA emc291837: VNX: VNX systems with iSCSI-attached hosts may have a single or dual storage processor (SP) reboot after 248 days of runtime.”
| ID: |
emc291837 |
| Usage: |
161 |
| Date Created: |
04/04/2012 |
| Last Modified: |
01/04/2013 |
| STATUS: |
Approved |
| Audience: |
Customer |
Knowledgebase Solution
| Question: |
ETA emc291837: VNX: VNX systems with iSCSI-attached hosts may have a single or dual storage processor (SP) reboot after 248 days of runtime. |
| Environment: |
EMC Technical Advisory (ETA) |
| Environment: |
Product: VNX Series |
| Environment: |
EMC SW: VNX Operating Environment (OE) 05.31.000.5.0xx |
| Environment: |
EMC SW: VNX Operating Environment (OE) 05.31.000.5.5xx |
| Environment: |
iSCSI connection usage |
| Environment: |
EMC SW: VNX Operating Environment (OE) 05.31.000.5.716 or earlier |
| Problem: |
Single or Dual HEMI_CPU1_WATCHDOG SP, NMI_HARDWARE_FAILURE and/or CMID_BUGCHECK_PARTITION_FROM_LIVE_PEER_DETECTED, or 05900000 FF_ASSERT_PANIC reboot after 248 days of storage processor runtime. |
| Root Cause: |
A timer overflow within the VNX operating system occurs after approximately 248 days of runtime. When this overflow happens, iSCSI-based network traffic can be interrupted. Depending on the length and severity of this interruption, the VNX OE software can interpret it as non-responsive driver software and induce a reset (reboot) to clear the issue.This timer is started when the SP is booted so any non-disruptive upgrade (NDU), or controlled shutdown/reboot sequence resets this timer and starts the clock anew for that SP.The reset does not happen at exactly 248.000 days of runtime because there is some variance depending on the network history of the array. However, all arrays that have so far encountered the issue have reset themselves between 248 and 249 days of runtime. The likelihood of this issue affecting your storage system or environment is extremely low.Note: Not all systems with iSCSI connection usage will necessarily reset themselves after running 248 days. |
| Fix: |
Fix: Upgrade VNX Block OE to 05.31.000.5.726 or later and VNX File OE to 7.0.54.3 or later (if applicable).To determine your system storage processor runtime you can download the SP Runtime tool. The SP Runtime tool requires that your client system has the latest version of Navisphere CLI installed and the SP RemotelyAnywhere IP filters are set to allow your client system to connect to the storage processors. (See the SP Runtime User Manual for more detailed information how to use the tool.)
Workaround:
If upgrading VNX OE is not an option at this time, the storage processors may be rebooted one at a time to reset the 248 day timer. However, before the 248 day timer expires, you must upgrade your VNX OE to the version containing the permanent fix. |
| Notes: |
To check if this issue affects your system: From Unisphere Manager task bar select Hosts > Initiators. Check the Initiator table Protocol column. If any initiators list the ISCSI protocol, your system is affected. |
| Notes: |
AR526528, AR531278 |
| Notes: |
EMC Confidential |
When you contact EMC to arrange VNX upgrade, please bear these in mind:
- VNX block and file OE code version must be compatible with all applications and solutions you have in your environment.
- VMware Site Secovery Manager and SRAs – check VMware Compatibility Guides;
- EMC RecoverPoint – EMC RecoverPoint documentation on EMC Support web site. EMC Simple Support Matrix / EMC RecoverPoint 3.5.
- Prior to VNX OE 5.31 upgrade to 5.32, make sure you run SMLink_check tool (EMC primus emc308955) and confirm all your Virtual Provision (VP) Pools with auto-tiering enabled are OK.

By default, Apache Tomcat web server is configured to listen on port 8080. In order to get it to listen on the default http port 80 you have to reinstall it or follow these instructions:
- Navigate to C:Program FilesApache Software FoundationTomcat 6.0conf and edit server.xml:
Change Connector port from 8080 to 80 (or any other port )
<Connector port="80" protocol="HTTP/1.1"
connectionTimeout="20000"
redirectPort="8443" />
- Restart Tomcat service.
Again, default website is Tomcat home page. If you want to redirect all requests to a specific web app, you need to:
- Make a copy of index.html and/or rename it to index-tomcathome.html in C:Program FilesApache Software FoundationTomcat 6.0webappsROOT;
- Create a new index.html file with the following content:
<html>
<head>
<META http-equiv="refresh" content="0;URL=http://<WebserverName_or_IPaddress>/<webapp_WARName>">
</head>
</html>
For example, for IBM Cognos Incentive Compensation Management (ICM) WEB Client change URL to http://<WebserverName_or_IPaddress>/ICM
Should you need to access Tomcat management home page, you can do so via http://<WebserverName_or_IPaddress>/index-tomcathome.html
Hope this will help.
Topic: “Using UIM Demo Series” weekly series
Date: Every Wednesday, from Wednesday, 17 April 2013 to Wednesday, 8 January 2014
Time: 8:00 AM PDT (America/Los Angeles) / 16:00, GMT Summer Time (London, GMT+01:00)
Meeting Number: 685 169 138
Meeting Password: ChangeIt!@34
Description
This series is designed to give UIM users deep dive of UIM functionality and a forum to get answers from UIM architects.
The following two alternating topic areas will be covered in the first half of the session then leaving time for Q&A:
- 1st and 3rd week of the month – Configuration/compliance management and operations
- 2nd and 4th week of the month – Managing the lifecycle of services on your Vblock (initial set-up, changes to services and infrastructure, adding new services, releasing and decommissioning resources)
To attend this meeting
- Go to https://emc.webex.com/emc/j.php?J=685169138&PW=NZmZjY2Y1ZjFi
- If you are not logged in, log in to your account.
——————————————————
Audio conference information
——————————————————
To receive a call back, provide your phone number when you join the meeting, or call the number below and enter the access code.
Call-in toll-free number (US/Canada): 1-877-668-4490
Call-in toll number (US/Canada): 1-408-792-6300
Toll-free dialing restrictions: http://www.webex.com/pdf/tollfree_restrictions.pdf
Access code: 685 169 138
http://www.webex.com
- Login to UIM/P management interface as sysadmin;
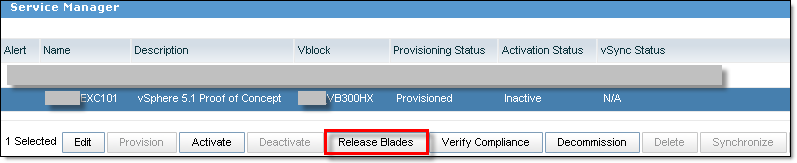
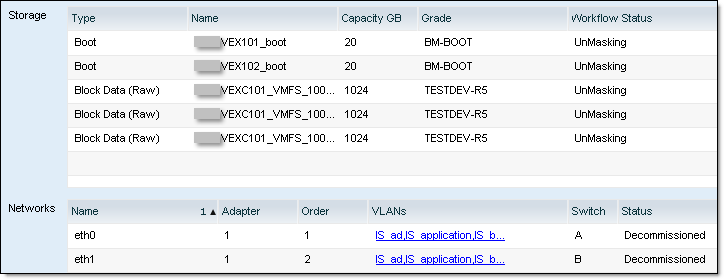
- Navigate to ‘Service Manager’ and highlight the service you would like to decommission or delete;
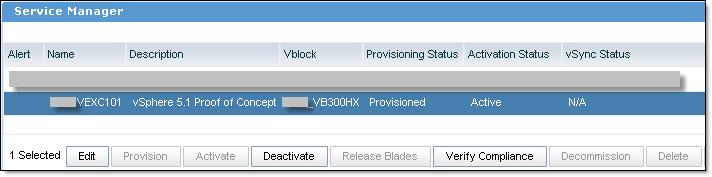
- Click ‘Deactivate’ and select servers you would like to remove from the service or select ALL, click on Deactivate;
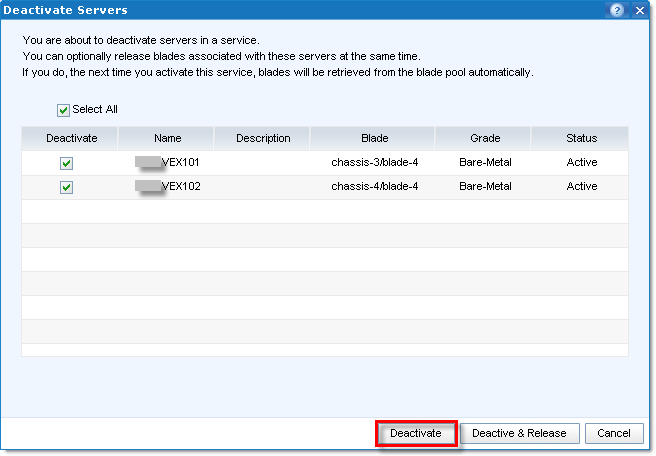
The servers will be powered off, Service Profile and vNIC(s) de-activated:

VEXC101, Deactivating service VEXC101
VEX101, Initiated powering down the service profile VEX101
VEX102, Initiated powering down the service profile VEX102
VEX101, Service profile VEX101 has been shut down
VEX101, Service profile VEX101 is now inactive
VEX102, Service profile VEX102 has been shut down
VEX102, Service profile VEX102 is now inactive
VEXC101, Set service profiles to inactive for VEXC101
VEX101, Set vNIC eth1 inactive
VEX101, Set vNIC eth0 inactive
VEX102, Set vNIC eth1 inactive
VEX102, Set vNIC eth0 inactive
VEXC101, Service VEXC101 deactivation completed
- When the blades have been powered off, they can be released from the service;
- Select the blades and click Continue;
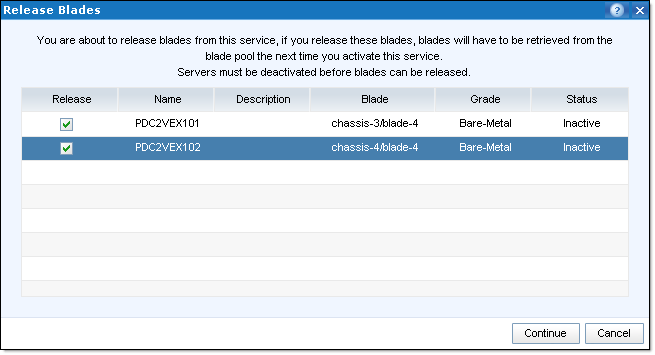

VEXC101, Releasing blades for service VEXC101
chassis-3/blade-4, Releasing blade chassis-3/blade-4 associated with service profile VEX101
VEX101, Successfully released blade associated with service profile VEX101
VEX101, Returning blade to pool
VEX101, Successfully returned blade associated with service profile VEX101
chassis-4/blade-4, Releasing blade chassis-4/blade-4 associated with service profile VEX102
VEX102, Successfully released blade associated with service profile VEX102
VEX102, Returning blade to pool
VEX102, Successfully returned blade associated with service profile VEX102
VEXC101, Released blades for service VEXC101
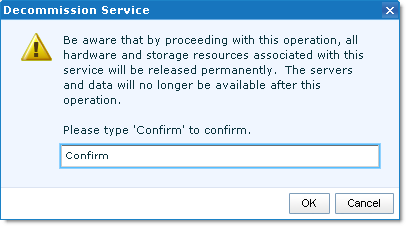
- Highlight the service and click on ‘Decommission’, type ‘Confirm’ and click OK;
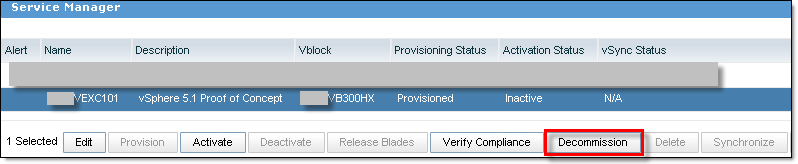
- UIM/P will delete zones in Fabric A/B, disassociate Service Profile(s) from blades and delete them, return MAC addresses and UUIDs to the pool, delete the LUNs.
VEXC101, Decommission of VEXC101 in progress
VEXC101, Decommission of VEXC101 in progress
FABRIC_A, Deleting zones A
FABRIC_B, Deleting zones B
FABRIC_A, Reactivating zoneset A
FABRIC_B, Reactivating zoneset B
VEX101, Disassociating service profile from blade
VEX101, Deleting service profile
VEX101, Returning MAC addresses to pool
VEX101, Returning blade to pool
VEX101, Returning identities to pool
VEX101, Decommissioned
eth1, Decommissioned
eth0, Decommissioned
VEXC101, Decommission of VEXC101 in progress
FABRIC_A, Deleting zones A
FABRIC_B, Deleting zones B
FABRIC_B, Reactivating zoneset B
FABRIC_A, Reactivating zoneset A
VEX102, Disassociating service profile from blade
VEX102, Deleting service profile
VEX102, Returning MAC addresses to pool
VEX102, Returning blade to pool
VEX102, Returning identities to pool
VEX102, Decommissioned
eth1, Decommissioned
eth0, Decommissioned
VEXC101, Unmapping data
VEXC101, Unmapping boot
VEXC101, Unmapping data
VEXC101, Unmapping boot
VEXC101, Unmapping data
VEXC101_VMFS_1001_NON_REPLICATED_BRONZE, Decommissioned
VEX101_boot, Decommissioned
VEXC101_VMFS_1003_NON_REPLICATED_BRONZE, Decommissioned
VEXC101_VMFS_1002_NON_REPLICATED_BRONZE, Decommissioned
VEX102_boot, Decommissioned
VEXC101, Decommissioned
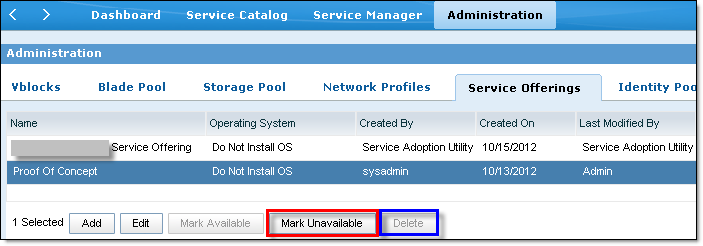
- After that Service Offering can be deleted:

- Delete the Service from Service Offerings:
- Download Cisco Nexus 1000V upgrade code from Cisco web site:
These instructions will be for Cisco Nexus 1000V Release 4.2(1)SV1(5.2b).
- Extract the following files from Nexus1000v.4.2.1.SV1.5.2b.zip:
- VSM – Nexus1000v.4.2.1.SV1.5.2b.zipVSMUpgrade:
- nexus-1000v.4.2.1.SV1.5.2b.bin – system software image;
- nexus-1000v-kickstart.4.2.1.SV1.5.2b.bin – kickstart software image
- VEM – Nexus1000v.4.2.1.SV1.5.2b.zipVEM:
- VMware vSphere ESX 4.1 – VEM410-20121212147401.zip
- VMware vSphere ESX 5.0 – VEM500-201212147102-BG-release.zip
- VMware vSphere ESX 5.1 – VEM510-201212147105-BG-release.zip
- Cisco Nexus 1000V VEM upgrade:
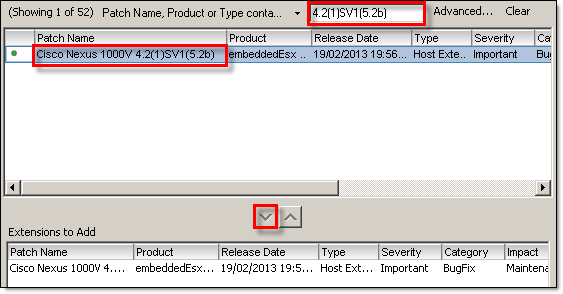
- Open vCenter Update Manager, Admin View, Patch Repository, Import Patches
- Browse for VEM upgrade offline bundle that we extracted from the archive in Step 2, click Next
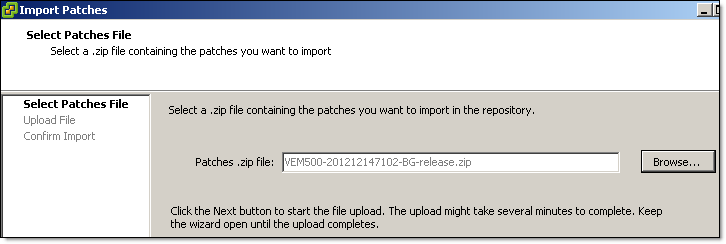
- Confirm the upgrade version and click Finish.

The patch has been added to the Patch Repository.
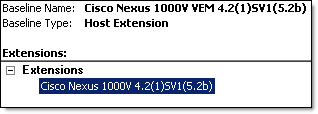
- Click on Baselines and Groups tab and in the Baselines area click on Create…
- Provide a name for the new baseline, select Host Extension, click Next
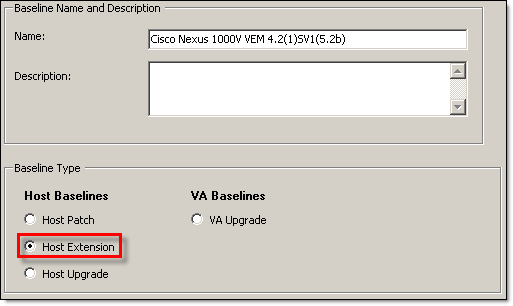
- Select Cisco 1000V VEM and add it to the Baseline, click Next
- Confirm Host Extension version and click Finish.
- Assign newly created Baseline to host/cluster/Data Center and install VEM upgrade following standard host remediation procedure.
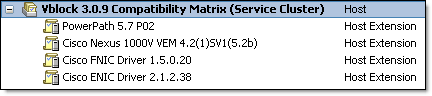
- Alternatively, add this Baseline to Baseline Group, similar to this:
- Cisco Nexus 1000V VSM upgrade:
- Login to the active VSM;
- Save the running configuration to the startup configuration.
1000V-01# copy running-config startup-config
- Ensure that there is enough space for the image file(s);
1000V-01# dir bootflash:

<The list of files in bootflash>

Usage for bootflash://sup-local
672698368 bytes used
922177536 bytes free
1594875904 bytes total
1000V-01# dir bootflash://sup-standby/

<The list of files in bootflash>

Usage for bootflash://sup-standby
500957184 bytes used
1093918720 bytes free
1594875904 bytes total
- Copy the Cisco Nexus 1000V kickstart and system images to the active VSM. You can use ftp:, tftp:, scp:, or sftp:.
1000V-01# copy scp://user@server/folder/nexus-1000v-kickstart.4.2.1.SV1.5.2b.bin bootflash: nexus-1000v-kickstart.4.2.1.SV1.5.2b.bin
1000V-01# copy scp://user@server/folder/nexus-1000v.4.2.1.SV1.5.2b.bin bootflash: nexus-1000v.4.2.1.SV1.5.2b.bin
- Run “show install all impact” command to check for any compatibility issues;
1000V-01# show install all impact kickstart bootflash:nexus-1000v-kickstart.4.2.1.SV1.5.2b.bin system bootflash:nexus-1000v.4.2.1.SV1.5.2b.bin

Verifying image bootflash:/nexus-1000v-kickstart.4.2.1.SV1.5.2b.bin for boot variable "kickstart".
[####################] 100% -- SUCCESS

Verifying image bootflash:/nexus-1000v.4.2.1.SV1.5.2b.bin for boot variable "system".
[####################] 100% -- SUCCESS

Verifying image type.
[###########         ]  50%
[####################] 100% -- SUCCESS

Extracting "system" version from image bootflash:/nexus-1000v.4.2.1.SV1.5.2b.bin.
[####################] 100% -- SUCCESS

Extracting "kickstart" version from image bootflash:/nexus-1000v-kickstart.4.2.1.SV1.5.2b.bin.
[####################] 100% -- SUCCESS

Notifying services about system upgrade.
[####################] 100% -- SUCCESS

Compatibility check is done:
Module  bootable          Impact  Install-type  Reason
------  --------  --------------  ------------  ------
1       yes       non-disruptive  reset
2       yes       non-disruptive  reset

Images will be upgraded according to following table:
Module   Image         Running-Version         New-Version          Upg-Required
------  ----------  ----------------------  ----------------------  ------------
1      system          4.2(1)SV1(5.1a)         4.2(1)SV1(5.2b)           yes
1   kickstart          4.2(1)SV1(5.1a)         4.2(1)SV1(5.2b)           yes
2      system          4.2(1)SV1(5.1a)         4.2(1)SV1(5.2b)           yes
2   kickstart          4.2(1)SV1(5.1a)         4.2(1)SV1(5.2b)           yes

Module     Running-Version         ESX Version                                           VSM Compatibility       ESX Compatibility
------  ----------------------  ----------------------------------------------------  ----------------------  ----------------------
17         4.2(1)SV1(5.1a)         VMware ESXi 5.0.0 Releasebuild-768111 (3.0)              COMPATIBLE              COMPATIBLE
18         4.2(1)SV1(5.1a)         VMware ESXi 5.0.0 Releasebuild-768111 (3.0)              COMPATIBLE              COMPATIBLE
<skipped>
Make sure the impact of VSM module upgrade is ‘non-disruptive’ and upgraded VSM is compatible with VEM and ESX version.
- Perform the upgrade on the active VSM using the kickstart and system images;
1000V-01# install all kickstart bootflash:nexus-1000v-kickstart.4.2.1.SV1.5.2b.bin system bootflash:nexus-1000v.4.2.1.SV1.5.2b.bin

Verifying image bootflash:/nexus-1000v-kickstart.4.2.1.SV1.5.2b.bin for boot variable "kickstart".
[####################] 100% -- SUCCESS

Verifying image bootflash:/nexus-1000v.4.2.1.SV1.5.2b.bin for boot variable "system".
[####################] 100% -- SUCCESS

Verifying image type.
[####################] 100% -- SUCCESS

Extracting "system" version from image bootflash:/nexus-1000v.4.2.1.SV1.5.2b.bin.
[####################] 100% -- SUCCESS

Extracting "kickstart" version from image bootflash:/nexus-1000v-kickstart.4.2.1.SV1.5.2b.bin.
[####################] 100% -- SUCCESS

Notifying services about system upgrade.
[####################] 100% -- SUCCESS

Compatibility check is done:
Module  bootable          Impact  Install-type  Reason
------  --------  --------------  ------------  ------
1       yes  non-disruptive         reset
2       yes  non-disruptive         reset

Images will be upgraded according to following table:
Module   Image         Running-Version         New-Version           Upg-Required
------  ----------  ----------------------  ----------------------  ------------
1      system         4.2(1)SV1(5.1a)         4.2(1)SV1(5.2b)           yes
1   kickstart         4.2(1)SV1(5.1a)         4.2(1)SV1(5.2b)           yes
2      system         4.2(1)SV1(5.1a)         4.2(1)SV1(5.2b)           yes
2   kickstart         4.2(1)SV1(5.1a)         4.2(1)SV1(5.2b)           yes

Module     Running-Version         ESX Version                                           VSM Compatibility       ESX Compatibility
------  ----------------------  ----------------------------------------------------  ----------------------  ----------------------
17         4.2(1)SV1(5.1a)         VMware ESXi 5.0.0 Releasebuild-821926 (3.0)              COMPATIBLE              COMPATIBLE
18         4.2(1)SV1(5.1a)         VMware ESXi 5.0.0 Releasebuild-821926 (3.0)              COMPATIBLE              COMPATIBLE
<skipped>
Do you want to continue with the installation (y/n)?  [n]
Continue with the installation by pressing Y, if you press N, the installation will be aborted.
Install is in progress, please wait.

Syncing image bootflash:/nexus-1000v-kickstart.4.2.1.SV1.5.2b.bin to standby.
[####################] 100% -- SUCCESS

Syncing image bootflash:/nexus-1000v.4.2.1.SV1.5.2b.bin to standby.
[####################] 100% -- SUCCESS

Setting boot variables.
[####################] 100% -- SUCCESS

Performing configuration copy.
[####################] 100% -- SUCCESS

Module 2: Waiting for module online.
-- SUCCESS

Notifying services about the switchover.
[####################] 100% -- SUCCESS

"Switching over onto standby".

Install has been successful.
As part of the upgrade process, the standby VSM is reloaded with new software images. Once it becomes the HA standby again, the upgrade process initiates a switchover
- After upgrade completed, log in and verify that the switch is running the required software version.
1000V-01# show version
<skipped>
Software
loader:    version unavailable [last: loader version not available]
kickstart: version 4.2(1)SV1(5.2b)
system:    version 4.2(1)SV1(5.2b)

In January 2013 I had an unpleasant experience with VMware Certification Marketplace. I purchased an Exam Voucher for VMware Certified Professional 5 – Desktop (VCP5-DT) exam but it was not valid for tests scheduled in the UK. When I realised my mistake, I contacted the Customer Support and asked for a refund. There is no telephone number on the web site and the only way you can contact Customer Service is via email. When I did not get any reply, I tried to send email again and even included Pearson VUE Customer Support. Eventually, after about three weeks, I received a reply from them and got the refund.
Last night I received this email from VMware Certification Marketplace:
Introducing the VMware Certification Marketplace — your global VMware certification learning resource!
Recently, we opened our online store for customers located around the globe. Now, from Anguilla to Zimbabwe, customers can log on and find best-of-breed online learning resources and exam vouchers to take VMware certification exams.
To help you get started, we would like to offer you 20% off your first order of learning products on the VMware Certification Marketplace. Simply enter the coupon code Global2013, in your shopping cart before checking out.
Hurry, offer expires on April 30, 2013*.
*Discount excludes exam vouchers sold on the VMware Certification Marketplace
What an excellent news! It looks like exam takers from UK might be able to save some money, see below:
VMware Certification Marketplace
Price for VCP and VCAP exams, converted to GBP, no VAT:
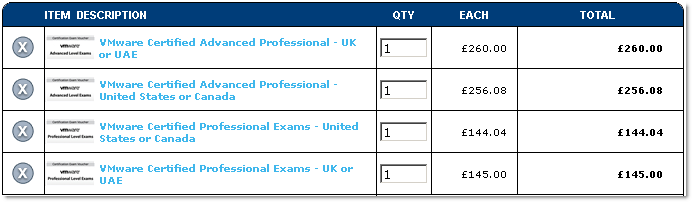
PLEASE NOTE: Please keep in mind that this is just a guide for your information based on current currency conversion rates. Your final payment will be made in USD.
|
Subtotal:
|
£805.12 |
|
Shipping & Handling:
|
£0.00 |
|
VAT:
|
£0.00 |
|
Total:
|
£805.12 |
| NOTE: Your actual cost is $1,257.63 USD. All other currencies displayed on this page are for your convenience only, and are not actual costs. Exchange rates may vary. |
Pearson VUE
Price for VCP exam, in GBP + 20% VAT:
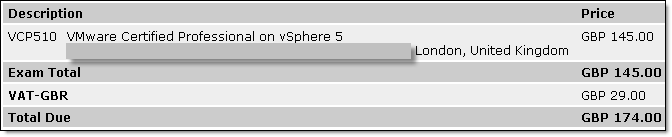
I am not planning to book any VMware exams in the near future, I would really appreciate if you could test the theory and confirm that we can really save 20% on VAT in the UK. Please let me know and I will update the post.
Thank you.
|
Subscribe to Blog via Email
Join 169 other subscribers
|
Recent Comments