|
|
I have been asked to write a script to find out who created a particular VM or get a list of VMs that were built in the last N days…
Again, we need to go through the vCenter database and search for a particular event type or name. Cmdlet that is going to help us is Get-VIEvent, well documented <here>.
Next step is to filter Events of a particular type/name. Get-VM | Get-VIEvent -Types Info | Where {$_.Gettype().Name -eq "VMEvent"}. Full list of virtual machine VM events is available at the bottom of this post.
What VM events correspond to VM deployment? Well, you can create, register or deploy VM from a template / clone VM. All these actions have corresponding VM Events but not all of them give us the information that we need:
- “
VmClonedEvent” records the event when VM has been cloned but does not tell you what VM it has been cloned to:
UserName                        CreatedTime         FullFormattedMessage
--------                        -----------         --------------------
vStrong.localzmark.strong      30/09/2013 13:52:44 Clone of DDC1EDI002 completed
This VM Event is useful if you want to check whether the cloning/deploying from a template was successful. I am more interested in what VM the template has been cloned to, not the fact that the template has been cloned, therefore, I will not include “VmClonedEvent” in my script.
- “
VmDeployedEvent” only tells you that VM has been deployed from a template but does not tell you what template is got deployed from:
UserName                        CreatedTime         FullFormattedMessage
--------                        -----------         --------------------
vStrong.localzmark.strong      13/09/2013 11:50:57 Template tdc1orac002n002 deployed on host ddc1vexc01n02.vStrong.local
If you use “VmBeingDeployedEvent“, you get a the information what template VM gets deployed from:
UserName                        CreatedTime         FullFormattedMessage
--------                        -----------         --------------------
vStrong.localzmark.strong      13/09/2013 11:48:25 Deploying tdc1orac002n002 on host ddc1vexc01n02.vStrong.local in DC1 from template TestOracleCluster
You also can run a query to check if the VM deployment was successful…
OK, here is “Who created this VM” script?
Get-VM -Name MyVM | Get-VIEvent -Types Info |`
Where {`
     $_.GetType().Name -eq "VmBeingDeployedEvent"`
 -or $_.GetType().Name -eq "VmCreatedEvent"`
 -or $_.GetType().Name -eq "VmRegisteredEvent"} |`
Select UserName, CreatedTime, FullFormattedMessage | FT -AutoSize
VM created in the last seven days:
$CDT = Get-Date # CDT stands for 'Current Date and Time' :)
Get-Cluster -Name MyCluster | Get-VM |`
Get-VIEvent -Types Info -Start $CDT.AddDays(-7) -Finish $CDT |`
Where {`
      $_.Gettype().Name -eq "VmBeingDeployedEvent"`
  -or $_.Gettype().Name -eq "VmCreatedEvent"`
  -or $_.Gettype().Name -eq "VmRegisteredEvent"} |`
Select UserName, CreatedTime, FullFormattedMessage | Format-Table -AutoSize
Script output:
UserName                CreatedTime         FullFormattedMessage
--------                -----------         --------------------
vStrongzMark.Strong    13/09/2013 11:48:25 Deploying tdc1orac002n002 on host ddc1vexc01n02.vStrong.local in DC1 from template TestOracleCluster
vStrongzMark.Strong    17/09/2013 16:56:50 Registered Lost_and_Found on ddc1vexc01n02.vStrong.local in DC1
vStrongzSvcTrendMicro  18/08/2013 18:14:09 Created virtual machine dsva-ddc1vexc01n02 on ddc1vexc01n02.vStrong.local in DC1
You can also amend the script as the following:
$CDT = Get-Date # CDT stands for 'Current Date and Time'
Get-VM | Get-VIEvent -Types Info -Start $CDT.AddDays(-7) -Finish $CDT |`
Where {$_ -is [Vmware.vim.VmBeingDeployedEvent]`
-or $_ -is [Vmware.vim.VmCreatedEvent]`
-or $_ -is [Vmware.vim.VmRegisteredEvent]}|`
Select UserName, CreatedTime, FullFormattedMessage
You can get / refer to VM name as ‘$_.Vm.Name’. Therefore, if you are interested how much memory or CPU VM is configured with,
Select UserName, CreatedTime, FullFormattedMessage, @{ Name="VM"; Expression={$_.Vm.Name}}, @{ Name="CPU"; Expression={(Get-VM -Name $_.Vm.Name).NumCPU}}
Full list of virtual machine events:
VMware vSphere API 5.1:
http://pubs.vmware.com/vsphere-51/index.jsp#com.vmware.wssdk.apiref.doc/vim.event.VmEvent.html
- CustomizationEvent, DrsRuleComplianceEvent, DrsRuleViolationEvent, MigrationEvent, NoMaintenanceModeDrsRecommendationForVM, NotEnoughResourcesToStartVmEvent, VmAcquiredMksTicketEvent, VmAcquiredTicketEvent, VmAutoRenameEvent, VmBeingCreatedEvent, VmBeingDeployedEvent, VmBeingHotMigratedEvent, VmBeingMigratedEvent, VmCloneEvent, VmConfigMissingEvent, VmConnectedEvent, VmCreatedEvent, VmDasBeingResetEvent, VmDasResetFailedEvent, VmDasUpdateErrorEvent, VmDasUpdateOkEvent, VmDateRolledBackEvent, VmDeployedEvent, VmDeployFailedEvent, VmDisconnectedEvent, VmDiscoveredEvent, VmDiskFailedEvent, VmEmigratingEvent, VmEndRecordingEvent, VmEndReplayingEvent, VmFailedMigrateEvent, VmFailedRelayoutEvent, VmFailedRelayoutOnVmfs2DatastoreEvent, VmFailedStartingSecondaryEvent, VmFailedToPowerOffEvent, VmFailedToPowerOnEvent, VmFailedToRebootGuestEvent, VmFailedToResetEvent, VmFailedToShutdownGuestEvent, VmFailedToStandbyGuestEvent, VmFailedToSuspendEvent, VmFailedUpdatingSecondaryConfig, VmFailoverFailed, VmFaultToleranceStateChangedEvent, VmFaultToleranceTurnedOffEvent, VmFaultToleranceVmTerminatedEvent, VmGuestRebootEvent, VmGuestShutdownEvent, VmGuestStandbyEvent, VmInstanceUuidAssignedEvent, VmInstanceUuidChangedEvent, VmInstanceUuidConflictEvent, VmMacAssignedEvent, VmMacChangedEvent, VmMacConflictEvent, VmMaxFTRestartCountReached, VmMaxRestartCountReached, VmMessageErrorEvent, VmMessageEvent, VmMessageWarningEvent, VmMigratedEvent, VmNoCompatibleHostForSecondaryEvent, VmNoNetworkAccessEvent, VmOrphanedEvent, VmPoweredOffEvent, VmPoweredOnEvent, VmPoweringOnWithCustomizedDVPortEvent, VmPrimaryFailoverEvent, VmReconfiguredEvent, VmRegisteredEvent, VmRelayoutSuccessfulEvent, VmRelayoutUpToDateEvent, VmReloadFromPathEvent, VmReloadFromPathFailedEvent, VmRelocateSpecEvent, VmRemoteConsoleConnectedEvent, VmRemoteConsoleDisconnectedEvent, VmRemovedEvent, VmRenamedEvent, VmRequirementsExceedCurrentEVCModeEvent, VmResettingEvent, VmResourcePoolMovedEvent, VmResourceReallocatedEvent, VmResumingEvent, VmSecondaryAddedEvent, VmSecondaryDisabledBySystemEvent, VmSecondaryDisabledEvent, VmSecondaryEnabledEvent, VmSecondaryStartedEvent, VmStartingEvent, VmStartingSecondaryEvent, VmStartRecordingEvent, VmStartReplayingEvent, VmStaticMacConflictEvent, VmStoppingEvent, VmSuspendedEvent, VmSuspendingEvent, VmTimedoutStartingSecondaryEvent, VmUpgradeCompleteEvent, VmUpgradeFailedEvent, VmUpgradingEvent, VmUuidAssignedEvent, VmUuidChangedEvent, VmUuidConflictEvent, VmWwnAssignedEvent, VmWwnChangedEvent, VmWwnConflictEvent
VMware Infrastructure API 2.5:
http://www.vmware.com/support/developer/vc-sdk/visdk25pubs/ReferenceGuide/vim.event.VmEvent.html
- CustomizationEvent, MigrationEvent, NoMaintenanceModeDrsRecommendationForVM, NotEnoughResourcesToStartVmEvent, VmAcquiredMksTicketEvent, VmAutoRenameEvent, VmBeingCreatedEvent, VmBeingDeployedEvent, VmBeingHotMigratedEvent, VmBeingMigratedEvent, VmCloneEvent, VmConfigMissingEvent, VmConnectedEvent, VmCreatedEvent, VmDasUpdateErrorEvent, VmDasUpdateOkEvent, VmDateRolledBackEvent, VmDeployedEvent, VmDeployFailedEvent, VmDisconnectedEvent, VmDiscoveredEvent, VmDiskFailedEvent, VmEmigratingEvent, VmFailedMigrateEvent, VmFailedRelayoutEvent, VmFailedRelayoutOnVmfs2DatastoreEvent, VmFailedToPowerOffEvent, VmFailedToPowerOnEvent, VmFailedToRebootGuestEvent, VmFailedToResetEvent, VmFailedToShutdownGuestEvent, VmFailedToStandbyGuestEvent, VmFailedToSuspendEvent, VmFailoverFailed, VmGuestRebootEvent, VmGuestShutdownEvent, VmGuestStandbyEvent, VmMacAssignedEvent, VmMacChangedEvent, VmMacConflictEvent, VmMessageEvent, VmMigratedEvent, VmNoNetworkAccessEvent, VmOrphanedEvent, VmPoweredOffEvent, VmPoweredOnEvent, VmReconfiguredEvent, VmRegisteredEvent, VmRelayoutSuccessfulEvent, VmRelayoutUpToDateEvent, VmRelocateSpecEvent, VmRemovedEvent, VmRenamedEvent, VmResettingEvent, VmResourcePoolMovedEvent, VmResourceReallocatedEvent, VmResumingEvent, VmStartingEvent, VmStaticMacConflictEvent, VmStoppingEvent, VmSuspendedEvent, VmSuspendingEvent, VmUpgradeCompleteEvent, VmUpgradeFailedEvent, VmUpgradingEvent, VmUuidAssignedEvent, VmUuidChangedEvent, VmUuidConflictEvent, VmWwnAssignedEvent, VmWwnChangedEvent, VmWwnConflictEvent
Backup/Restore UIM/P database:
uim001:/opt/ionix-uim/tools # ./backup.pl
 Would you like to back up your current data? [y/n]
 y
 Backing up database...
 Backing up files...
 Building backup image file...
 Backup file created: /opt/ionix-uim/data-image/backup-image-4.0.0.0.314.CS.Sep-16-2013-14.04.tgz

 To restore this data file, type:
 restore.pl backup-image-4.0.0.0.314.CS.Sep-16-2013-14.04.tgz
Collect UIM/P logs:
uim001:/opt/ionix-uim/tools # ./saveLogs.pl all
 adding: opt/ionix-uim/logs/cflist.3.log (deflated 95%)
 adding: opt/ionix-uim/logs/ssh.log (stored 0%)
 {skipped}
 adding: messages_16-9-2013.log (deflated 95%)

The logfile zip is at /opt/ionix-uim/logs/logs-14_6_50-16-9-2013-all.zip (121345020 bytes)
We all well familiar with the problem with Raw Device Mapped (RDM) LUNs that are used by VMs running Microsoft Clusters Service.
VMware KB: 1016106
ESXi 5.0 uses a technique to determine if Raw Device Mapped (RDM) LUNs are used for MSCS cluster devices, by introducing a configuration flag to mark each device as “perennially reserved” that is participating in an MSCS cluster. During the boot of an ESXi host, the storage mid-layer attempts to discover all devices presented to an ESXi host during the device claiming phase. However, MSCS LUNs that have a permanent SCSI reservation cause the boot process to lengthen as the ESXi host cannot interrogate the LUN due to the persistent SCSI reservation placed on a device by an active MSCS Node hosted on another ESXi host.
Going through the ESX host logs we noticed several storage errors such as the following.
2013-09-10T10:36:37.498Z cpu0:6070)Partition: 484: Read of GPT header failed on "naa.6006016002d02c00763f3a9f87b0e111": I/O error

2013-09-10T10:36:40.389Z cpu5:6070)WARNING: Partition: 1083: Device "naa.6006016031d02c00ec0b2c0d8f88e211" with a VMFS partition is marked perennially reserved. This is not supported and may lead to data loss.
We still need to investigate how or why the LUN that is VMFS formatted has been configured as such but in the mean time, here is the script that checks if any datastore / corresponding LUN is configured as “Perennially Reserved“.
$PRreport = @()
$cluster = "My_Super_Cluster"
$vmhosts = Get-Cluster -Name $cluster | Get-VMHost
foreach ($vmhost in $vmhosts) {
$myesxcli = Get-EsxCli -VMHost $vmhost
foreach ($DS in Get-Datastore -VMHost $vmhost){
$Result = New-Object PSObject
$DSDiskName = $DS.ExtensionData.Info.vmfs.extent[0].diskname
$diskinfo = $myesxcli.storage.core.device.list("$DSDiskName") | Select IsPerenniallyReserved
# Option 1| Write-Host $vmhost, $DS, $DS.ExtensionData.Info.vmfs.extent[0].diskname, $diskinfo.IsPerenniallyReserved
# Option 3| if ($diskinfo.IsPerenniallyReserved -eq "true"){
# Option 2| $Result | add-member -membertype NoteProperty -name "Host" -Value $vmhost
# Option 2| $Result | add-member -membertype NoteProperty -name "Datastore" -Value $DS
# Option 2| $Result | add-member -membertype NoteProperty -name "Disk Name" -Value $DS.ExtensionData.Info.vmfs.extent[0].diskname
# Option 2| $Result | add-member -membertype NoteProperty -name "Is PR'd?" -Value $diskinfo.IsPerenniallyReserved
# Option 2| $PRreport += $Result
# Option 3| }
}
}
# Option 2| $PRreport | Export-Csv -Path "C:PRreport.csv"
There are three output options. (Un-comment relevant line and remote “Option x|”):
- Option 1| – Lists Host name, Datastore name, Disk Name, Perennially Reserved (true or false);
ESX51-01.vStrong.info DATASTORE01 naa.6006016031d02c0007171886a6fae211 false
- Option 2| – Exports the list to CSV file
| Host |
Datastore |
Disk Name |
Is PR’d? |
ESX51-01.vStrong.info |
DATASTORE01 |
naa.6006016031d02c0007171886a6fae211 |
FALSE |
- Option 3| – Does exactly the same as Option 2 but lists PR’ed LUNs only.
Hope this will help.
I am sure you have been in a situation where there are a lot of old, unidentifiable virtual machine snapshots and no one takes responsibility for creating them. How would you deal with all these “pre install”, “upgrade” or any other meaningless snapshot names without description?
Well, it is easy to find out when snapshot was taken ( Get-VM | Get-Snapshot | Select-Object VM, Name, SizeMB, Created ) but how to identify, name and shame users who created them?
Depending on vCenter Event database retention policy, the username might not be available – the Create VM snapshot event has already been purged.
Check the Database Retention Policy configuration: Administration / vCenter Server Settings / Database Retention Policy / Tasks retained for X days, Events retained for X days.
Here is the script that gets a list of virtual machine snapshots and users who created them:
#
foreach ($snap in Get-VM | Get-Snapshot)
{$snapevent = Get-VIEvent -Entity $snap.VM -Types Info -Finish $snap.Created -MaxSamples 1 | Where-Object {$_.FullFormattedMessage -imatch 'Task: Create virtual machine snapshot'}
if ($snapevent -ne $null){Write-Host ( "VM: "+ $snap.VM + ". Snapshot '" + $snap + "' created on " + $snap.Created.DateTime + " by " + $snapevent.UserName +".")}
else {Write-Host ("VM: "+ $snap.VM + ". Snapshot '" + $snap + "' created on " + $snap.Created.DateTime + ". This event is not in vCenter events database")}}
#
Output result example:
VM: DC2DC001. Snapshot 'pre-5.1.2upgrade' created on 28 July 2013 07:10:26 by vStrong.infowin8user.

VM: DC1DC001. Snapshot 'pre 5.1.2a upgrade' created on 28 July 2013 07:51:24 by vStrong.infowin7user.

VM: DC2APP001. Snapshot 'pre-fix' created on 02 August 2012 14:29:19. This event is not in vCenter events database
Hope this will help.
UIM/P Nimbus has been released as UIM/P v. 4.0 on the 15th of August 2013. I was waiting for the official announcement and the release code on the Unified Infrastructure Manager/Provisioning page on support.emc.com but, as it turned out, version 4.0 will have its own support page: https://support.emc.com/products/28497_Unified-Infrastructure-Manager
The review of new features can be found on this blog post: EMC UIM/P (Nimbus) review
New features and changes
Support for FAST VP Storage
UIM/P provides support for the discovery and display of the Fully Automated Storage Tiering for Virtual Pools (FAST VP) feature available on the Symmetrix VMAX series and EMC VNX series platforms.
FAST VP Policies are discovered at the same time as Converged Hardware System discovery. When made available, you can assign FAST VP Policies (instead of grades) to block storage when creating service offerings and services.
Support for Shared Storage
UIM/P provides support for shared storage. You can now share datastores across multiple services.
UIM/P services prior to UIM/P 4.0 are now referred to as standard services. A shared storage service is a service that contains LUNs that are shared across multiple standard services. Using UIM/P you can attach multiple standard services to a shared storage service.
Storage Group Selector
For non-shared VMAX storage, if there is more than one storage group available on the array when adding storage to a standard service, UIM/P will allow you to select which storage group to use.
If multiple storage groups are available for new storage resources in your standard service, the ‘Storage Group’ field appears when you use the Service Manager and add block storage.
Support for VPLEX
UIM/P services prior to UIM/P 4.0 are now referred to as standard services.
Introduced in UIM/P 4.0, the new VPLEX service is a service that allows management of virtual volumes shared across stretched clusters. The stretch clusters are represented by two standard services attached to the VPLEX service; where the standard services are in different sites (Converged Hardware Systems).
OS Install Agent
UIM/P now allows you to fully manage and provision remote Converged Hardware Systems.
Due to latency issues, local OS Install Agents may sometimes not allow operating system installations over WAN. To support VPLEX, and to provision Converged Hardware Systems to install operating systems over WAN, UIM/P can now interface with instances of remote OS Install Agents in addition to local ones.
To enter information for a remote OS Install Agent and associate it with a Converged Hardware System, log into the UIM/P console and go to the Administration, Infrastructure Assets, OS Install Agents tab.
Enhancements and changes to the ICA utility
As for previous releases, the standalone UIM/P Infrastructure Configuration Analyzer (ICA) utility can be run from the command line, using credentials entered in an XML file. In this release, the standalone ICA utility has been enhanced to also determine VSPEX and VPLEX, and to run the relevant tests as appropriate for the given components. In addition to running on VMs, the standalone ICA utility can now also be run on Windows.
For more information, refer to EMC Unified Infrastructure Manager/Provisioning Configuration Requirements for Converged Hardware Systems.
Support for DNS, NTP, and SSH settings
UIM/P allows you to perform additional ESX configuration, which will help you reduce manual post-provisioning steps. You can use UIM/P to configure IP addresses for DNS servers, IP address for NTP servers, and to enable SSH to the ESX/ESXi operating systems. The DNS, NTP, and SSH settings will be applied to all the servers in a standard service, when the standard service is provisioned.
To configure the DNS, NTP, and SSH settings, use the UI console, access the Service Manager, edit a standard service, and go to the Server tab.
Enhancements and changes to automatic compliance checking
Compliance checking verifies that the provisioning performed by UIM/P matches what is on the equipment.
Starting with this release of UIM/P, automatic compliance checking on standard services is switched off by default.
To enable automatic compliance checking for a standard service: use the Service Manager to edit the standard service; on the General tab, check the Auto Compliance checkbox. However, if you enable automatic compliance checking for a standard service after it has been provisioned, you will need to run a compliance check to regenerate the tests for OOB changes to be captured.
You can run a compliance check on a standard service, at any time, by using the Service Manager to select the standard service, then clicking the Verify Compliance button.
NUMEROUS enhancements and changes to the UIM/P console
UIM/P 4.0 documentation and Downloads
I have been a big fan of UIM/P for a long time. I blogged vastly on the subject and was pleased to receive an invitation to take part in new version of BETA (codename Nimbus) testing. I would like to thank EMC UIM/P team for the privilege and am looking forward to cooperate with them in the future.
OK, lets get started!
The following new features will be available in UIM/P Nimbus:
- UIM/P to manage remote Vblock;
- FAST VP support for VMAX, VNX;
- Support for Shared Storage;
- VPLEX support;
- Configure NTP and DNS Server(s).
Deployment/Upgrade
Deployment
UIM/P deployment is almost identical to the previous versions. See “Install and configure UIM/P”
There are two new options that were not available before:
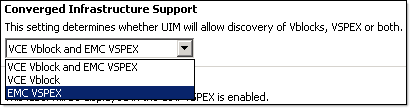
- UIM/P can now discover VCE Vblock and EMC VSPEX or both:
- UIM/P has two operation modes: UIMP and OS_Install_Agent.
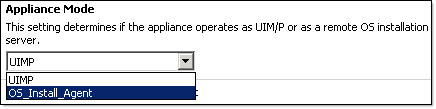
UIM/P mode is the same mode that we used to, OS_Install_Agent – UIM/P virtual appliance acts as OS installation agent at remote datacenter. This mode has a limited number of services enabled and does not have a web interface. If you try to connect to it, you will get an “UIM/P Unavailable, Error 503” error message. Don’t be alarmed, it is an expected behaviour.
If you wonder if it is possible to swap between the modes, yes, it is. If the remote datacenter network connectivity is no longer available, or due to any other reasons you would like to manage Vblock using locally, you can change the UIM/P mode and start using it. You would have to start from scratch as UIM/P database will be empty. Use UIM/P Service Adoption Utility (SAU) to adopt Vblock / import the services. UIM/P needs to be powered off to change the mode.
You install UIM/P in UIMP mode in one datacenter and UIM/P in OS_Install_Agent mode in all remote datacenters.

UIM/P Nimbus Administration tab. New interface. Multiple Vblock Management.
This is how remote Vblock management works:
- Deploy UIM/P in UIMP mode in the main datacenter;
- Deploy UIM/P in OS_Install_Agent mode in all remote datacenters and perform the following tasks;
- Upload and import OS installation ISO image;
- Change
homebase.admin password (this password will be used in step 3);
RemoteUIM001:~ # cd /opt/ionix-uim/tools

RemoteUIM001:/opt/ionix-uim/tools # perl password-change.pl
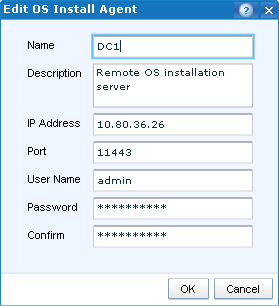
- Login to the UIM/P, navigate to Administration –> Infrastructure Assets –> OS Install Agents and click Add;
- Fill in remote OS Agent details (admin password is the homebase.admin password that you changed in step 2.b) and click OK;
- Click Enable Connection and verify Connection Status.
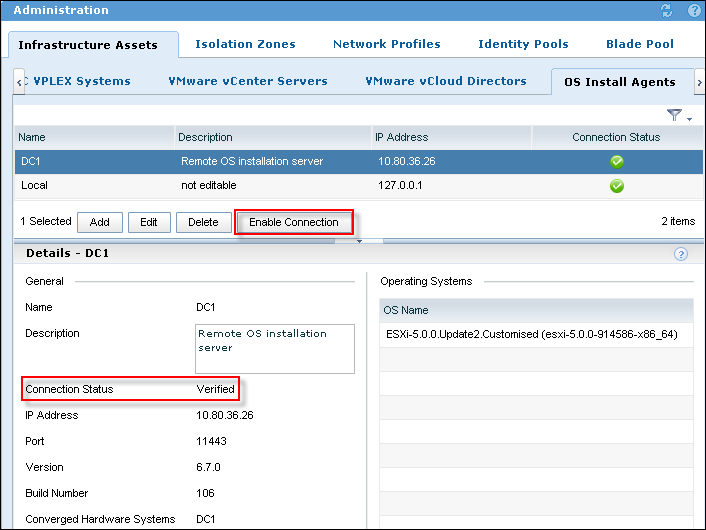
This configuration allows one UIM/P VA to manage multiple remote Vblocks.
Upgrade
UIM/P 3.1.x or higher is supported for in-place upgrade to UIM/P Nimbus. The procedure is the same as described in this blog post: “HOW TO: Upgrade EMC Ionix Unified Infrastructure Manager/Provisioning (UIM/P)“. Please be patient, in my environment it took 45-50 mins to perform UIM/P 3.2.0.1 Build 661 upgrade.
FAST VP Support
- FAST Policies on arrays discovered by UIM/P
- Apply FAST policies to block storage (instead of storage Grade)
- Configuration Pre-requisites
- Vblock 300 @RCM 2.5+
- FAST VP Enabled
- Mixed drive types in pools
- Vblock 700 @RCM 2.5+
- FAST VP Enabled
- FAST VP tiers created and associated to Thin Pools
- FAST VP policies created and associated to existing VP tiers
- Optional VPLEX Metro (for above configuration)
- Matching FAST Policy names & initial tiers across arrays
- Matching pool names for VNX FAST Policies across arrays
In previous versions of UIM/P you did not have a choice – all LUNs were configured as thin LUNs (Also see my post “EMC UIM/P and Thick LUNs“) with the following FAST VP tiering policy:
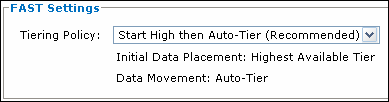
It will probably work in most environments but may put an unnecessary load on the array. The Initial Data Placement is a killer. Lets say you added a couple of new LUNs, configured the datastores and started to build VMs or copy VMs. What is going to happen? New or copied VMs will be placed on the highest available storage tier within the pool. This is not what you would necessary want. Well, in UIM/P Nimbus you can finally configure the storage tier where the LUN will be allocated from.
Here is an example: I have a storage pool with all three tiers: Extreme Performance, Performance and Capacity. UIM/P automatically configures the following FAST VP policies: Start High then Auto-Tier, Auto-Tier, Highest Available Tier, Lowest Available Tier and No Data Movement. The Default Initial Tier for NoMovement policy needs to be configured for it to be available.
Instead of provisioning the LUNs and then changing the tiering policy, you can configure them in UIM/P:
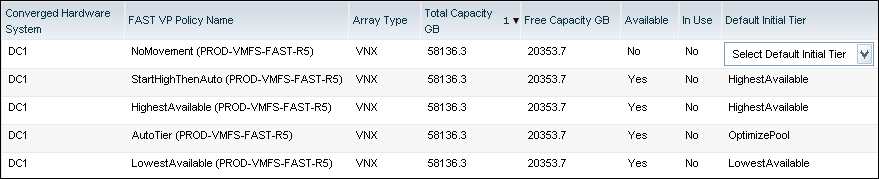
UIM/P FAST VP policies.
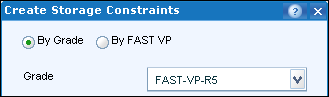
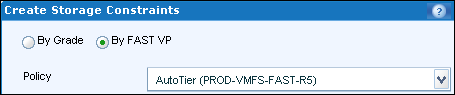
When you configure Service Offering constraints, you have a choice to allocate storage either by Grade or by FAST VP policy:
The Service FAST1 has the following storage provisioned:
FAST1_SHTA-HA – Datastore created from Start High Then Auto-tier FAST policy – On the storage array the Default initial tier is Highest Available.

EMC VSI screenshot confirms the datastore/storage tier placement:

Shared Storage Service
In previous versions of UIM/P we could not share storage between two or more service offerings / clusters unless you manually configure LUN(s) on the storage array and present it to multiple clusters / storage groups. UIM/P Nimbus introduces a new type of Service – Shared Storage Service. This type of service allows you to create and share storage between multiple Standard Services (BTW, from now on the old type of Service that we used to create will be referred to as “Standard Service”).
N.B. Shared storage is Block Only.
The use cases for Shared Storage Services:
- Datastore to share Templates / ISO images;
- Shared Diagnostic partition (more info on this is in this post “Configure Shared Diagnostic Partition“);
- SRM placeholder datastore;
- Shared datastore that can be used to facilitate Virtual Machine migration between clusters;
- etc… (let me know if you use it for anything else).
Configure Shared Storage Service:
- UIM/P –> Administration –> Service Offerings.
As you can see from the screenshot below, UIM/P Nimbus can create three types of Service Offerings: Standard (the old type of Service), Shared Storage and VPLEX:
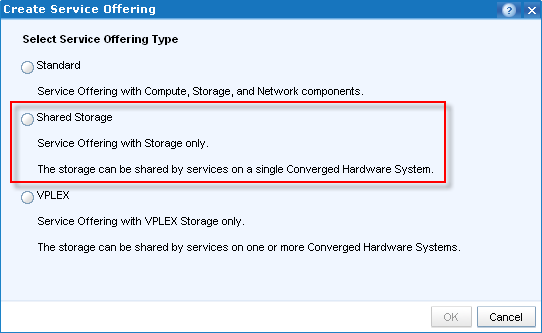
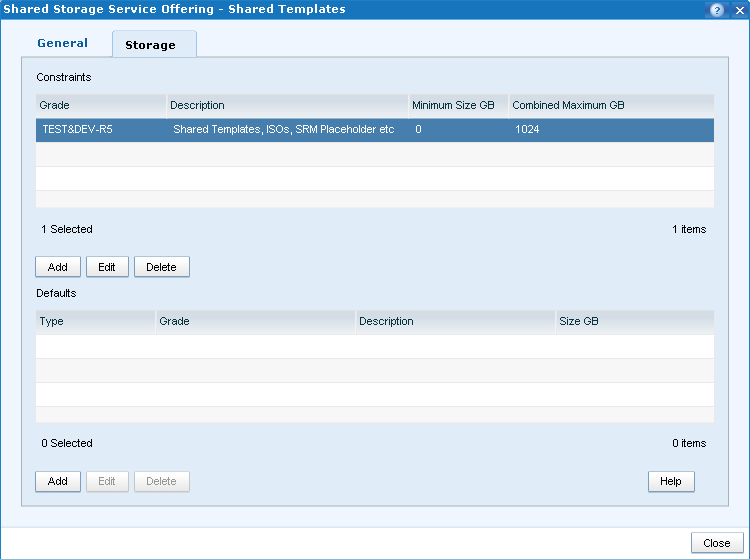
- Apart from the service name, Storage is the only resource which can be configured in Shared Storage Service offering:
Add storage from a Grade (FAST VP policies do not come into play in SSS) and configure min and max;
There is no need to configure Storage Defaults. When you create a Service from Shared Storage Service offering, you will be creating LUNs/datastores per customer requirements and therefore there is no need to configure Storage Defaults. All Shared Storage Services will be carved out of the Storage Grades that you assigned to it and will be within the limits.
- Make the Service Offering available;
- Create a new Service from the SSS
- Configure Shared Storage Service name, select Vblock
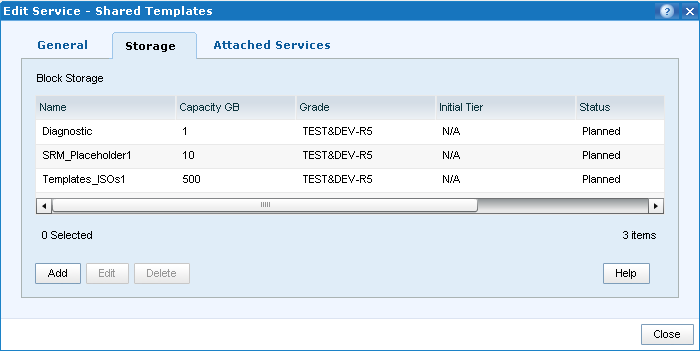
- Configure storage that will be presented to the Standard services:
- Attach the Standard Services to the SSS:
Standard Services must be: Configured on the same Vblock, Provisioned, Activated and synchronised with vCenter!
In this example, there are two Standard Services that I configured during FAST VP testing: FAST1 and FAST2. Highlight the services and click Add.
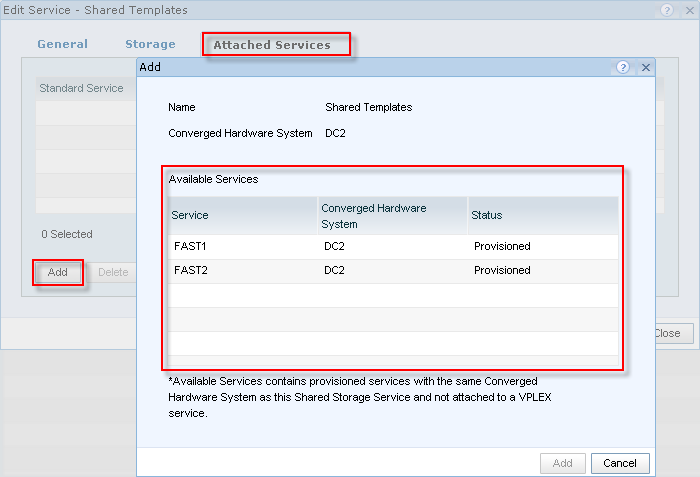
Click Close;
- Click Provision button. This will create the Shared Storage LUN(s) and add them to the Standard Service Storage Groups on the array. Shared Storage LUN(s) will be configured with the same Host LUN ID across all Storage Groups. During SSS provisioning, the Standard Services that are attached to it, will be in Workflow in Progress mode to prevent any other change to the SS.
- There is no option to Synchronise the Shared Storage Service, you need to synchronise the Standard Services attached to it individually. Even though when you synchronise one of the Standard Services, shared datastores will be available on the hosts from the other Standard Service, their vSync Status will stay Partially Synchronized. If you think about it, it makes sense – what if there are some outstanding changes that require vSync and the moment we sync SSS might not be ideal to apply them?
VPLEX Support
New “VPLEX Service” allows management of Virtual Volumes shared across stretch clusters represented by two Standard Services, one in each site (i.e. Vblock)
UIM/P Nimbus will support VPLEX in LOCAL and METRO configuration.
VPLEX systems can be added and discovered in Administration –> Infrastructure Assets –> EMC VPLEX systems.
VPLEX Configuration Pre-requisites:
VPLEX Metro
Vblock 300/700 @RCM 2.5+
- VPLEX 5.0 or later
- 2 VPLEX clusters, one on each site (i.e.: Vblock) with at least one engine on each site
- 2 WAN Nexus switches with WAN connectivity and zoning completed
- Back-end VPLEX-to-Array connectivity with back-end zoning completed
- Front-end connectivity completed for UCS-to-VPLEX
- Standard director connections (i.e.: not cross-connected)
- Access to single Vcenter instance to manage both Vblocks
- Remote OS Install Agent has been configured
- Requires UIM/P Nimbus on remote site to be in ‘OS Install Agent’ mode
- Single UIM/P instance to access both Vblocks
VPLEX Local
Vblock 300/700 @RCM 2.5+
- VPLEX 5.0 or later
- 1 VPLEX cluster attached to 2 Vblocks in one site
- Back-end VPLEX-to-Array connectivity with back-end zoning completed
- Front-end connectivity completed for UCS-to-VPLEX
- Access to single Vcenter instance to manage both Vblocks
- Single UIM/P instance to access both Vblocks
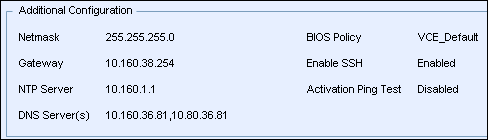
Configure NTP and DNS Server(s)
UIM/P Nimbus gives you a new option to configure NTP and DNS servers.
Conclusion
EMC Unified Infrastructure Manager for Provisioning has evolved to be a very solid and useful product, it is nice to see that it is still in constant development, bugs fixed and an additional functionality being added with every version.
Well done, EMC UIM/P Team!
What other features would you like to see in new versions? Comments / ideas are welcome. Leave a comment below and I will pass it to the development team.
UPDATE:
EMC Unified Infrastructure Manager / Provisioning (UIM/P) 4.0 is GA as of 16/08/2013.
1
- Login as
root;
- Confirm Trend Micro Deep Security Agent is installed:
[root@RHEL001 ~]# rpm -qa | grep ds_agent*
 ds_agent-9.0.0-2008.x86_64
- Review status of the Trend Micro Deep Security Agent service:
[root@RHEL001 ~]# /etc/init.d/ds_agent status
 ds_agent is stopped
- Restart the Trend Micro Deep Security Agent Service:
 [root@RHEL001 ~]# /etc/init.d/ds_agent restart
 Stopping ds_agent:                           [FAILED]
 Starting ds_agent:                           [  OK  ]
EMC Unified Infrastructure Manager for Provisioning is a great product! It saves you a lot of time and helps you to automate a lot of tasks. The product has been in constant development and starting from v 3.0 finally became a product you would use on a regular basis. The upcoming new version of UIM/P (codename Nimbus) is even better and has a lot of new features which I am planning to review shortly.
There is one very useful feature which is not available in the current version 3.2 and will not be available in new version of UIM/P (Nimbus), at least at the time of GA release. I am talking about thick LUN provisioning. Thick LUNs offer better performance than thin LUNs and should be used for any applications that require top storage performance. MS Exchange, Citrix Write Cache etc etc. By default, UIM/P will create all LUNs as thin LUNs and you need to perform additional tasks to make them Thick.
There are two ways to convert thin LUN to thick LUN:
- Create the LUN in UIM/P as thin LUN and then use LUN migration tool to convert it to Thick. There are a couple of things you need to bear in mind: 1) You MUST have enough space on the backend VNX before converting LUN from thin to thick; and 2) Converting the LUN WILL affect the performance of the entire array.
- Create the LUN as think LUN manually and then use EMC UIM/P SAU (Service Adoption Utility) to import in into the Service.
Storage Array performance is the deciding factor for me and, unless the LUNs have already been provisioned and are in use, I prefer the second method, the SAU!
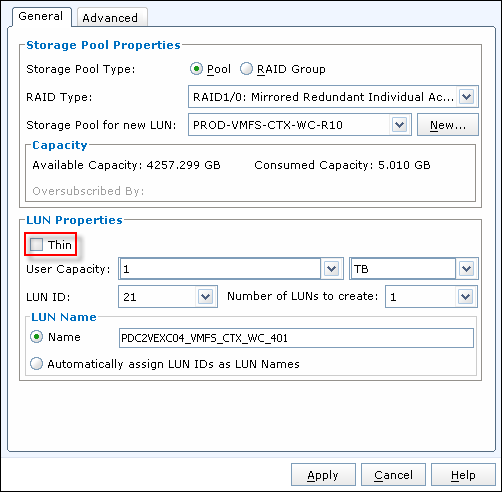
Here I will be creating three Thick LUNs for Citrix Write Cache and import them into a service provisioned for a Citrix cluster.
- Create a LUN, do not tick Thin, select appropriate Tiering Policy;
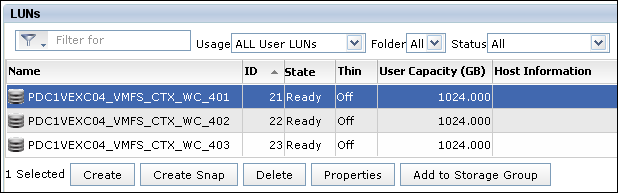
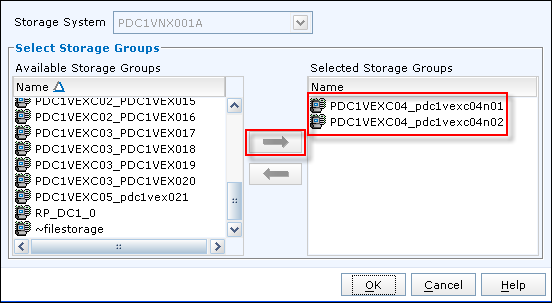
- Add LUN to Storage group;
- Login to UIM/P and discover Vblock. This will refresh the database and allow UIM/P to “see” new LUNs:
Administration –> Vblocks, highlight Vblock, click on Discover;
- Open EMC UIM/P SAU (Service Adoption Utility) and login as sysadmin;
https://<UIM-P.IP.address>/slm/sau
- Select ‘Edit Services’, select ‘Refresh Storage Configuration’:

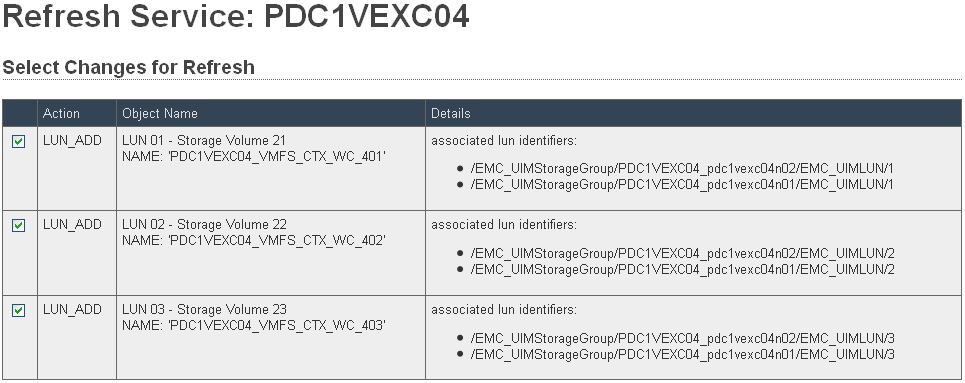
- There are several Refresh Options. Most of them are self explanatory. We are going to use “import new block LUNs found on the storage array (boot LUNs not supported)” option:

- UIM/P SAU will find three new LUNs presented to the hosts:
 Click APPLY Click APPLY
Click on Return;
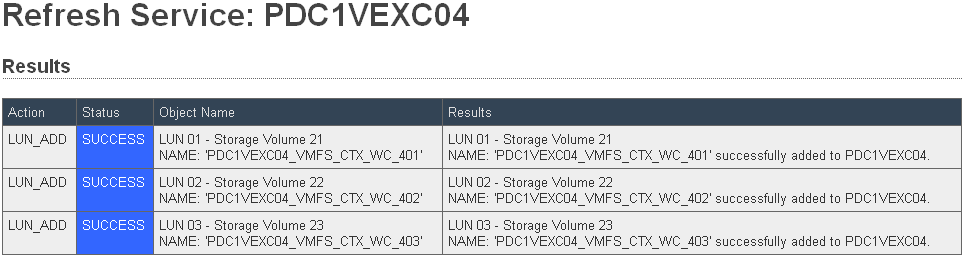
- Go back to UIM/P and refresh the Service. The Service / Service Offering that I am adding these LUNs to does not have any Storage Default types configured (apart from the Boot, obviously) and therefore SAU does not know to to treat new LUNs i.e. if they should be VMFS or RAW. VMFS is self explanatory – UIM/P will create VMFS datastore on the LUN. The RAW type is like telling UIM/P “Do NOT touch this LUN, leave it alone, ignore any data on this LUN”. This type of LUN is used for RDM LUNs, SRM protected LUNs, Shared Diagnostic Partition etc…
As you can see, all new LUNs are RAW LUNs:

- As we are going to use these LUNs as VMFS datastores, we need to change the LUN type. Go back to SAU, ‘Edit Services’, ‘Edit Storage Formats’, change Storage Format to VMFS;
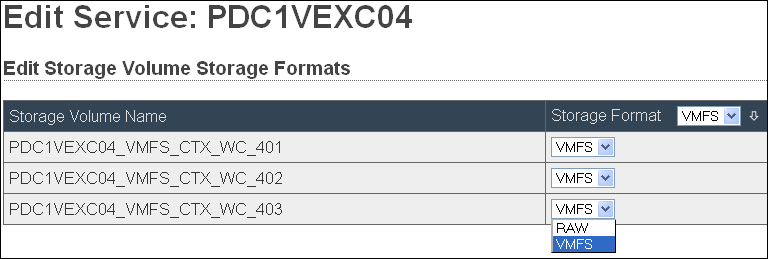 
- Go back to UIM/P and refresh the Service.

- Click on Synchronise to create datastores and format them with VMFS.
Hope this helps.
A couple of days ago I had a strange problem on newly deployed VMware ESX hosts which were added to Cisco 1000V Distributed Virtual Switch. Both, the Management Network and vMotion interfaces were OK but VMs on any other port groups did not have network connection. The UCS server profiles were configured correctly and all necessary VLANs were presented on the vNICs. As a test, I created a new Standard Switch, configured a Port Group and put a test VM on it. It worked just fine. It was time to troubleshoot Cisco 1000V DVS… As there were already a few hosts configured on Cisco 1000V switch, I was confident that the basic configuration was correct. It turned out to be the licensing issue. Unfortunately, there are times when we built new ESXi hosts at a faster rate than we add licenses… :)
- Login to Cisco Nexus 1000V VSM (Virtual Supervisor Module) and check the number of licenses available:
C1000v-01# show license usage

Feature                      Ins  Lic   Status Expiry Date Comments

Count

--------------------------------------------------------------------------------

NEXUS_VSG_SERVICES_PKG        No    0   Unused             -

NEXUS1000V_LAN_SERVICES_PKG   Yes  28   In use Never       -

NEXUS_ASA1000V_SERVICES_PKG   No    0   Unused             -

--------------------------------------------------------------------------------
- Check what hosts are licensed. As you can see, two servers are unlicensed:
C1000v-01# show module

Mod  Ports  Module-Type                       Model               Status

---  -----  --------------------------------  ------------------  ------------

1    0      Virtual Supervisor Module         Nexus1000V          active *

2    0      Virtual Supervisor Module         Nexus1000V          ha-standby

4    248    Virtual Ethernet Module           NA                  ok

5    248    Virtual Ethernet Module           NA                  ok

7    248    Virtual Ethernet Module           NA                  ok

8    248    Virtual Ethernet Module           NA                  ok

9    248    Virtual Ethernet Module           NA                  ok

10   248    Virtual Ethernet Module           NA                  unlicensed

 11   248    Virtual Ethernet Module           NA                  unlicensed

17   248    Virtual Ethernet Module           NA                  ok

{skipped}

Mod  Server-IP        Server-UUID                           Server-Name

---  ---------------  ------------------------------------  --------------------

1    192.168.38.15      NA                                    NA

2    192.168.38.15      NA                                    NA

4    192.168.38.115     00000000-0000-0000-0101-0a0b0c0d0110  dc1esx015.vStrong.info

5    192.168.38.116     00000000-0000-0000-0101-0a0b0c0d010f  dc1esx016.vStrong.info

7    192.168.38.119     00000000-0000-0000-0101-0a0b0c0d0111  dc1esx019.vStrong.info

8    192.168.38.120     00000000-0000-0000-0101-0a0b0c0d0112  dc1esx020.vStrong.info

9    192.168.38.121     00000000-0000-0000-0101-0a0b0c0d0113  dc1esx021.vStrong.info

10   192.168.38.122     00000000-0000-0000-0101-0a0b0c0d0115  dc1exc04n01.vStrong.info

 11   192.168.38.123     00000000-0000-0000-0101-0a0b0c0d0114  dc1exc04n02.vStrong.info
- OK, it is time to contact your Cisco account manager and buy new licenses.
Cisco Nexus 1000V is licensed per physical CPU i.e. if you have dual CPU, quad core host, you need two Cisco Nexus 1000V licenses. Please refer to “Cisco Nexus 1000V Switch for VMware vSphere Licensing Information“.
- You will be sent a PAK (Product Authorization Key) which you need to register with Cisco;
- Login to www.Cisco.com, Support, Manage Software, Register and Manager Licenses, click on “Continue to Product License Registration”;
- Enter PAK or click ‘Load More PAKs…’ to register multiple PAKs, click Fulfill Selecte PAKs;
- Type the Host ID for the Cisco Nexus 1000V switch that you need to add the licenses to (see below);
C1000v-01# show license host-id

License hostid: VDH=9623761541319554XXX
- Click Assign, click Next;
- Select End User, confirm that the email address is correct, click on Get Licenses. The licenses will be emailed to you in a .ZIP file or you can download them straight away;
- If you registered multiple PAKs or split up license, you will get multiple license files (.lic). If you don’t remember which one is for which 1000V switch – no problem: a) you will not be able to add license that is assigned to another switch (different host ID) and b) license file contains the switch host id:
These license files were carved out of one PAK (3711J318XXX):
License1.lic:

SERVER this_host ANY

VENDOR cisco

INCREMENT NEXUS1000V_LAN_SERVICES_PKG cisco 1.0 permanent 2

HOSTID=VDH=9623761541319554XXX

NOTICE="<LicFileID>20130722020450170</LicFileID><LicLineID>1</LicLineID>

<PAK>3711J318XXX</PAK>" SIGN=29650F741XXX
License2.lic:
SERVER this_host ANY
VENDOR cisco
INCREMENT NEXUS1000V_LAN_SERVICES_PKG cisco 1.0 permanent 2
HOSTID=VDH=9641345861319634XX
NOTICE="<LicFileID>20130722020450XXX</LicFileID><LicLineID>1</LicLineID>
<PAK>3711J318XXX</PAK>" SIGN=9224DF2E1XXX
- Download license file from a FTP site:
C1000v-01# copy ftp://User_Name@192.168.36.89/N1KVFEAT20130722020450XXX.lic bootflash:
- Make sure the license file has been coppied:
C1000v-01# dir bootflash:

248     Jul 23 09:30:55 2013  N1KVFEAT20130722020450XXX.lic

{skipped}

Usage for bootflash://sup-local

713424896 bytes used

881451008 bytes free

1594875904 bytes total
- Install Cisco Nexus 1000V license:
C1000v-01# install license bootflash:N1KVFEAT20130722020450XXX.lic

Installing license ......done
- Check the license file has been added:
C1000v-01# show license brief

N1KVFEAT20111101083251XXX.lic

N1KVFEAT20130722020450XXX.lic <-- new license file

C1000v-01# show license usage

Feature                      Ins  Lic   Status Expiry Date Comments

Count

--------------------------------------------------------------------------------

NEXUS_VSG_SERVICES_PKG        No    0   Unused             -

NEXUS1000V_LAN_SERVICES_PKG   Yes  30   In use Never       -

NEXUS_ASA1000V_SERVICES_PKG   No    0   Unused             -

--------------------------------------------------------------------------------
- Check the VEMs are licensed:
C1000v-01# show moduleMod  Ports  Module-Type                       Model               Status

---  -----  --------------------------------  ------------------  ------------

1    0      Virtual Supervisor Module         Nexus1000V          active *

2    0      Virtual Supervisor Module         Nexus1000V          ha-standby

4    248    Virtual Ethernet Module           NA                  ok

5    248    Virtual Ethernet Module           NA                  ok

7    248    Virtual Ethernet Module           NA                  ok

8    248    Virtual Ethernet Module           NA                  ok

9    248    Virtual Ethernet Module           NA                  ok

10   248    Virtual Ethernet Module           NA                  ok

 11   248    Virtual Ethernet Module           NA                  ok

{skipped}

Mod  Server-IP        Server-UUID                           Server-Name

---  ---------------  ------------------------------------  --------------------

1    192.168.38.15      NA                                    NA

2    192.168.38.15      NA                                    NA

4    192.168.38.115     00000000-0000-0000-0101-0a0b0c0d0110  dc1esx015.vStrong.info

5    192.168.38.116     00000000-0000-0000-0101-0a0b0c0d010f  dc1esx016.vStrong.info

7    192.168.38.119     00000000-0000-0000-0101-0a0b0c0d0111  dc1esx019.vStrong.info

8    192.168.38.120     00000000-0000-0000-0101-0a0b0c0d0112  dc1esx020.vStrong.info

9    192.168.38.121     00000000-0000-0000-0101-0a0b0c0d0113  dc1esx021.vStrong.info

10   192.168.38.122     00000000-0000-0000-0101-0a0b0c0d0115  dc1exc04n01.vStrong.info

 11   192.168.38.123     00000000-0000-0000-0101-0a0b0c0d0114  dc1exc04n02.vStrong.info
- Happy days!? Not really!…
Run show license usage <package_name> to get a real picture:
C1000v-01# show license usage NEXUS1000V_LAN_SERVICES_PKG

----------------------------------------

Feature Usage Info

----------------------------------------

Installed Licenses : 30

Default Eval Licenses : 0

Max Overdraft Licenses : 16

Installed Licenses in Use : 30

Overdraft Licenses in Use : 12  <-- We need more licenses...

Default Eval Lic in Use : 0

Default Eval days left : 0

Licenses Available : 4  <-- Well, there is hope!...

Shortest Expiry : Never
Hope this will help…
EMC UIM/P server provisioning failed with the following error message:
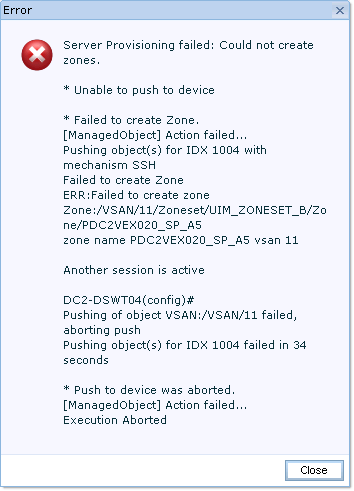
This error message is not a problem with UIM/P (Come on! Stop blaming UIM for everything!), it is Cisco MDS SAN switch “Enhanced zoning” feature.
Enhanced zoning uses a session locking facility like CFS to prevent simultaneous zoning configuration changes by two users on the same or separate switches. When a user starts to make a zoning change on one switch for a VSAN, that switch will lock the fabric to prevent others from making zoning changes. The user must issue a commit to make the changes active and release the fabric wide lock.
Problems can occur when the lock is acquired, but not released. In this situation, you cannot configure zoning on that VSAN. If you are using the CLI, you see error messages when you attempt to enter the zoning configuration mode.
Troubleshooting CLI commands to use for enhanced zoning issues:
- show zone internal change event-history
- show zone status vsan
- show zone pending-diff
- show zone pending vsan
Use the ‘show zone status vsan‘ command to determine the lock holder. If the lock holder is on this switch, the command output shows the user. If the lock holder is on a remote switch, the command output shows the domain ID of the remote switch.
- Determine who is logged in and has a lock;
DC2-DSWT04# show zone status vsan 11
VSAN: 11 default-zone: deny distribute: full Interop: default
mode: enhanced merge-control: allow
session: cli [admin]             <---- User 'admin' has a lock
hard-zoning: enabled broadcast: unsupported
smart-zoning: disabled
- Use the ‘
no zone commit vsan‘ command on the switch that holds the lock to release the lock if you are the holder of the lock;
- Use the ‘
no zone commit vsan <vsan id> force‘ command on the switch that holds the lock to release the lock if another user holds the lock;
DC2-DSWT04(config)# no zone commit vsan 11 force
DC2-DSWT04(config)# show zone status vsan 11
VSAN: 11 default-zone: deny distribute: full Interop: default
mode: enhanced merge-control: allow
session: none             <---- No active sessions / locks
hard-zoning: enabled broadcast: unsupported
smart-zoning: disabled
Default zone:
qos: none broadcast: unsupported ronly: unsupported
Full Zoning Database :
DB size: 4992 bytes
Zonesets:1  Zones:37 Aliases: 0 Attribute-groups: 1
Active Zoning Database :
DB size: 2804 bytes
Name: UIM_ZONESET_B  Zonesets:1  Zones:37
Status: Commit completed at 07:46:04 UTC Apr 27 2013
- If problems persist, use the ‘
clear zone lock‘ command to remove the lock from the switch. This should only be done on the switch that holds the lock;
- Re-run the server provisioning in UIM/P.
|
Subscribe to Blog via Email
Join 169 other subscribers
|
Recent Comments