|
|
EMC UIM v 4.0 Patch 2
During datastore provisioning EMC UIM created a LUN but did not add it to any of the Storage Groups and failed with “Mapping data failed” error:
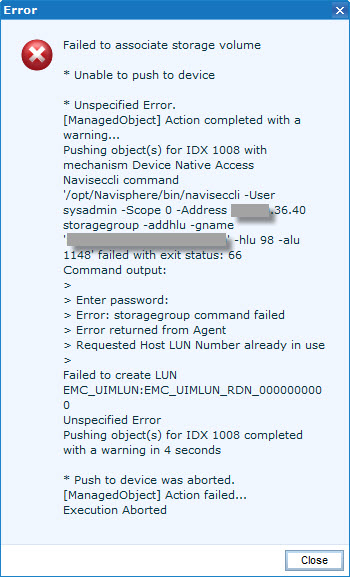 |
Mapping data failed
Failed to associate storage volume
* Unable to push to device
* Unspecified Error.
[ManagedObject] Action completed with a warning…
Pushing object(s) for IDX 1008 with mechanism Device Native Access
Naviseccli command ‘/opt/Navisphere/bin/naviseccli -User sysadmin -Scope 0 -Address 192.168.36.40 storagegroup -addhlu -gname ‘STORAGE_GROUP_NAME’ -hlu 98 -alu 1148′ failed with exit status: 66
Command output:
>
> Enter password:
> Error: storagegroup command failed
> Error returned from Agent
> Requested Host LUN Number already in use
>
Failed to create LUN EMC_UIMLUN:EMC_UIMLUN_RDN_0000000000
Unspecified Error
Pushing object(s) for IDX 1008 completed with a warning in 4 seconds
* Push to device was aborted.
[ManagedObject] Action failed…
Execution Aborted
|
 |
Mapping failed
Failed to associate storage volume* Failed to attach clients to volume(s):
1022270:Unable to push to device
|
 |
Storage provisioning failed
Service provisioning failed while trying to provision storage.
* Failed to provision 1 storage volume(s)
|
| When I re-run provisioning operation, it failed again: |
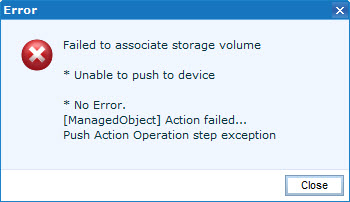 |
Mapping data failed
Failed to associate storage volume
* Unable to push to device
* No Error.
[ManagedObject] Action failed…
Push Action Operation step exception
|
I successfully re-discovered Vblock to confirm all usernames, passwords were OK and ECOM service is running but still could not provision storage.
I also recently upgraded one VNX array from 5.32.000.5.207 to 5.32.000.5.209 but it was not the issue as the other array on 5.32.000.5.207 exhibited the same errors.
The issue has been resolved as the following:
- Restarted Management Server on both VNX’es;
- Decommissioned half-provisioned LUN;
- Re-provisioned LUNs again.
Hope this will help.
One of my clients was concerned about the number of virtual machines that were built with Thin provisioned disks. Before they go with the project to inflate all Thin provisioned disks (or migrate to Thick Provisioned Lazy Zeroed) they needed to know how much additional storage they would need.
PowerCLI to the rescue!
Yes, you can run ‘Get-VM | Select Name, ProvisionedSpaceGB, UsedSpaceGB‘ but, strictly speaking, it will not give you a clear picture.
ProvisionedSpaceGB – the total size of the VM: virtual disks (VMDK files) + snapshots + memory swap (if not reserved) + logs etc.
UsedSpaceGB – how much disk space is actually used by the VM.
The following script will identify all virtual machines with at least one thin provisioned disk, calculate the total size of configured virtual disks and then create a report of the disk usage and list all virtual disks helping you to identify which one of them is thin provisioned:
$report = @()
foreach ($vm in Get-VM){
 $view = Get-View $vm
   if ($view.config.hardware.Device.Backing.ThinProvisioned -eq $true){
   $row = '' | select Name, Provisioned, Total, Used, VMDKs, Thin
      $row.Name = $vm.Name
      $row.Provisioned = [math]::round($vm.ProvisionedSpaceGB , 2)
      $row.Total = [math]::round(($view.config.hardware.Device | Measure-Object CapacityInKB -Sum).sum/1048576 , 2)
      $row.Used = [math]::round($vm.UsedSpaceGB , 2)
      $row.VMDKs = $view.config.hardware.Device.Backing.Filename | Out-String
      $row.Thin = $view.config.hardware.Device.Backing.ThinProvisioned | Out-String
   $report += $row
}}
$report | Sort Name | Export-Csv -Path "D:Thin_Disks.csv"
Here is the example of the output:
| Name |
Provisioned |
Total |
Used |
VMDKs |
Thin |
| Mgr05 |
52.06 |
50 |
26.78 |
[Datastore_02_GOLD] Mgr05/Mgr05.vmdk
[Datastore_02_GOLD] Mgr05/Mgr05_1.vmdk |
True
True |
| SQL-009 |
1004.07 |
996 |
1000.94 |
[Datastore_318_BRONZE] SQL-009/SQL-009.vmdk
[Datastore_316_BRONZE] SQL-009/SQL-009.vmdk
[Datastore_319_BRONZE] SQL-009/SQL-009.vmdk
[Datastore_306_BRONZE] SQL-009/SQL-009.vmdk |
True
True
False
False |
| DC01 |
185.05 |
181 |
30.15 |
[Datastore_17_GOLD] DC01/DC01.vmdk
[Datastore_17_GOLD] DC01/DC01_1.vmdk
[Datastore_17_GOLD] DC01/DC01_2.vmdk |
True
False
True |
UPDATE:
If you need to include the size used for each disk:
$report = @()
foreach ($vm in Get-VM){
$view = Get-View $vm
if ($view.config.hardware.Device.Backing.ThinProvisioned -eq $true){
$row = '' | select Name, Provisioned, Total, Used, VMDKs, VMDKsize, DiskUsed, Thin
    $row.Name = $vm.Name
    $row.Provisioned = [math]::round($vm.ProvisionedSpaceGB , 2)
    $row.Total = [math]::round(($view.config.hardware.Device | Measure-Object CapacityInKB -Sum).sum/1048576 , 2)
    $row.Used = [math]::round($vm.UsedSpaceGB , 2)
    $row.VMDKs = $view.config.hardware.Device.Backing.Filename | Out-String
    $row.VMDKsize = $view.config.hardware.Device | where {$_.GetType().name -eq 'VirtualDisk'} | ForEach-Object {($_.capacityinKB)/1048576} | Out-String
    $row.DiskUsed = $vm.Extensiondata.Guest.Disk | ForEach-Object {[math]::round( ($_.Capacity - $_.FreeSpace)/1048576/1024, 2 )} | Out-String
    $row.Thin = $view.config.hardware.Device.Backing.ThinProvisioned | Out-String
$report += $row
}}
$report | Sort Name | Export-Csv -Path "D:Thin_Disks.csv"
Here is the output:
| Name |
Provisioned |
Total |
Used |
VMDKs |
VMDKsize |
DiskUsed |
Thin |
| My_Thin_VM |
185.06 |
181 |
31.36 |
[DATASTORE_01] My_Thin_VM/My_Thin_VM.vmdk
[DATASTORE_01] My_Thin_VM/My_Thin_VM_1.vmdk
[DATASTORE_01] My_Thin_VM/My_Thin_VM_2.vmdk |
41
40
100 |
27.85
1.15
0.09 |
True
True
True |
Hope this helps.
Array: EMC VNXe 3100
Current version – 2.4.0.20932
Candidate version – 2.4.1.21171
EMC VNXe firmware upgrade failed at 15% with the following error message:
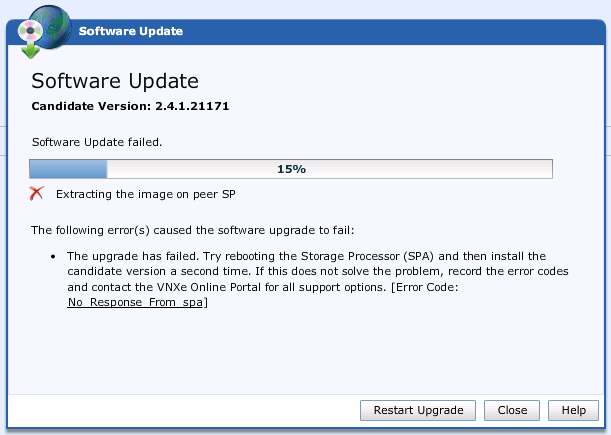
“Software Update failed:
Extracting the image on peer SP
The following error(s) caused the software upgrade to fail:
- The upgrade has failed. Try rebooting the Storage Processor (SPA) and then install the candidate version a second time. If this does not solve the problem, record the error codes and contact the VNXe Online Portal for all support options. [Error Code: No_Response_From_spa]”
I tried all of the following without any luck:
- Restarted Upgrade :);
- Rebooted SPA and SPB, re-upload the Candidate Firmware version and run the upgrade again;
- Restarted Management Software;
- Reimaged SPA with new image through GUI and CLI.
I also noticed SPA took a lot longer to come back online after restart and if I restart SPB and therefore fail the services over to SPA, Unisphere was not responding and only when SPB came back online, it started to function correctly. In the end, EMC accepted it may be a hardware fault and replaced SPA.
Unfortunately, even after we replaced SPA, VNXe upgrade did not finish successfully but this time it failed at 41% which was a good indication we were on the right track.
Before you start upgrading VNXe, make sure you check the available space on /dev/sda2 file system:
- SSH to VNXe Management IP address and login as ‘
service‘. The password may be different to the ‘admin‘ account;
- Run ‘
df -h‘ to check the available space:
service@(none) spa:~> df -h
Filesystem            Size  Used Avail Use% Mounted on
/dev/sda2             5.0G  4.3G  401M  92% / =======> 8% of free space WILL NOT be enough!
tmpfs                 725M  2.8M  722M   1% /dev/shm
udev                  469M  900K  468M   1% /dev
/dev/sda4             4.1G  538M  3.4G  14% /cores
/dev/tmpfs             32M  9.6M   23M  30% /tmp
/dev/mirrora4          17G  2.9G   13G  19% /EMC/backend/service
/dev/c4nasdba2       1019M   30M  938M   4% /EMC/backend/CEM
/dev/c4nasdba1       1015M   41M  924M   5% /nbsnas
/dev/c4loga2          653M   22M  599M   4% /EMC/backend/perf_stats
/dev/c4loga1          3.4G  665M  2.6G  21% /EMC/backend/log_shared
- Verify VNXe storage integrity – ‘
svc_storage_integritycheck‘:
service@(none) spa:~> svc_storage_integritycheck
Storage integrity verified successfully. All storage elements appear to be healthy.
- Delete unused files on both SP’s – ‘
svc_clean_ssd -c‘:
service@(none) spa:~> svc_clean_ssd -c
INFO: Peer SP found - attempting to run on both SPs.
Now searching for files that could be deleted on SPA ...Done!

[Fri Dec  6 15:46:29 UTC 2013] Filesystem Usage Report (SPA) :
=============================================
Local Root filesystem mount point         : /
Total Size of Drive                       : 5040MB
Current Total Space Used                  : 4351MB, 86.32% usage
A total of 1130MB can be saved on this system by removing files.
Total Space Used (after / cleanup) : 3221MB, 63.90% usage
{skipped}
Cleared 1130MB of space off of SPA root filesystem!
{skipped}
This script will clear up some space on the root filesystem. It can also
atempt to find large files on the filesystem and generate a report so the
user can analyze the findings.
{skipped}
- Run ‘
df -h‘ to check available space:
service@(none) spa:~> df -h
Filesystem            Size  Used Avail Use% Mounted on
/dev/sda2             5.0G  3.2G  1.6G  68% / ======> 1.6 GB or 32% is free!
tmpfs                 725M  2.8M  722M   1% /dev/shm
udev                  469M  900K  468M   1% /dev
/dev/sda4             4.1G  538M  3.4G  14% /cores
/dev/tmpfs             32M  9.6M   23M  30% /tmp
/dev/mirrora4          17G  2.9G   13G  19% /EMC/backend/service
/dev/c4nasdba2       1019M   30M  938M   4% /EMC/backend/CEM
/dev/c4nasdba1       1015M   40M  925M   5% /nbsnas
/dev/c4loga2          653M   22M  599M   4% /EMC/backend/perf_stats
/dev/c4loga1          3.4G  665M  2.6G  21% /EMC/backend/log_shared
- Connect to the peer SP and check available space:
service@(none) spa:~> ssh peer
Last login: Tue Dec  3 20:51:10 2013 from peer
service@(none) spb:~> df -h
Filesystem            Size  Used Avail Use% Mounted on
/dev/sda2             5.0G  2.9G  1.9G  61% / ======> That's much better!
tmpfs                 725M  3.3M  722M   1% /dev/shm
udev                  469M  924K  468M   1% /dev
/dev/sda4             4.1G  2.0G  2.0G  50% /cores
/dev/tmpfs             32M  9.9M   23M  31% /tmp
/dev/mirrora4          17G  2.4G   13G  16% /EMC/backend/service
- Check if any software upgrade packages are still present in ‘
/cores/service‘ and delete them ‘rm -rf VNXe*‘:
root@(none) spb:~> cd /cores/service
root@(none) spb:/cores/service> ls
.bash_history  VNXe-MR4SP1-upgrade-2.4.1.21171-RETAIL.tgz.bin      svc_networkch
.bashrc        VNXe-MR4SP1-upgrade-2.4.1.21171-RETAIL.tgz.bin.gpg  svc_puhccheck
.ssh           svc_help                                            svc_puhccheck
root@(none) spb:/cores/service> rm -rf VNXe*
- Run ‘
df -h‘ to check available space again:
root@spa:~>df -h
Filesystem            Size  Used Avail Use% Mounted on
/dev/sda2             5.0G  2.7G  2.1G  57% / ======> Even better!
tmpfs                 725M  2.8M  722M   1% /dev/shm
udev                  469M  900K  468M   1% /dev
/dev/sda4             4.1G  538M  3.4G  14% /cores
/dev/tmpfs             32M  9.6M   23M  30% /tmp
/dev/mirrora4          17G  2.9G   13G  19% /EMC/backend/service
/dev/c4nasdba2       1019M   30M  938M   4% /EMC/backend/CEM
/dev/c4nasdba1       1015M   40M  925M   5% /nbsnas
/dev/c4loga2          653M   22M  599M   4% /EMC/backend/perf_stats
/dev/c4loga1          3.4G  665M  2.6G  21% /EMC/backend/log_shared
- Run ‘
svc_clean_ssd -c‘ again:
root@spa:~>svc_clean_ssd -c
INFO: Peer SP found - attempting to run on both SPs.
Now searching for files that could be deleted on SPA ...Done!
[Fri Dec  6 16:14:04 UTC 2013] Filesystem Usage Report (SPA) :
=============================================
Local Root filesystem mount point         : /
Total Size of Drive                       : 5040MB
Current Total Space Used                  : 2683MB, 53.23% usage
A total of 9MB can be saved on this system by removing files.
Total Space Used (after / cleanup) : 2674MB, 53.05% usage
- Go back to VNXe Unisphere GUI and upload Software Upgrade / Candidate Version;
- Make sure you have 20-25% of free space on
/dev/sda2 file system:
service@(none) spa:~> df -h
Filesystem            Size  Used Avail Use% Mounted on
/dev/sda2             5.0G  3.4G  1.3G  73% / ======> 20-25% of free space is OK
tmpfs                 725M  2.8M  722M   1% /dev/shm
udev                  469M  900K  468M   1% /dev
/dev/sda4             4.1G  538M  3.4G  14% /cores
/dev/tmpfs             32M  9.6M   23M  30% /tmp
/dev/mirrora4          17G  2.9G   13G  19% /EMC/backend/service
/dev/c4nasdba2       1019M   30M  938M   4% /EMC/backend/CEM
/dev/c4nasdba1       1015M   35M  930M   4% /nbsnas
/dev/c4loga2          653M   22M  599M   4% /EMC/backend/perf_stats
/dev/c4loga1          3.4G  665M  2.6G  21% /EMC/backend/log_shared
- Proceed with the upgrade.
Hope this will help.
Just a quick script to export virtual machine inventory:
$report = @()
foreach ($DC in Get-Datacenter -Name MyDC){ # Specify Datacenter name if needed
foreach ($Cluster in Get-Cluster -Location $DC ){ # Specify Cluster name if needed
foreach ($VM in Get-VM -Location $Cluster ){

$row = "" | select DC, Cluster, ResourcePool, VMPath, VMhost, PowerState, Name, OS, IPaddress, CPU, Memory, ProvisionedSpaceGB, UsedSpaceGB, Datastore, CustomField1, CustomField2, Notes

  $row.DC = $DC
  $row.Cluster = $Cluster
     ##### If there is no Resource Pool configured in the Cluster, use the Cluster name
     if ($vm.ResourcePool -like "Resources") {$row.ResourcePool = $Cluster}
     else {$row.ResourcePool = $vm.ResourcePool}
        ##### Full VM path in the vCenter VM folder structure - start
        $current = $vm.Folder
        $path = $vm.Name
        do {
        $parent = $current
        if($parent.Name -ne "vm"){$path =  $parent.Name + "" + $path}
        $current = Get-View $current.Parent
        } while ($current.Parent -ne $null)
        $row.VMPath = $path
        ##### Full VM path in the vCenter VM folder structure - finish
  $row.VMhost = $vm.VMHost
  $row.Name = $vm.Name
  $row.PowerState = $vm.PowerState
  $row.OS = $vm.Guest.OSFullName
  $row.IPaddress = $vm.Guest.IPAddress | Out-String
  $row.CPU = $vm.NumCPU
  $row.Memory = $vm.MemoryGb
  $row.ProvisionedSpaceGB = [math]::round( $vm.ProvisionedSpaceGB , 2 )
  $row.UsedSpaceGB = [math]::round( $vm.UsedSpaceGB , 2 )
  $row.Datastore = ($vm | Get-Datastore).Name | Out-String
  $row.CustomField1 = $vm.CustomFields.item('CustomField1') # If you have Custom Fields...
  $row.CustomField2 = $vm.CustomFields.item('CustomField2') # If you have Custom Fields...
  $row.Notes = $vm.Notes

$report += $row

}}}

$report | Sort Name | Export-Csv -Path "D:VMs.csv"
Would you like to add any other VM details to the script output?
I tried to adopt a Shared Storage Service but it failed with the following error message:
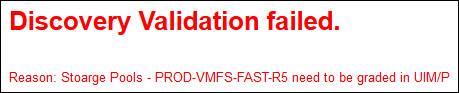
Discovery Validation failed.
Reason: Storage Pools – %Pool_Name% need to be graded in UIM
I checked Storage Pool configuration and confirmed it has been graded correctly. In my environment there are two Vblocks that are managed by one UIM virtual appliance. As both Vblocks configured in almost identical way, the storage pool names and grades are the same. UIM engineering team looked at this problem and confirmed that in this configuration UIM SAU may not be able to adopt a SSS correctly and provided the following workaround:
- Re-discover Vblock to refresh storage configuration;
- Backup UIM database;
- Open Database utility:
uim001:/opt/ionix-uim/tools # su - pgdba
pgdba@uim001:~> psql voyencedb uim
SET
psql (8.4.14)
Type "help" for help.
- List the storage pools, I only included Storage pools where the Shared Storage LUNs are provisioned from:
voyencedb=# select name, rdn from storage_pool;
name                        |         rdn
----------------------------+---------------------
PROD-VMFS-FAST-R5           | /EMC_UIMThinPool/3 # DC1 Vblock
PROD-VMFS-FAST-R5           | /EMC_UIMThinPool/0 # DC2 Vblock
I added Vblock names i.e. ‘# DC1 Vblock’ to help to identify Vblocks in different datacentres
- Run the following command to change the ‘rdn’ value to something UIM will not recognise. As you can see, it will only change ‘rdn’ / Storage Pool names for a Vblock called DC1, therefore SAU will only be able to see Storage Pools for other Vblock, called DC2, where we need to adopt the Shared Storage Service.
voyencedb=# update storage_pool SET rdn = REPLACE(rdn, '/' , '@') where storage_array_id = (select storage_array_id from vblock where name ='DC1');
UPDATE 13
Where ‘UPDATE 13’ – Number of Storage Pools configured in Vblock DC1, all of them have been changed. As I stated before, I am only showing the Storage Pools where Shared Storage LUNs are carved from.
voyencedb=# select name, rdn from storage_pool;
name                        |         rdn
----------------------------+---------------------
PROD-VMFS-FAST-R5           | @EMC_UIMThinPool@3 # DC1 Vblock
PROD-VMFS-FAST-R5           | /EMC_UIMThinPool/0 # DC2 Vblock
- Now, when SAU can only ‘see’ storage pools on Vblock DC2, we can follow these instructions and adopt Shared Storage Service
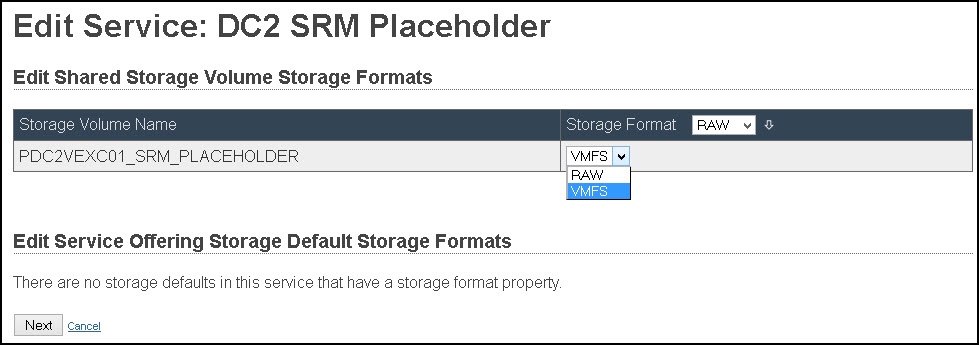
- During SSS adoption, the LUNs/datastores may get adopted in RAW format:

Change them to VMFS in SAU: Edit Services / Edit Storage Format…
- When it is done, let’s revert ‘rdn’ to the original names (changing ‘@‘ back to ‘/‘):
voyencedb=# update storage_pool SET rdn = REPLACE(rdn, '@' , '/') where storage_array_id = (select storage_array_id from vblock where name ='DC1');
UPDATE 13
voyencedb=# select name, rdn from storage_pool;
name                        |         rdn
----------------------------+---------------------
PROD-VMFS-FAST-R5           | /EMC_UIMThinPool/3 # DC1 Vblock
PROD-VMFS-FAST-R5           | /EMC_UIMThinPool/0 # DC2 Vblock
- Don’t forget to Synchronize all Standard Services attached to Shared Storage Services you have just adopted.
This issue will be fixed permanently in the new release.
I would like to thank Zbigniew ‘Ziggy’ Misiak for his help in resolving this issue! Excellent service, as always!
Disclaimer: Make sure you take UIM database backup prior to implementing this workaround and follow this procedure at your own risk.
This procedure must be performed by a qualified VCE or EMC engineer. Please contact support.vce.com
VMware vCloud Connector server / node locks out the admin account on the vApp if you try to log in with incorrect credentials three times in a row, displaying this error message:
Account locked due to 4 failed logins
 Login incorrect
Unlock the admin account
- Log in to vCloud Connector console as
root user (default password is vmware);
- Run the following command:
pam_tally --user admin --reset.
vcc001:/ # pam_tally --user admin --reset
User admin      (1005)  had 5
You can also disable the automated lockout for the admin account or change the number of unsuccessful logons:
- Log in to vCloud Connector console as
root user (default password is vmware);
- Remove or comment out the following line from file
/etc/pam.d/common-auth:
# auth    requisite       pam_tally.so deny=3
  auth    required        pam_env.so
  auth    required        pam_unix2.so
Hurray! EMC UIM 4.0 Patch 02 has been released! Lots of new features and bug fixes!
New features and changes
Decommission of shared storage service
When using UIM 4.0 and UIM 4.0 Patch 01 to perform a full decommission of a shared storage service, VMs were correctly deleted from the shared storage service, however VMs and datastores were also deleted from any attached standard services. This has been corrected in UIM 4.0 Patch 02, so that when decommissioning a shared storage service, VMs are no longer deleted from any attached standard services.
When using UIM 4.0 Patch 02 to decommission a shared storage service, UIM will check for any VMs (running or not) and display an override confirmation that lists all impacted disks. Also, if detaching a standard service, UIM 4.0 Patch 02 will display a new override confirmation to warn of possible service interruption.
Naming convention for VMAX base initiator groups
With UIM 4.0, the pre-requisites for VPLEX configuration imposed a naming convention in which the name of the VMAX base initiator groups containing the actual initiators, were named according to the WWNN of the ports in that initiator group.
As of UIM 4.0 Patch 01, the WWNN naming convention, as described above, is no longer mandatory.
However, it should be noted that for unconfigured systems, UIM 4.0 Patch 02 uses a simple naming convention for VMAX initiator groups, whereby each initiator is in a base group of its own and that base group’s name is the WWPN of the initiator. Although not mandatory, it is highly recommended that you use the same group naming convention for consistency and ease of troubleshooting.
For details, refer to EMC Unified Infrastructure Manager/Provisioning Configuration Requirements for Converged Hardware Systems.
Handling of shared storage volumes
As of UIM 4.0 Patch 01, an issue has been fixed that may cause degraded performance on storage arrays, due to multiple HLUs being assigned to the same storage volume. It occurred when a shared storage volume, which had already been assigned an HLU for one host, was added to a standard service where that HLU was already in use by another volume, forcing UIM to use a different HLU, which could lead to severe performance issues over time as the volumes are used.
As of UIM 4.0 Patch 01, unique HLUs are used for all shared storage service volumes.
Support for Disjoint Layer 2
Optionally, for customers who want to implement Disjoint Layer 2 networks, UIM 3.2 P 01 and higher is compatible with UCSM 2.0, which supports Disjoint Layer 2 networks in end-host mode.
In a Disjoint Layer 2 network, separate vNICs are configured to communicate with different network domains to ensure that traffic for the different domains does not flow on the same interface.
VLANs for disjoint domains are assigned different uplink ports (or port channels). Traffic for a VLAN that is part of a disjoint network can only flow through a designated uplink port or port channel that is assigned to that VLAN. Traffic for that VLAN is dropped on all other uplinks. Therefore, with UIM 3.2 P 01 and greater, the vNICs that are to communicate with the disjoint domains should be pinned only to the uplink, which is designated to handle traffic for the VLANs on that domain.
The following limitations and assumptions apply:
- If the VLAN designated as the OS Install VLAN is associated with pin groups, and if any of those pin groups are specified on the vNICs, then operating system installation through UIM/P may fail. Therefore, it is not advisable to use pin groups in this case.
- If a vNIC is provisioned with two or more VLANs and then (outside of UIM/P) the VLANs are added to different disjoint domains, the port that the vNIC is pinned to will go down. However, UIM/P does not generate a service alert to indicate that the port is down.
- If the isolation zone for a service is updated and the new NFS VLAN or new ESX Management VLAN is pinned, then UIM/P does not add them to all vNICs; UIM/P removes the old management VLANs from all vNICs, but will only add the new vNICs if they are not pinned. However, UIM/P generates a validation error to indicate that the NFS VLAN and/or ESX Management VLAN will need to be manually added to at least one vNIC.
To do so, open the Service Editor, select the Network tab, and edit the appropriate vNICs to add the VLANs.
Configuration Center console support — Java runtime 1.7.0
The UIM/P Configuration Center console requires Java runtime 1.7.0. As of UIM/P 4.0 Patch 01, the UIM/P Configuration Center launches with Java runtime versions 1.7.0_7 to 1.7.0_25.
For the full list of bug fixes please refer to Unified Infrastructure Manager/Provisioning (UIM/P) 4.0 Patch 2 Read Me.
Documentation/Release Notes/Update Media and Full Release ISO:
Unified Infrastructure Manager/Provisioning 4.0 Documentation Portfolio
Unified Infrastructure Manager/Provisioning (UIM/P) 4.0 Patch 2 Read Me
Unified Infrastructure Manager/Provisioning (UIM/P) 4.0 Patch 2 – Update Media
Unified Infrastructure Manager/Provisioning (UIM/P) 4.0 Patch 2 Virtual Appliance – Full Release
Gentlemen, start your engines and upgrade EMC UIM/P!
This is the second article about EMC UIM Service Adoption Utility (SAU) and takes you through the adoption of Shared Storage Service. For Standard Service adoption please refer to “EMC UIM Service Adoption Utility (SAU)” article.
EMC UIM 4.0 introduced a new type of service – Shared Storage Service. This type of service allows you to create and share storage volumes between multiple Standard Services.
There are two things you should remember about SSS:
- Shared Storage Service is BLOCK Only;
- Shared Storage Service can only be created based on storage grade not a FAST Policy.
Here is how you adopt a Shared Storage Service:
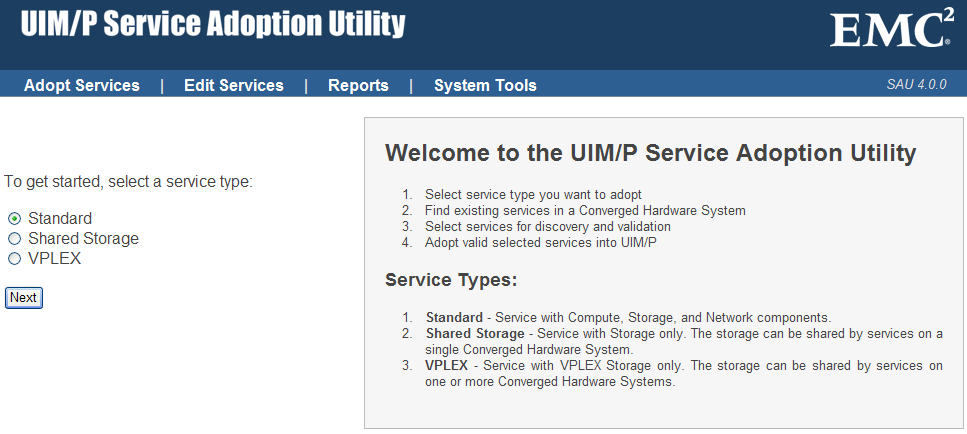
- Open UIM Service Adoption Utility: https://<UIM-P.IP.address.or.name>/slm/sau, login as sysadmin;
- From the type of service you want to adopt, select “Shared Storage”. Click Next;
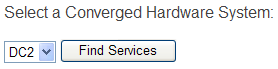
- Select a Converged Hardware System and click Find Services;
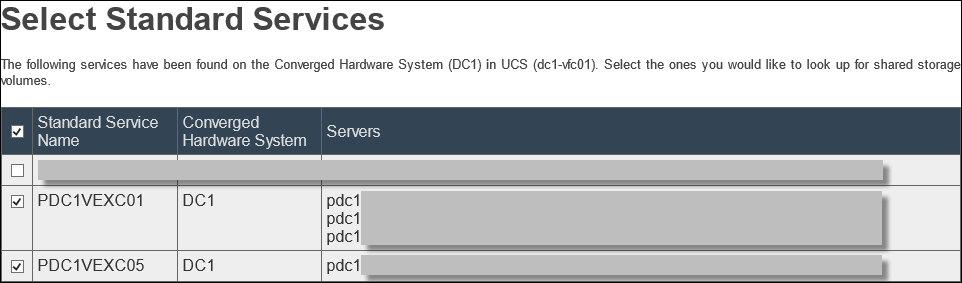
- Select the Standard Services that have shared storage volumes, click Next;
- Confirm Shared Storage Volume name and click Next;

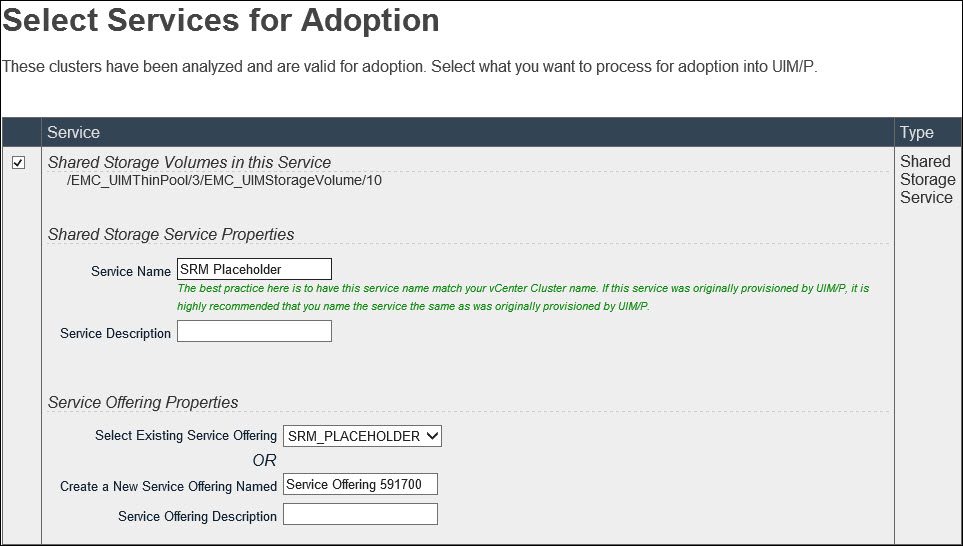
- Configure the Shared Storage Service:
Again, you can either create a new Service Offering or select existing one.
There is bug in UIM 4.0 P1 (4.0.0.1.349) where it does not correctly create a new Service Offering for SSS. If you have all your Standard Services configured with storage volumes based on FAST policies, like in the previous EMC SAU article “EMC UIM Service Adoption Utility (SAU)“, SAU might either create a new Service Offering based on a completely wrong storage grade (storage pool) or fail with the following message, which is also wrong – the storage pool has been graded in UIM.
This issue has been resolved in UIM 4.0 P2. Please follow these instructions to upgrade UIM… If you still on UIM 4.0 P1, the best solution to avoid this bug would be to manually create Shared Storage Service Offering and select it during adoption.Shared Storage Service Offering:
 Create SSS: Create SSS:
Click Next
- Shared Storage Service adoption completed.
- Open UIM, Service Manager and synchronize the service.
Disclaimer: These instructions are valid for EMC UIM 4.0 P1 (4.0.0.1.349).
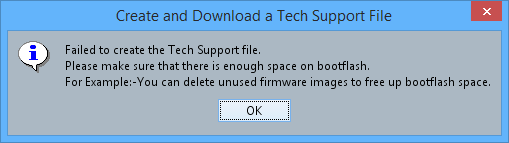
Creation of ‘ucsm’ Tech Support file (Technical support data for the entire UCSM instance) for UCS Manager has failed with the following error message:
‘Failed to create the Technical Support file.
Please make sure that there is enought space on bootflash.
For Example:- You can delete unused firmware images to free up bootflash space’
I checked the local storage on Fabric Interconnect and realised that there is plenty of space on the bootflash partition but the workspace partition is full.
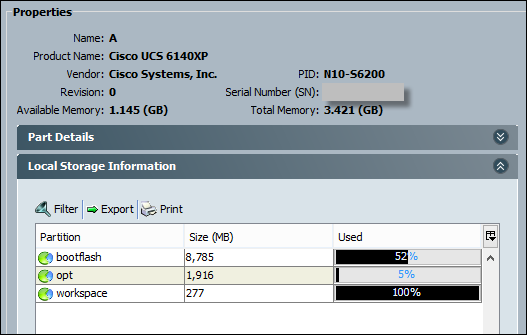
Apparently, it is a bug in UCSM firmware v. 2.1(1f). You need to log a call with Cisco Support (or VCE Support if the UCS domain is part of Vblock) and obtain a debug plugin ‘ucs-dplug.5.0.3.N2.2.11f.gbin‘.
Follow this procedure to free up workspace partition and install the fix:
- SSH to the Fabric Interconnect UCS Manager cluster IP address and login as admin;
- Connect to primary Fabric Interconnect and confirm the workspace partition is full:
 UCS01-A# scope fabric-interconnect a
 UCS01-A /fabric-interconnect # show storage
Storage on local flash drive of fabric interconnect:
 Partition        Size (MBytes)    Used Percentage
 ---------------- ---------------- ---------------
 bootflash        8785             35
 opt              1916             5
 workspace        277              Full
- Connect to local management on primary Fabric Interconnect:
 UCS01-A /fabric-interconnect # connect local-mgmt
 Cisco Nexus Operating System (NX-OS) Software
 {skipped}
- Review of the Fabric Interconnect (FI) workspace partition reveals it is completely full:
 UCS01-A(local-mgmt)# cd workspace:/
 UCS01-A(local-mgmt)# ls
1        16 Aug 13 20:13:51 2011 cores
 2      1024 Oct 17 14:42:50 2011 debug_plugin/
 1        31 Aug 13 20:13:51 2011 diagnostics
 1 272245758 Dec 20 16:58:00 2013 fwm_trace_log
 2      1024 Aug 13 20:11:50 2011 lost+found/
 2      1024 Dec 18 20:34:52 2013 techsupport/
Usage for workspace://
 290835456 bytes total
 281743360 bytes used
 0 bytes free
fwm_trace_log fills up the whole partition!
- Delete
fwm_trace_log file from primary Fabric Interconnect (FI):
 UCS01-A(local-mgmt)# rm workspace:/fwm_trace_log
 UCS01-A(local-mgmt)# ls
1   16 Aug 13 20:13:51 2011 cores
 2 1024 Oct 17 14:42:50 2011 debug_plugin/
 1   31 Aug 13 20:13:51 2011 diagnostics
 2 1024 Aug 13 20:11:50 2011 lost+found/
 2 1024 Dec 18 20:34:52 2013 techsupport/
Usage for workspace://
 290835456 bytes total
 8427520 bytes used
 267392000 bytes free
- Connect to the local management on subordinate Fabric Interconnect (FI) and delete
fwm_trace_log file from there as well:
UCS01-A(local-mgmt)# connect local-mgmt B
Cisco Nexus Operating System (NX-OS) Software
{skipped}
UCS01-B(local-mgmt)# ls
1        16 Aug 13 20:09:11 2011 cores
2      1024 Oct 17 14:42:50 2011 debug_plugin/
1        31 Aug 13 20:09:11 2011 diagnostics
1 272521089 Jan 06 17:17:42 2014 fwm_trace_log
2      1024 Aug 13 20:06:54 2011 lost+found/
2      1024 Aug 13 20:08:12 2011 techsupport/
Usage for workspace://
291089408 bytes total
282019840 bytes used
0 bytes free
UCS01-B(local-mgmt)# rm fwm_trace_log
- Upload debug plugin ‘
ucs-dplug.5.0.3.N2.2.11f.gbin‘ (2.2MB) to FI using UCS Manager (Equipment -> Equipment -> Firmware management -> Download Firmware)
- Connect to local management, navigate to the debug plugin directory:
UCS01-B /fabric-interconnect # connect local-mgmt A
UCS01-A(local-mgmt)# cd debug_plugin/
- Load the debug plugin:
UCS01-A(local-mgmt)# load-debug-plugin ucs-dplug.5.0.3.N2.2.11f.gbin
###############################################################
Warning: debug-plugin is for engineering internal use only!
For security reason, plugin image has been deleted.
###############################################################
Successfully loaded debug-plugin!!!
- Create link for fwm_trace_log:
Linux(debug)# ln -s /volatile/fwm_trace_log /workspace/fwm_trace
Linux(debug)# exit
exit
- Repeat the procedure on the peer Fabric Interconnect:
UCS01-A(local-mgmt)# connect local-mgmt B
{skipped}
UCS0101-B(local-mgmt)# cd debug_plugin/
UCS0101-B(local-mgmt)# load-debug-plugin ucs-dplug.5.0.3.N2.2.11f.gbin
###############################################################
Warning: debug-plugin is for engineering internal use only!
For security reason, plugin image has been deleted.
###############################################################
Successfully loaded debug-plugin!!!
Linux(debug)# ln -s /volatile/fwm_trace_log /workspace/fwm_trace
Linux(debug)# exit
exit
Hope this will help.
The EMC® Ionix™ Unified Infrastructure Manager/Provisioning Service Adoption Utility is used to adopt services on VCE Vblock™ Infrastructure Platforms that were not created using EMC® Ionix™ Unified Infrastructure Manager/Provisioning (UIM/P). Once discovered, these services are adopted and managed by UIM/P. The Service Adoption Utility also is used to edit services and to generate reports summarising the storage, network, and zoning resources in a service.
UIM/P SAU has been available as an installable RPM module in UIM/P 3.0 and since version 3.2 is integrated with UIM/P virtual appliance.
UIM/P 4.0 is now available and includes many new features and bug fixes. Even if you have had any doubts or reservations about using UIM/P, after using UIM/P 4.0 you will not have any. It is really good!
Before we begin, please go through the ‘Vblock/VPLEX Prerequisites‘ and general guidelines on ‘What Makes a Service Adoptable‘.
There are also several additional points I would like to make which will help you to prepare to adopt the services and successfully synchronise them.
- Delete any datastores/LUNs that you don’t need;
- Resolve any inconsistency in the LUN / datastore names;
- Know your infrastructure:
- What type of LUNs are presented to the hosts: VMFS, RAW/RDM, Replicated?
- What are the host’s IP addresses?
- Can UIM/P resolve host names?
- Do as much housekeeping as possible!
Here is the high level process of service adoption in UIM/P SAU:
- Discover Vblock;
- Select service type you want to adopt;
- Find / discover existing services in a Converged Hardware System;
- Select services for discovery and validation;
- Adopt valid selected services into UIM/P;
- Edit the Service;
- Synchronise the Service.
During the adoption process, the UIM/P Service Adoption Utility does the following:
- Imports zones and adds them to the existing zonesets.
- Assembles existing LUNs, ports, and host initiators into a UIM/P storage group
- Storage volumes are identified and added to UIM/P storage pools.
- Service profiles are imported into UIM/P.
- A managed service is created in UIM/P. An existing service offering can be used if it passes validation. If no existing service offering can be used, a new service offering will be created from the structure of the service.
After the service is successfully adopted, you can use both the UIM/P API and the Unified Infrastructure Manager/Provisioning console to manage the service.
I would strongly recommend to NOT use this article as a step by step guide. You may want to read the whole article first, understand the logic behind SAU and then decide how you going to adopt the Services in your environment as there are some options…
My test environment consists of one UIM/P 4.0 virtual appliance that manages two Vblocks (DC1 and DC2, each in a separate data centre). The Service that I am going to adopt is a two two-node clusters (one in each datacentre) with 5 x 1TB non-replicated and one 1TB replicated LUNs. The services have been built and configured by the old UIM/P 3.2 which managed each Vblock individually. I would also like to have one Service Offering (instead of two like in the old configuration with two UIM/P VAs) that will cover this type of Service. This SO must contain only the bare minimum Service configuration to simplify any new Service deployment.
Disclaimer: For the purpose of this guide, I slightly mis-configured the services to demonstrate how all components fit together… In real life…, please, please do the housekeeping.
- Discover Vblock. This will refresh UIM/P’s “knowledge” about your current infrastructure configuration;
- Open UIM/P Service Adoption Utility: https://<UIM-P.IP.address.or.name>/slm/sau, login as sysadmin;
- Select type of service you want to adopt. In this example, select Standard, click Next;
- Select a Converged Hardware System and click Find Services. On the right hand side you will find ‘Vblock/VPLEX Prerequisites‘ and ‘What Makes a Service Adoptable‘ I mentioned before.
- From the list on servers discovered on the
Vblock Converged Hardware System select servers that you want to import into UIM/P.
“At the adoption stage, they will be consolidated into clusters based on shared data storage volumes. If they do not have shared storage, they will end up as standalone servers.
It is recommended to select all servers for discovery. Unselecting a server from discovery could leave servers in a cluster unmanaged by UIM/P and cause decommissioning or elastic operation failures in the future.”
There is an option to “Adopt selected hosts as a “host only” service.” If this box is checked, the selected hosts will be combined into a “host only” service containing no data volumes. That is, only boot volumes will be adopted into the service. This is required for adopting Standard Services that will be attached to a VPLEX Shared Storage Service.

Click Next at the bottom of the page.
- UIM/P SAU discovers the servers…
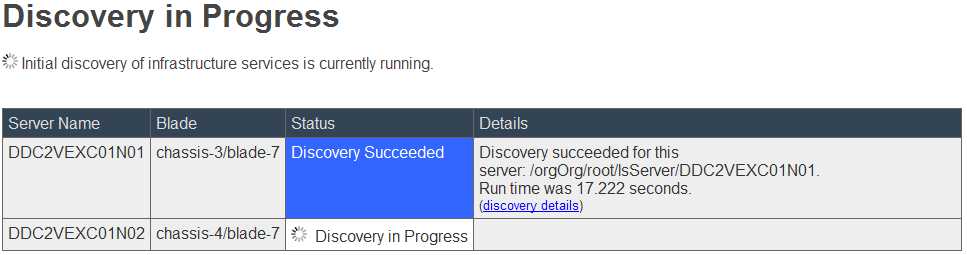
… and check for any errors in:
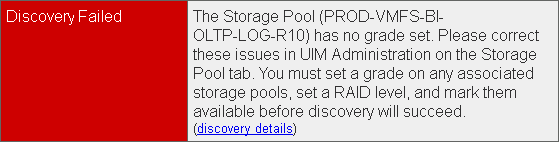
- Server configuration:

- UIM/P configuration – The Storage Pool has no grade set
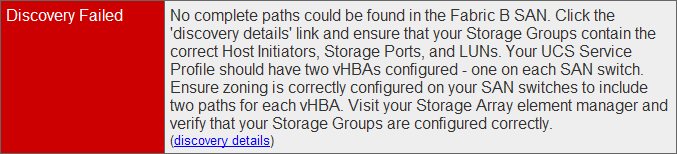
- Some issues with zones / host initiators
Resolve the issues, run discovery again and wait for it to complete:
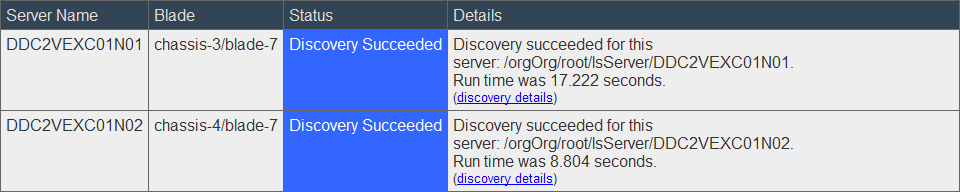
click Next;
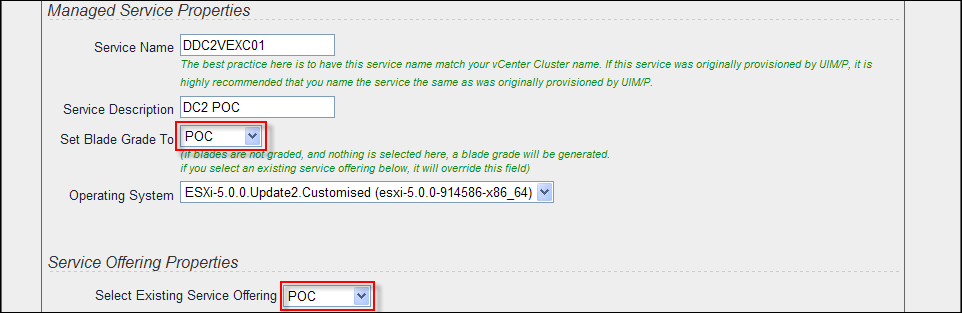
- On the Select Services for Adoption page, double check that you are happy with the service configuration and configure Service Properties:
- Service Name / Description;
- Set Blade Grade to the appropriate grade;
- Select the Operating System;
- Create a new or select existing Service Offering. If a service offering was selected in the Service Offering Name drop-down list, the selection is validated against the current constraints and resources that are available for use for that offering.
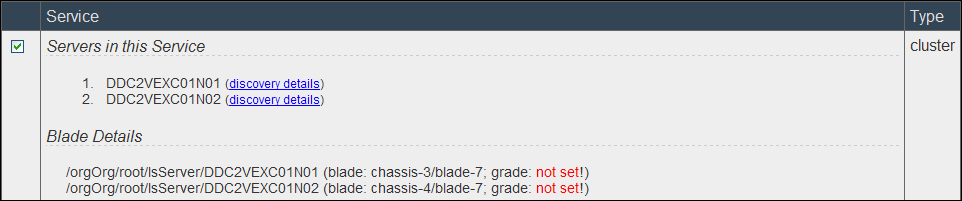
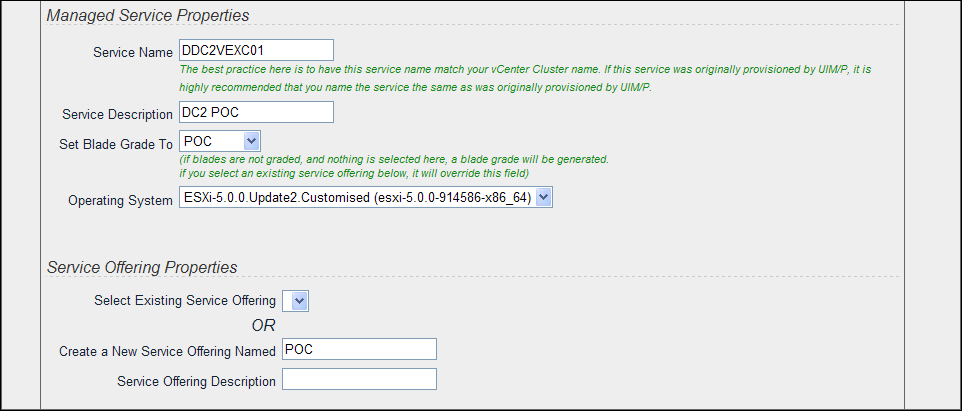
Click Next.
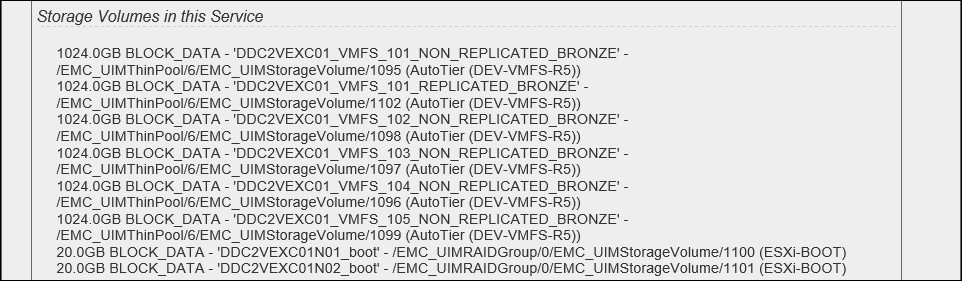
Side Note: I deliberately excluded screenshot of ‘Storage Volumes in this Service’ section because I would like to demonstrate how UIM/P SAU would interpret and adopt different storage policies:
1024.0GB BLOCK_DATA – ‘REPLICATED_LUN‘ – /EMC_UIMThinPool/6/EMC_UIMStorageVolume/1102 (LowestAvailable (DEV-VMFS-R5))
1024.0GB BLOCK_DATA – ‘NON_REPLICATED_LUN-01‘ – /EMC_UIMThinPool/6/EMC_UIMStorageVolume/1095 (AutoTier (DEV-VMFS-R5))
1024.0GB BLOCK_DATA – ‘NON_REPLICATED_LUN-02‘ – /EMC_UIMThinPool/6/EMC_UIMStorageVolume/1098 (StartHighThenAuto (DEV-VMFS-R5))
20.0GB BLOCK_DATA – ‘DDC2VEXC01N01_boot’ – /EMC_UIMRAIDGroup/0/EMC_UIMStorageVolume/1100 (ESXi-BOOT)
20.0GB BLOCK_DATA – ‘DDC2VEXC01N02_boot’ – /EMC_UIMRAIDGroup/0/EMC_UIMStorageVolume/1101 (ESXi-BOOT)
The LUN Tiering Policies in Unisphere:

As you can see, the data LUNs have different Tiering Policy configuration. In UIM/P SAU 3.2 this would not make any difference, SAU would associate these LUNs with DEV-VMFS-R5 Storage Pool and corresponding Storage Grade. SAU 4.0 is FAST VP policy aware and therefore when it adopts this service, it will create Service Offering with three FAST_VP_policy-based Constraints AND Defaults. Please make sure it is how you would like to configure the Service. If not – amend the configuration, re-discover Vblock and run Service Adoption Utility again. You might also consider to subscribe to this well known publication.
In my test environment I don’t have any specific tiering requirements for the data LUNs and therefore, I amended the tiering policy on these LUNs to Auto-Tier:

You need to re-discover Vblock in UIM/P for these changes to be visible to UIM/P.
This is better:
Click Next.
- The service will be adopted:
 
OK, the Service has been adopted.
- Lets have a look how the Service was configured. Go to UIM/P Administration interface and check the Service configuration.
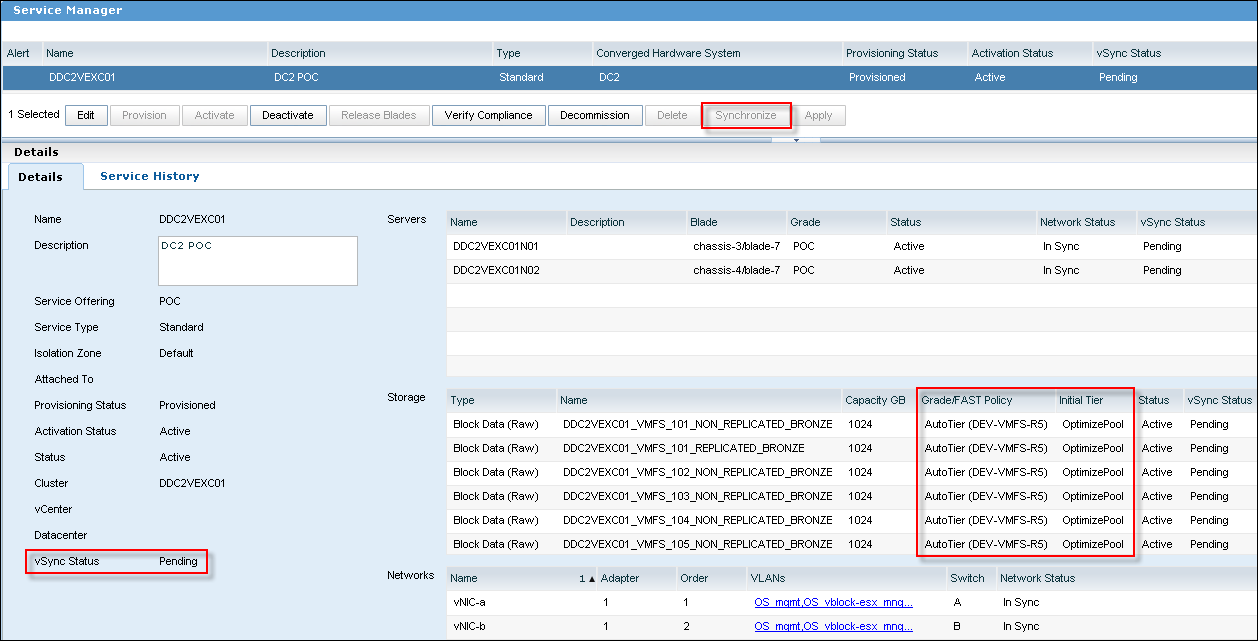
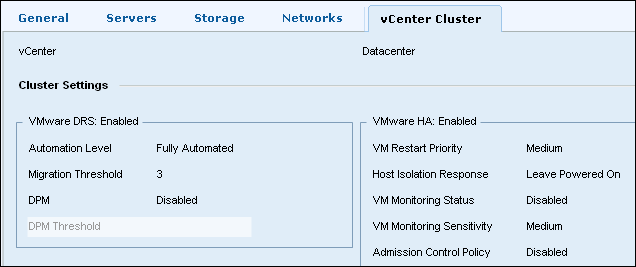
- You will notice the ‘Synchronize’ button is greyed out. Edit the Service, go to vCenter Cluster tab and configure vCenter, Datacenter, DRS and HA settings.
“Perform Full Sync’ option: By default, UIM/P performs an incremental synchronization on only the updated servers and data stores. This option, if selected, will force a re-synchronization of all servers and data stores associated with this service.”
- There are still several things you need to check before Service can be synchronised with vCenter:
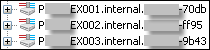
- ESX host names. UIM/P takes the host names from the UCS Service Profile name which might be incorrect. Until Cisco UCS Manager 2.1 you could not rename Service Profile;
For example, if, at the time of provisioning, the servers were configured with FQDN, the Service Profile names might have been truncated by UCSM like below:
- ESX host IP addresses. UIM/P assumes all hosts are on DHCP and relies on DNS resolution. Make sure all hosts are in DNS and UIM/P is configured with correct DNS server IP ddresses. If it is not the case, add them to DNS or Edit the Service in SAU, select ‘Edit Services’, ‘Update OS Settings’ and configure IP addresses, Subnet Mask and the Getaway;
- Datastore types are configured correctly (VMFS or RAW). VMFS is self explanatory – UIM/P will create VMFS datastore on the LUN. The RAW type is like telling UIM/P “Do NOT touch this LUN, leave it alone, ignore any data on this LUN”. This type of LUN is used for RDM LUNs, SRM protected LUNs, Shared Diagnostic Partition etc…
To configure/change storage type, go back to SAU, ‘Edit Services’, ‘Edit Storage Formats’, change Storage Format to the correct type;
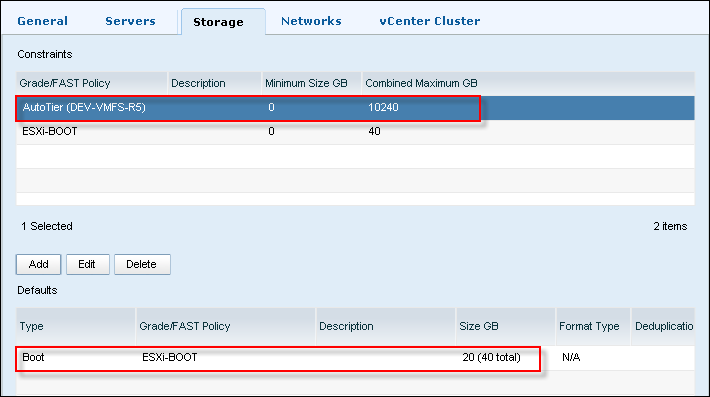
- If it is just one cluster you want to adopt, this would be the end of the story, but, as we are planning to provision similar service, let’s have a look how the Service Offering was configured:
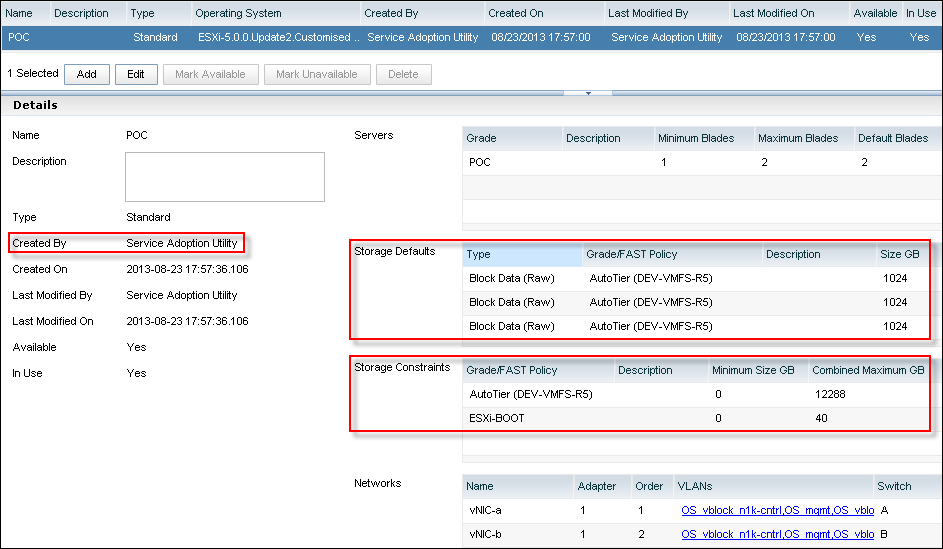
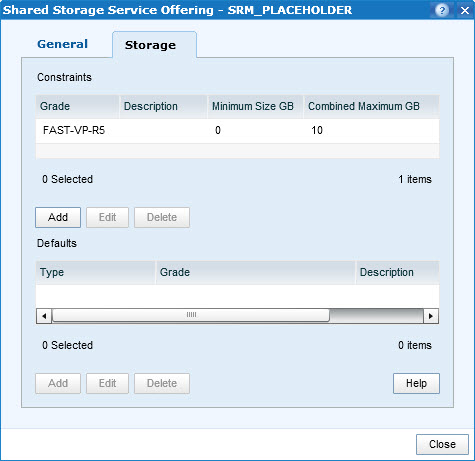
- I am quite happy with the Network and Server configuration but the Storage Defaults and Constraints are not how I would like this Service Offering to be configured:
- Storage Defaults:
There are six 1TB LUNs (only three visible on the screenshot). This is because the hosts have six 1TB LUNs datastores provisioned. Should I need to deploy a new Service from this Service Offering, UIM/P will configure it with 6x1TB LUNs, this might not be required;
- Storage Constraints:
Combined Maximum has been calculated based on the fact that there are two hosts with 6 x 1TB LUNs in this cluster. 2 x 6 x 1024GB = 12288GB. This again is not what the real storage limit I would like to set for this Service Offering.
- There are two ways we can amend the Service Offering, in either way you need to Unmanage the Service first (SAU: Edit Services, Unmanage Service), Remove Service Offering from Service Catalog (UIM/P: Administration, Service Offering, Mark Unavailable) and then:
- Edit Service Offering and re-configure Storage Constraints and Defaults;
- Delete the Service Offering that was created during Service adoption and then create a New Service Offering from scratch. Please refer to “HOW TO: Configure a new Service Offering in EMC UIM/P” article for details.
You need to re-run SAU and re-adopt the Service and link it to the “Existing Service Offering”.
- Both options look very similar, and both take roughly the same amount of time to complete. I think, the biggest difference is that Option 1 is less prone to errors in Network configuration as it adopts existing Network configuration comparing to manual configuration.
- Lets proceed with the Option 1
- Login to SAU, Edit Services, select Unmanage This Service from the Available Functions drop-down menu, click Go:

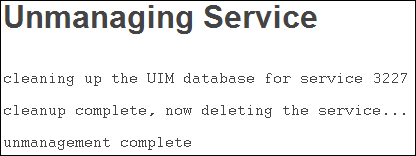
- Read the warning message and click “Unmanage Service”
IMPORTANT: Click the Unmanage Service button with extreme caution. This process removes the service from the UIM/P database. Unmanaging does not alter the actual Converged Hardware System hardware; it just removes the service from being managed by UIM/P. After the process completes, the service will again be adoptable using SAU. There is no guarantee that if you unmanage the service here, you will be able to re-adopt it using SAU.

- Login to UIM/P. Open Service Manager, make sure the Service is no longer listed. In Service Offerings, highlight the SO that deleted Service was based on and click ‘Mark Unavailable’.
- You can now edit the Service Offering according to your requirements and publish it in Service Catalog by clicking ‘Mark Available’ (overwise it will not be available in the “Existing Service Offering” drop-down menu in SAU).
For the purpose of this guide, I only amended Storage Maximum, deleted all Storage Defaults except of Boot and Cluster Settings:
and the vCenter cluster configuration:
- OK, let’s re-adopt the Service. Go through the standard procedure as described before with only minor changes:
Click Next
- The Service will be re-adopted:
- We can now go back to UIM/P administration interface and edit the Service’s. Configure vCenter Cluster configuration and other things described in step 11.
- Follow the same steps to re-adopt the cluster from the other datacenter. Make sure you select the same Existing Service Offering and correct vCenter server.
- Synchronize the Service.
There are several reasons why vCenter synchronization may fail:
- UIM/P fails to create a datastore. The datastore name is different to the LUN name;
- LUN that is managed by VMware SRM and currently resides in the Recovery Site, is configured as VMFS datastore. UIM/P will try to “create” a VMFS datastore and fails as the LUN is not accessible to the host. Change the Storage type to RAW;
- UIM/P cannot resolve host names…
What about Shared Storage Service? Please stayed tuned, I am working on the article and will publish it as soon as it is ready.
Please subscribe to the RSS feed, Twitter or via email.
Vblock Prerequisites
VPLEX specific requirements
- Required: Vblock platform (VPLEX platform) is in a “Discovery Succeeded” state in UIM/P.
- Required: Both Vblocks associated with the VPLEX are in a “Discovery Succeeded” state in UIM/P.
- Required: Vblock(s) platform has passed setup validation with a “Ready” or “Warning” result.
- Required: On all UIM/P Storage Pools to be used by adopted services for non-FAST storage:
- Storage pool has been assigned a UIM/P storage grade.
This is also applicable to Raid Pool 0 (RAID Group 0) – storage RAID Group where host boot LUNs are created. Really easy to miss.

- Storage pool has been marked “available”.
- Storage pool RAID Level has been set.
- Required: On all UIM/P FAST VP Policies to be used by adopted services:
- FAST Policy Default Initial Tier has been set. In my environment it is only applicable to NoMovement FAST VP Policy.
- FAST Policy has been marked “available”.
- Required: The service is confined to a single Vblock platform.
- Required: An isolation zone must be created in UIM/P with the same VSAN id as is configured for the service(s) intended for adoption. If you intend to adopt file storage volumes, the isolation zone should be configured to include an NFS VLAN and NFS IP Pool.
- Required: The UCS VSAN names match the SAN Switch VSAN names for the same VSAN ids.
- Required: The service does not differ significantly from the form of service created by UIM/P:
- Vblock platforms must be a Cisco® Unified Computing System™ (UCS), one storage array, and two SAN switches.
- UCS must use SAN boot and no local storage.
- SAN Zoning with WWPNs.
- Recommended: Identity pools (UUID, WWNN, WWPN, and MAC addresses) have been created in UIM/P.
- Recommended: Blade Grades have been created in UIM/P (for association during adoption).
- Recommended: vCenter and vCloud instances have been configured in UIM/P and enabled.
- Recommended: Operating System ISO images have been installed into Homebase.
- Optional: Service Offerings have been created to match your existing services (this is optional because Service Adoption Utility can automatically create a Service Offering for you that exactly matches your configuration).
What Makes a Service Adoptable
- UCS & Blade Configuration
- All blades in the service should be of the same Cisco UCS Blade model.
- Servers cannot use UCS service profile, vNIC, or vHBA templates. You can unbind the templates easily in the UCS manager.
- Each server in a cluster should have the exact same vNIC configuration across servers. That means they should have the same number of vNICs, the same vNIC names across servers, and each relative vNIC should have the same vLANs configured.
- All blades in the service should have the same BIOS policy:
- Storage Configuration
- On EMC CLARiiON™-based Vblocks, there should be a storage group for each server which includes both the boot LUN and all shared data LUNs.
- On EMC Symmetrix™-based Vblocks, there should be a boot masking view for each server with a single boot LUN and both server host initiators. There should also be a single shared masking view which includes all the host initiators and shared data LUNs for the whole cluster.
- All servers should recognize the exact same shared data volumes – no fewer, no more.
- Blades, vHBAs, and SAN Zoning
- Every server should have 2 vHBAs.
- Every server must have identical vHBA configuration.
- Every server must have exactly 4 paths (zones) between the UCS and Storage Array (two per Fabric between each vHBA and array Storage Ports).
|
Subscribe to Blog via Email
Join 169 other subscribers
|
Recent Comments