|
|
Now Available: vSphere 6.7 Clustering Deep Dive book!
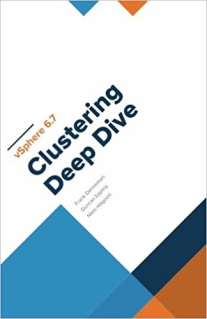
Advertise here with BSA The post Now Available: vSphere 6.7 Clustering Deep Dive book! appeared first on Yellow Bricks .
VMware Social Media Advocacy
Introducing VMware vSphere 6.7!

We are excited to share that today VMware is announcing vSphere 6.7, the latest release of the industry-leading virtualization and cloud platform. vSphere 6.7 is the efficient and secure platform for hybrid clouds, fueling digital transformation by delivering simple and efficient management at scale, comprehensive built-in security, a universal application platform, and seamless hybrid cloud The post Introducing VMware vSphere 6.7! appeared first on VMware vSphere Blog .
VMware Social Media Advocacy
Free ebook: Upgrading to VMware vSphere 6.5: Insights for vSphere Administrators

Continue to provide the best foundation for your business. Learn about the three phases of the upgrade to ensure a successful process overall whether you are upgrading from vSphere 5.5 or vSphere 6.0. Access this ebook to understand what steps should be taken to support and meet the needs of your organization.
VMware Social Media Advocacy
- Log in to Windows Server 2016 as a member of Enterprise Administrators group;
- Run Powershell as Administrator;
- Type
netdom query fsmo to get a list of the FSMO roles and their current owners;
PS C:\Windows\system32> netdom query fsmo
Schema master               cs-core-adc-01.vstrong.info
Domain naming master        cs-core-adc-01.vstrong.info
PDC                         cs-core-adc-01.vstrong.info
RID pool manager            cs-core-adc-01.vstrong.info
Infrastructure master       cs-core-adc-01.vstrong.info
The command completed successfully.
- As you can see,
cs-core-adc-01.vstrong.info holds all FSMO roles.
I would like to transfer ALL FSMO roles to another Domain Controller cs-core-adc-02.vstrong.info
- Run the following command to move FSMO roles over:
Move-ADDirectoryServerOperationMasterRole -Identity cs-core-adc-02.vstrong.info -OperationMasterRole SchemaMaster, DomainNamingMaster, PDCEmulator, RIDMaster, InfrastructureMaster
PS C:\Windows\system32> Move-ADDirectoryServerOperationMasterRole -Identity cs-core-adc-02 -OperationMasterRole SchemaMaster, DomainNamingMaster, PDCEmulator, RIDMaster, InfrastructureMaster
Move Operation Master Role
Do you want to move role 'SchemaMaster' to server 'cs-core-adc-02.vstrong.info' ?
[Y] Yes  [A] Yes to All  [N] No  [L] No to All  [S] Suspend  [?] Help (default is "Y"): A
Type A for all.
- Type
netdom query fsmo again to get a list of the FSMO roles and their current owners;
PS C:\Windows\system32> netdom query fsmo
Schema master               cs-core-adc-02.vstrong.info
Domain naming master        cs-core-adc-02.vstrong.info
PDC                         cs-core-adc-02.vstrong.info
RID pool manager            cs-core-adc-02.vstrong.info
Infrastructure master       cs-core-adc-02.vstrong.info
The command completed successfully.
- You may get ‘Access is denied’ error message as below. Please make sure you ARE a member of Enterprise Admins. Also, you may also need to change your Primary Group to Enterprise Admins. You will need to log off and log back in again.
Move-ADDirectoryServerOperationMasterRole : Access is denied
At line:1 char:1
+ Move-ADDirectoryServerOperationMasterRole -Identity cs-core-adc-02 -O ...
+ ~~~~~~~~~~~~~~~~~~~~~~~~~~~~~~~~~~~~~~~~~~~~~~~~~~~~~~~~~~~~~~~~~~~~~
+ CategoryInfo : NotSpecified: (cs-core-adc-02:ADDirectoryServer) [Move-ADDirector...ationMasterRole], AD
Exception
+ FullyQualifiedErrorId : ActiveDirectoryServer:0,Microsoft.ActiveDirectory.Management.Commands.MoveADDirectoryServerOperationMasterRole
I hope you find this helpful. As always, Like, Subscribe and Share! :)
DELL EMC InsightIQ 4.1.2:
- Before you begin
The root partition of the InsightIQ Linux computer or virtual machine must have at least 502 MB of free space.
[administrator@iiq-01 ~]$ df -kh
Filesystem Size Used Avail Use% Mounted on
/dev/mapper/VolGroup-lv_root
8.3G 2.8G 5.1G 36% /
tmpfs 3.9G 0 3.9G 0% /dev/shm
/dev/sda1 477M 125M 327M 28% /boot
/dev/sdb1 64G 52M 61G 1% /datastore
10.100.100.254:/ifs/data/insightiq_datastore
12P 6.4P 5.3P 55% /mnt/10.100.100.254/ifs/data/insightiq_datastore
- Download InsightIQ installation script (.sh file) from https://support.emc.com/ search/?text=InsightIQ&resource=DOWN&facetProductId=15208 in .sh format.
- Upload the file to InsightIQ VA / Linux.
- On the Linux computer or virtual machine that you want to upgrade, run the following command.
sudo sh <path>
Specify <path> as the file path of the .sh installation script.
[administrator@iiq-01 ~]$ cd /tmp
[administrator@iiq-01 tmp]$ ls
<strong>install-insightiq-4.1.2.7.sh</strong> vgauthsvclog.txt.0 vmware-config1 vmware-config3 vmware-config5 vmware-fonts0 yum.log
pip-YeTEq8-build vmware-config0 vmware-config2 vmware-config4 vmware-config6 vmware-root
[administrator@iiq-01 tmp]$ sudo sh install-insightiq-4.1.2.7.sh
[sudo] password for administrator:
Verifying archive integrity... All good.
Uncompressing EMC Isilon InsightIQ - 4.1.2.7 - Self Extracting Installer..
This script automates the installation or upgrade of InsightIQ. If you are
running a version of InsightIQ that can be upgraded by this version, the
upgrade will occur automatically. If you are trying to upgrade an unsupported
version, the script will exit. If you are installing on a new system, the
script will perform a clean install.
Detected current installation of InsightIQ
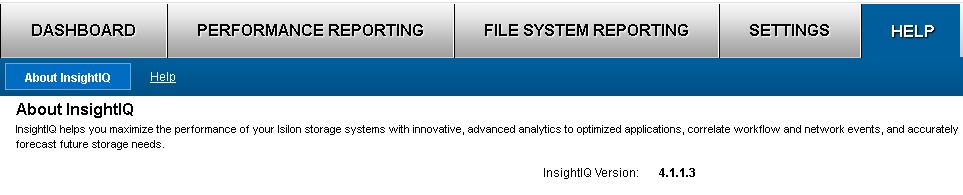
Version: 4.1.1.3
Upgrade options for InsightIQ:
(1) Upgrade using bundled packages to resolve dependencies
(2) Upgrade using yum mirrors to resolve dependencies
(3) Exit
Please select option 1, 2, or 3 followed by [ENTER] >>>
- Select how InsightIQ will be installed, either through the offline or online
method, and then press Enter.
– Option 1 – Offline. InsightIQ will be installed using the bundled packages.
– Option 2 – Online. InsightIQ will be installed using yum mirrors.
InsightIQ shows a list of software dependencies that must be installed to continue the upgrade.
- I am using Option 1
Please select option 1, 2, or 3 followed by [ENTER] >>> 1
Loaded plugins: fastestmirror
Setting up Install Process
Examining bash-4.1.2-48.el6.x86_64.rpm: bash-4.1.2-48.el6.x86_64
Marking bash-4.1.2-48.el6.x86_64.rpm as an update to bash-4.1.2-40.el6.x86_64
Determining fastest mirrors
Examining bind-libs-9.8.2-0.62.rc1.el6_9.5.x86_64.rpm: 32:bind-libs-9.8.2-0.62.rc1.el6_9.5.x86_64
Marking bind-libs-9.8.2-0.62.rc1.el6_9.5.x86_64.rpm as an update to 32:bind-libs-9.8.2-0.47.rc1.el6_8.3.x86_64
Examining bind-utils-9.8.2-0.62.rc1.el6_9.5.x86_64.rpm: 32:bind-utils-9.8.2-0.62.rc1.el6_9.5.x86_64
Marking bind-utils-9.8.2-0.62.rc1.el6_9.5.x86_64.rpm as an update to 32:bind-utils-9.8.2-0.47.rc1.el6_8.3.x86_64
Examining cloog-ppl-0.15.7-1.2.el6.x86_64.rpm: cloog-ppl-0.15.7-1.2.el6.x86_64
cloog-ppl-0.15.7-1.2.el6.x86_64.rpm: does not update installed package.
Examining cpp-4.4.7-18.el6.x86_64.rpm: cpp-4.4.7-18.el6.x86_64
Marking cpp-4.4.7-18.el6.x86_64.rpm as an update to cpp-4.4.7-17.el6.x86_64
{SKIPPED}
Examining xorg-x11-font-utils-7.2-11.el6.x86_64.rpm: 1:xorg-x11-font-utils-7.2-11.el6.x86_64
xorg-x11-font-utils-7.2-11.el6.x86_64.rpm: does not update installed package.
Resolving Dependencies
--> Running transaction check
---> Package bash.x86_64 0:4.1.2-40.el6 will be updated
---> Package bash.x86_64 0:4.1.2-48.el6 will be an update
{SKIPPED}
--> Finished Dependency Resolution
--> Running transaction check
---> Package kernel.x86_64 0:2.6.32-642.el6 will be erased
--> Finished Dependency Resolution

Dependencies Resolved

==========================================================================================
Package Arch Version Repository Size
==========================================================================================
Installing:
isilon-insightiq-debuginfo x86_64 4.1.2.7-1 /isilon-insightiq-debuginfo-4.1.2.7-1.x86_64 0.0
kernel x86_64 2.6.32-696.20.1.el6 /kernel-2.6.32-696.20.1.el6.x86_64 131 M
Updating:
bash x86_64 4.1.2-48.el6 /bash-4.1.2-48.el6.x86_64 3.0 M
bind-libs x86_64 32:9.8.2-0.62.rc1.el6_9.5 /bind-libs-9.8.2-0.62.rc1.el6_9.5.x86_64 2.2 M
bind-utils x86_64 32:9.8.2-0.62.rc1.el6_9.5 /bind-utils-9.8.2-0.62.rc1.el6_9.5.x86_64 440 k
{SKIPPED}
sudo x86_64 1.8.6p3-29.el6_9 /sudo-1.8.6p3-29.el6_9.x86_64 2.4 M
vim-minimal x86_64 2:7.4.629-5.el6_8.1 /vim-minimal-7.4.629-5.el6_8.1.x86_64 888 k
Removing:
kernel x86_64 2.6.32-642.el6 @base 131 M

Transaction Summary
==========================================================================================
Install 2 Package(s)
Upgrade 34 Package(s)
Remove 1 Package(s)

Total size: 436 M
Is this ok [y/N]:
- Type Y and then press Enter.
Is this ok [y/N]: y
Downloading Packages:
Running rpm_check_debug
Running Transaction Test
Transaction Test Succeeded
Running Transaction
Warning: RPMDB altered outside of yum.
Updating : libgcc-4.4.7-18.el6.x86_64 1/71
Updating : bash-4.1.2-48.el6.x86_64 2/71
{SKIPPED}
Verifying : libstdc++-4.4.7-17.el6.x86_64 70/71
Verifying : sudo-1.8.6p3-25.el6_8.x86_64 71/71

Removed:
kernel.x86_64 0:2.6.32-642.el6

Installed:
isilon-insightiq-debuginfo.x86_64 0:4.1.2.7-1 kernel.x86_64 0:2.6.32-696.20.1.el6

Updated:
bash.x86_64 0:4.1.2-48.el6 bind-libs.x86_64 32:9.8.2-0.62.rc1.el6_9.5 bind-utils.x86_64 32:9.8.2-0.62.rc1.el6_9.5
cpp.x86_64 0:4.4.7-18.el6 gcc.x86_64 0:4.4.7-18.el6 gcc-c++.x86_64 0:4.4.7-18.el6
glibc.x86_64 0:2.12-1.209.el6_9.2 glibc-common.x86_64 0:2.12-1.209.el6_9.2 glibc-devel.x86_64 0:2.12-1.209.el6_9.2
glibc-headers.x86_64 0:2.12-1.209.el6_9.2 gnutls.x86_64 0:2.12.23-21.el6 isilon-insightiq.x86_64 0:4.1.2.7-1
kernel-firmware.noarch 0:2.6.32-696.20.1.el6 kernel-headers.x86_64 0:2.6.32-696.20.1.el6 libgcc.x86_64 0:4.4.7-18.el6
libgomp.x86_64 0:4.4.7-18.el6 libstdc++.x86_64 0:4.4.7-18.el6 libstdc++-devel.x86_64 0:4.4.7-18.el6
libtiff.x86_64 0:3.9.4-21.el6_8 libtirpc.x86_64 0:0.2.1-13.el6_9 mysql-libs.x86_64 0:5.1.73-8.el6_8
nspr.x86_64 0:4.13.1-1.el6 nss.x86_64 0:3.28.4-4.el6_9 nss-sysinit.x86_64 0:3.28.4-4.el6_9
nss-tools.x86_64 0:3.28.4-4.el6_9 nss-util.x86_64 0:3.28.4-1.el6_9 openssh.x86_64 0:7.6p1-1
openssh-clients.x86_64 0:7.6p1-1 openssh-server.x86_64 0:7.6p1-1 openssl.x86_64 0:1.0.1e-57.el6
openssl-devel.x86_64 0:1.0.1e-57.el6 rpcbind.x86_64 0:0.2.0-13.el6_9.1 sudo.x86_64 0:1.8.6p3-29.el6_9
vim-minimal.x86_64 2:7.4.629-5.el6_8.1

Complete!</pre>
</li>
<li>
<pre>Delete old InsightIQ log files.</pre>
<pre>[bash][administrator@iiq-01 tmp]$ sudo rm -rf /var/log/insightiq*.log.*
[sudo] password for administrator:
[administrator@iiq-01 tmp]$ sudo rm -rf /var/log/insightiq_clusters/*/*.log.*
[administrator@iiq-01 tmp]$
- Update all software dependency packages by running the optional
sudo yum update command.
[administrator@iiq-01 tmp]$ sudo yum update
Loaded plugins: fastestmirror
Setting up Update Process
Loading mirror speeds from cached hostfile
* base: mirror.sov.uk.goscomb.net
* extras: mirror.freethought-internet.co.uk
* updates: mirror.vorboss.net
base | 3.7 kB 00:00
base/primary_db | 4.7 MB 00:00
extras | 3.4 kB 00:00
extras/primary_db | 30 kB 00:00
updates | 3.4 kB 00:00
updates/primary_db | 6.4 MB 00:00
Resolving Dependencies
--> Running transaction check
{SKIPPED}
Transaction Summary
==========================================================================================
Install 1 Package(s)
Upgrade 93 Package(s)

Total download size: 52 M
Is this ok [y/N]: y
Downloading Packages:
(1/94): acl-2.2.49-7.el6_9.1.x86_64.rpm | 76 kB 00:00
(2/94): audit-2.4.5-6.el6.x86_64.rpm | 204 kB 00:00
{SKIPPED}

Dependency Installed:
libkadm5.x86_64 0:1.10.3-65.el6

Updated:
acl.x86_64 0:2.2.49-7.el6_9.1 audit.x86_64 0:2.4.5-6.el6

Complete!
- Happy days!

- NOTES:
- After InsightIQ upgrade is complete, the Settings > Monitored Clusters page displays the Monitoring Status of clusters as Monitoring Starting while InsightIQ completes post-upgrade tasks. During this time, InsightIQ still
monitors clusters. However, you might see gaps of missing information in data modules. These gaps will update after each cluster returns to a status of Latest Data:<date>.
- InsightIQ does not automatically gather the correct jobs and services statistics if you upgrade the OneFS version on a monitored cluster from OneFS 8.0.0 or earlier to OneFS 8.0.1 or later. In such cases, restart InsightIQ before you collect the statistics.
- If you have upgraded to InsightIQ version 4.1.2, the root login will no longer work over SSH. In such a scenario, you can log in to InsightIQ as an administrator user and run
sudo to obtain the necessary privileges.
I hope you find this helpful. As always, Like, Subscribe and Share! :)
Introducing VMware Validated Design for Software-Defined Data Center 4.2

On Feb 13th VMware released the VMware Validated Design for Software-Defined Data Center version 4.2. This latest update to our detailed prescriptive path on how to implement, operate, and maintain a VMware based Software-Defined Data Center (SDDC) includes a few minor changes, such as updates to the software bill of materials and some new naming conventions, The post Introducing VMware Validated Design for Software-Defined Data Center 4.2 appeared first on Cloud Foundation .
VMware Social Media Advocacy
Assess performance impact of Spectre & Meltdown patches using vRealize Operations Manager
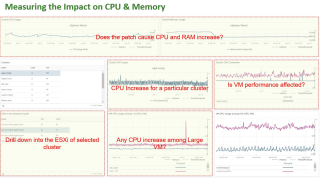
With this article, I wanted to share some quick tips and tricks which can help you manage the performance of your workloads while you go through the patching process for Spectre & Meltdown vulnerabilities. Before my recommendations, here are a few things which you should know about Spectre & Meltdown: What is Spectre & The post Assess performance impact of Spectre & Meltdown patches using vRealize Operations Manager appeared first on VMware Cloud Management .
VMware Social Media Advocacy
Top 10 reasons to upgrade to vSphere 6.5
Savvy IT leaders are moving their organizations—and their careers—forward by making the move to VMware vSphere® 6.5.
VMware Social Media Advocacy
Technical Insights about Horizon Cloud on Microsoft Azure
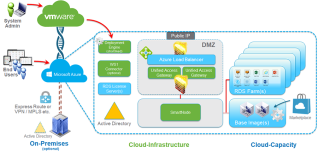
After much anticipation, VMware Horizon Cloud on Microsoft Azure is finally released. Horizon Cloud now offers three different options providing capacity for desktops and hosted applications. With Horizon Cloud on Microsoft Azure, you gain all of the benefits of a cloud-managed service, including the ability to manage RD Session Hosted desktops and applications on Microsoft […] The post Technical Insights about Horizon Cloud on Microsoft Azure appeared first on VMware End-User Computing Blog .
VMware Social Media Advocacy
VMware Cloud on AWS: Live End to End Demo
Provision SDDC: 9:04 Login to vCenter: 14:17 Deploy a VM: 19:00 Hybrid Linked Mode: 20:30 vRealize Suite: 25:10 Add host and Rest API: 27:20
VMware Social Media Advocacy
|
|
Recent Comments